Table of Contents
This updated guide explains how to Print Screen on a Toshiba Laptop through clear steps, practical examples, and important checks that help prevent common errors.
Powering ON Your Laptop
-
 Plug your laptop into a power outlet. Your computer has to have sufficient power to create an image from your screen capture, so grab your computer's power cord and plug the smaller end into your laptop's power port; it should be along the sides of the laptop. Then plug the power cord into a vacant outlet on a wall.
 -
 Turn on your laptop. Hold the Power button for a few seconds until the computer starts up. You will know if it is starting up when the lights and the screen begin to turn on.
- Just wait until your computer has booted up and is on the Windows desktop.
Capturing the Screen's Content
-
 Select a screen content to capture. Once you are at a place on your desktop that you may need to take a picture of, you can begin taking your screen capture.
 -
 Capture the screen's content. Press the 'Print screen' button to copy the screen's contents. Look for a 'PrtScn' key along the function keys of your keyboard, which are the F1 to F12 keys.
- The 'PrtScn' button will let you copy the screen's contents into the computer's clipboard.
Saving the Screen Capture
-
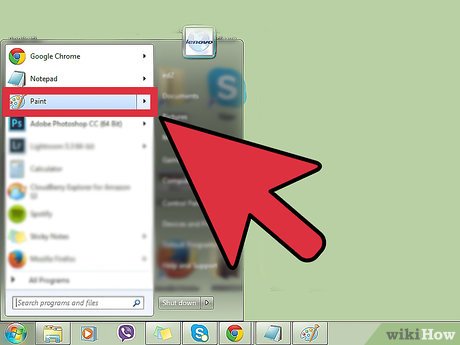 Launch MS Paint. Click the Windows Orb at the lower left; it looks like the Windows logo inside a blue circle. On the search bar, type in 'Paint' and click it in the results. This should open up the software.
 -
 Paste the screen capture. You should then see an empty canvas on the Paint software. Now you can paste the screen capture on it; do this by pressing Ctrl + V.
 -
 Save the image. When you are satisfied with the image, you can save it. Click 'File' at the upper left of the Paint window; a drop-down menu should appear. click 'Save As,' and the software should then prompt you to enter the file name and format to save the image as.
 -
 Name your image file and choose an image format. You can enter the name you want for your image on the File Name field. Then in the Save As field, choose a format you want. You can choose between JPG, BMP, and GIF, among others. Click JPG if you're unsure.
- Your picture should then be saved, and you can open it in the file location.
FAQ
What is the easiest way to Print Screen on a Toshiba Laptop?
Start with the requirements in this guide, then follow each step in order. Check the result after every major change so problems are easier to identify.
Can beginners follow these instructions?
Yes. The process is organized into practical steps, and you can repeat any step before moving forward.
What should I check if the method does not work?
Confirm your software or device version, permissions, settings, file format, and internet connection when the task depends on online services.
Related Articles
 Steps to Fix Print Screen Key Not Working8 minutes read
 Toshiba's Price Range from 12. 5 Million to Vietnam6 minutes read
 Toshiba Officially Sells 2-screen Laptops in the US4 minutes read
 Satellite P50 - the First Laptop to Use Toshiba Haswell Chip4 minutes read
 Laptop Monitor 2 Monitors in Vietnam5 minutes read
 Toshiba's Flip-screen Touchscreen Laptop3 minutes read
Reader Comments 0
Sign in with email or Google to join the discussion.