How to take a screenshot of your computer using the mouse quickly
Instructions on how to take a screenshot of your computer using the mouse quickly, simply and in detail from A to Z..
In addition to the way to take screenshots of your computer that you often see is using key combinations as before, some developers have posted a very new way to take screenshots on the Windows operating system. Users can now take screenshots of their computer using the mouse in a faster and simpler way. Now, even if you are not familiar with hard key combinations, you can still take screenshots of Windows easily.
How to take a screenshot with your mouse
Step 1: To be able to take screenshots on the new Windows, first download the file named https://www.tenforums.com/attachments/tutorials/194717d1530836983-add-remove-screen-snip-context-menu-windows-10-a-add_screen_snip_context_menu_for_all_users.reg,
Step 2: Install the file into the Windows Registry. Then restart your computer to start experiencing the new way of taking screenshots.
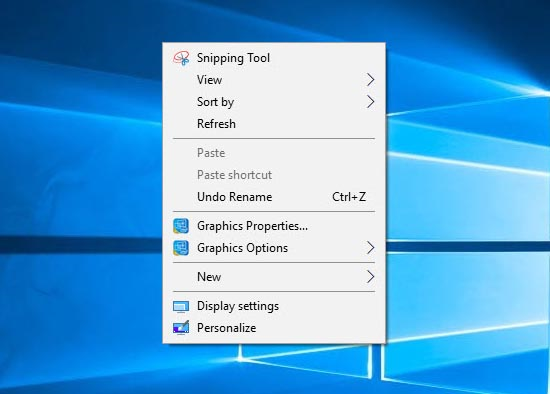
Step 3: Right-click on the screen, select Snipping Tool and choose the screenshot method you want. If you no longer want to use the screenshot method, download the file https://www.tenforums.com/attachments/tutorials/194719d1530836983-add-remove-screen-snip-context-menu-windows-10-a-remove_screen_snip_context_menu_for_all_users.reg to delete the original configuration file.
Some other ways to take screenshots on your computer
Besides the way to take a screenshot using the mouse mentioned above, you can take a screenshot in many different ways.
Take a screenshot of your computer using shortcut keys
You can take a screenshot of your PC and save it automatically with just the following shortcut:
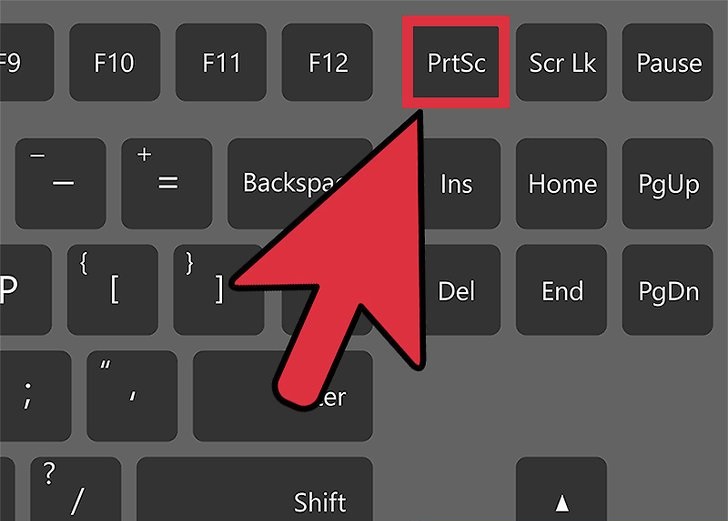
Step 1: Press Windows Key + PrtSc or Windows + Fn + PrtSc to take a screenshot of the entire computer screen. To review the photo you just took, press Windows + E > select Pictures in the left column > Screenshots:
Step 2: Press Windows Key + Alt + PrtSc to capture the open window. Go to C:UsersAdminVideosCaptures to get the captured image.
You can use one of the following keys PrtScn, Prt Scr if you can't find the PrtSc key.
How to take a screenshot on your laptop using Snipping Tool
This is a computer screen capture tool available on Windows XP, Windows 7/8/8.1, Windows 10/11. Snipping Tool can capture a part of the screen, capture the whole screen,. The captured image can be edited, marked with available tools, and can be saved in many different formats.
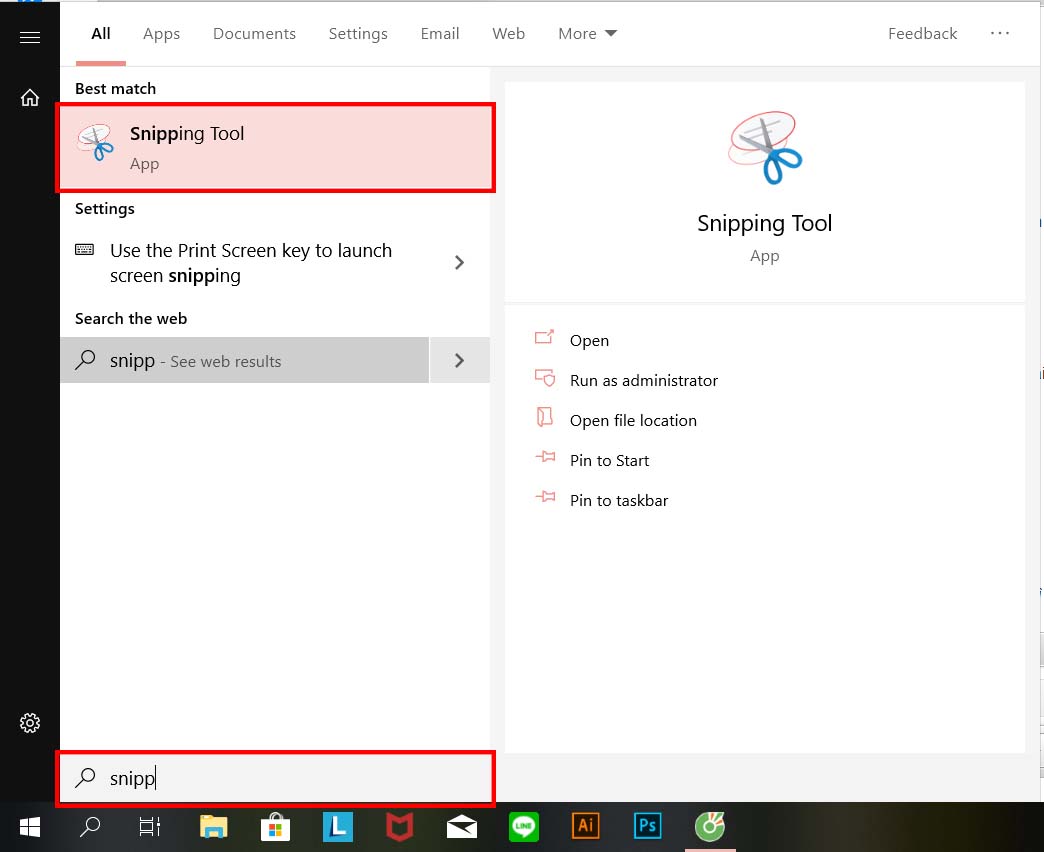
Step 1: Search for Snipping Tool in the search box, click on the result that appears:
Step 2: Snipping Tool has 4 capture modes, choose a capture mode:
- Free-form Snip: Take a free-form photo, you draw a circle on the screen to create a photo border
- Rectangular Snip: Take a photo in a rectangular frame
- Window Snip: Capture the open window
- Full-screen Snip: Capture the entire screen
Step 3: Click New to take a screenshot.
Step 4: Click on the screen, hold and drag to select the area of the screen you want to capture.
Step 5: The screenshot is then opened in the Snipping Tool window.
Step 6: Click the pen icon to mark up the photo.
Similar to method 2, Snipping Tool will save the image to the clipboard, you can Ctrl + V to paste the image into Photoshop, Paint for further editing.
Take a screenshot using the key combination Win + Shift + S
This is a way to take a screenshot on your computer that helps you quickly activate the Snipping Tool's screenshot frame. After you press the Win + Shift + S key combination, the screenshot toolkit will appear and you choose the type then press to take a screenshot.
The screenshot will be saved to the clipboard, you can paste it into Paint or social networks, messaging apps.
Take a screenshot using Game Bar
In addition to taking screenshots with the mouse, you can use the Game Bar. First, press the Win + G key combination to open the Game Bar. Next, you can use the mouse to click the screenshot button in the Game Bar interface or use the software's default shortcut Win + Alt + PrtScn to take a full-screen photo.
You can also create your own screenshot button for convenience. To do this, go to Settings > Gaming > Game Bar
Once you've taken a screenshot, confirm that you've taken one. Tap on it and you'll see the photo you just took.
Take screenshot on Macbook computer
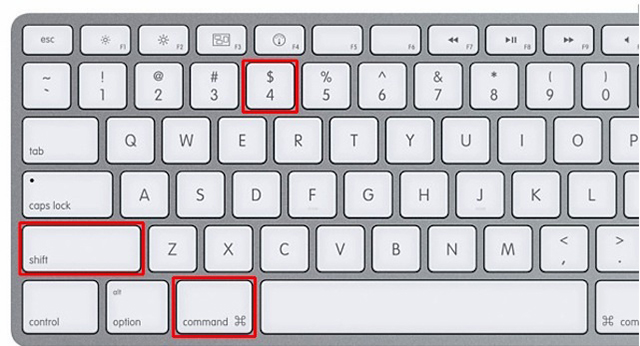
For taking screenshots on Macbook computers, it is simpler than Windows, you just need to press the combination Shift + Command (⌘) + 4. At this time, your mouse pointer will change to a cross, what you move the cross to the area you want to start taking screenshots, then drag them to the end of the area you want to capture. Note that while dragging, you can hold the Shift, Option or Space keys to change the way the selected area is moved.
After selecting the area you want to capture, release the mouse or trackpad to complete. To remove the screenshot, just press the Esc key before releasing the mouse. After taking the screenshot, it will be saved as a .png file on the desktop on the main screen.
Conclude:
Above is a summary of all the ways to take screenshots using the mouse and other methods on Windows and MacOS operating systems. If you have any questions related to screenshots, please contact TipsMake for answers and the clearest advice. For any questions, please contact hotline: 19001903 for the best advice and support.