How to switch from Legacy to UEFI in your computer's BIOS.
There are many reasons to switch your computer from traditional BIOS to the newer UEFI standard if your hardware supports it, and the following article will guide you through the steps to correctly switch Legacy BIOS to UEFI in Windows 10..
In previous versions of Windows, you were forced to reinstall the entire operating system if you wanted to switch from Legacy BIOS or Master Boot Record (MBR) to UEFI or GUID Partition Table (GPT). However, in Windows 10, Microsoft introduced a new and simple tool called MBR2GPT, which allows you to switch from Legacy BIOS to UEFI with just two commands.
Instructions on switching between Legacy and UEFI modes in BIOS
Although converting Legacy BIOS to UEFI in Windows is relatively easy, there are still a few things you need to know and do before starting the conversion process.
- Data will not be lost when converting Legacy BIOS to UEFI. However, you should still back up your system as a precaution.
- You should use Windows 10 v1703 or higher. If you are unsure of your OS version, press the Win + R key combination, type winver , and press Enter . On the second line, you will see your operating system version.
- The disk you are trying to convert should not have more than 3 partitions. If you have more than 3 partitions on your Windows 10 installation disk, merge or delete the extra partition.
- If you are using BitLocker to encrypt your system, decrypt the drive and disable BitLocker protection before starting the conversion process. When BitLocker protection is enabled, Windows 10 cannot convert your drive from Legacy BIOS to UEFI.
- After the conversion, you will likely need to change your motherboard's firmware settings from Legacy BIOS to UEFI. Depending on the motherboard manufacturer, the conversion process will vary. Having your motherboard's manual will make things easier for you.
The final thing you need to check is whether you are using Legacy BIOS. Ultimately, no transition will occur if you were using UEFI.
To find the answer, type " Create and format hard disk partitions" in the Start menu and press Enter to open the built-in Disk Management tool . Then, right-click on the Windows installation disk and select Properties.

In the Properties window , click on the Volumes tab . Here, if you see the words Master Boot Record (MBR) next to Partition style , it means you are using Legacy BIOS.
After confirming that you are using Legacy BIOS and have backed up your system, you can convert Legacy BIOS to UEFI by following these steps:
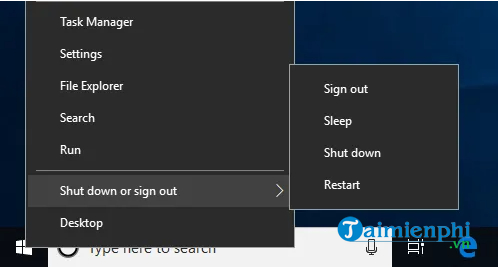
Step 1: To switch, you need to access Command Prompt from Windows Advanced Start-up. To do this, press the Win + X key combination, go to Shut down or sign out , and click the Restart button while holding down the Shift key.
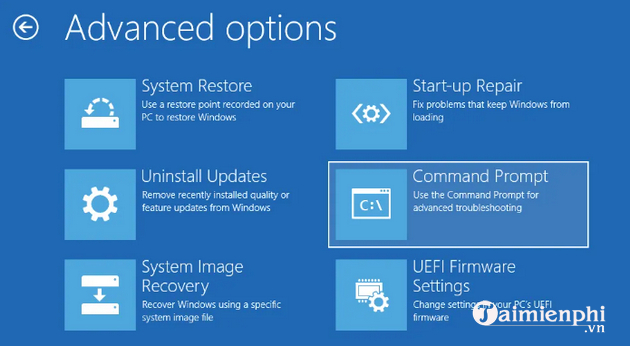
Step 2: This action will restart your system in Advanced Start-up mode . Here, click Troubleshoot > Advanced Options and select Command Prompt .
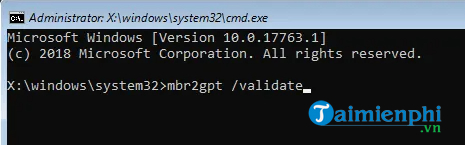
Step 3: The first thing you need to do is identify the disk you are trying to convert. Enter the following command and press Enter .
mbr2gpt /validate
If you see the message " Validation completed successfully ," you can proceed to the next step. If any errors appear, your disk or system may not be suitable for the conversion.
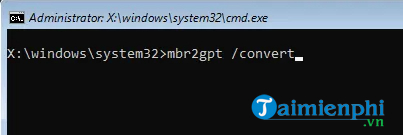
Step 4: After identifying the disk, execute the command below:
mbr2gpt /convert
Immediately after you execute it, Windows 10 will begin the transition process, meaning it will add all the necessary UEFI boot files and GPT components, and then update the Boot Configuration Data .
Step 5: Now, restart your system, open the motherboard firmware settings screen, and change it from Legacy BIOS to UEFI. The process for changing from Legacy BIOS to UEFI depends on your motherboard manufacturer. Refer to the instructions for the correct steps.
Step 6: After restarting into Windows 10, you can verify if the conversion has been successful. Just like before, open the Properties window from Disk Management and go to the Volumes tab . Here, you will see the text GUID Partition Table (GPT) next to Partition style.
The method for accessing the BIOS varies depending on the computer manufacturer. Therefore, to understand how it works and how to access the BIOS on your computer, don't miss this article from TipsMake.
Follow the steps above and you have successfully converted Legacy BIOS to UEFI. Don't forget to read the notes shared in the article before proceeding with the conversion. However, if you want to reset the BIOS settings to default, you can also refer to our article here.