Table of Contents
This guide explains how to split Columns in Word and Tips or Handle Columns in Word, with clear steps, practical tips, and important checks before you begin.
1. How to divide a column in Word
- Select the text to divide the column -> PageLayout -> Columns -> select the number of columns to divide, for example, here select the option to split into 2 columns:
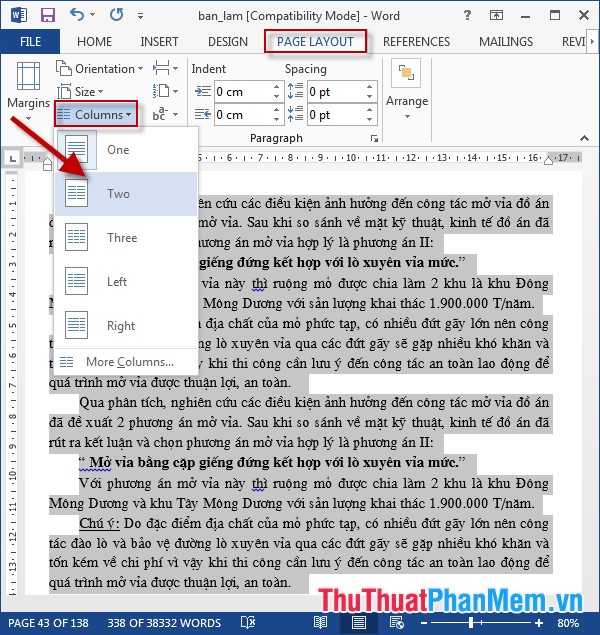
- The result has divided the text into 2 columns:

- In case you want to create a line in the middle of separating 2 columns, do the following: Go to PageLayout tab -> Columns -> More Columns:

- A dialog box appears and select the line between -> OK:

- The result has created a vertical line:

- Example divided into 3 columns with vertical lines:

2. Column handling tips in Word
When working with text content, you need to note the following: The text will go from top to bottom, from the leftmost column to the beginning of the next column.
2.1 Quick access to the Columns dialog box
To quickly access the Columns dialog box, double-click the space in the Ruler bar (the part corresponding to the space between the two columns):

2.2 Display the column border containing the text.
Step 1: On the card File -> Option:

Step 2: Select Advanced -> move the mouse to Show document content -> select Show text boundaries -> OK:

- Result of creating column border:

2.3 Customize column width size
- Make quick access to the Columns dialog box -> in the Width section, adjust the width of each column, respectively, the first column on the left is column 1, the remaining columns are numbered according to the next position:

- Also if you want to adjust the width of the columns equally, check the Equal column width item , so instead of adjusting the width of each column, you only need to adjust for 1 column:

2.4 Insert title into text after dividing column.
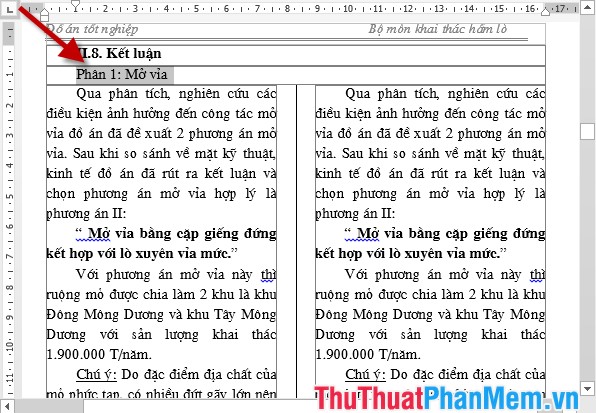
To insert a header for the column do the following:
Step 1: Enter a title in the first row of the first column:
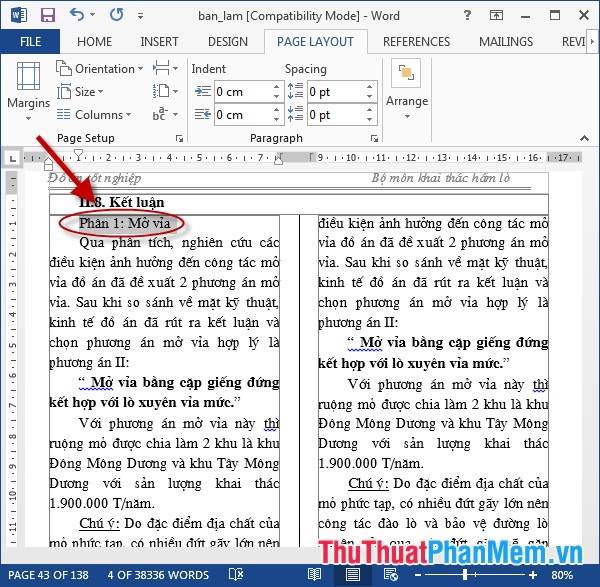
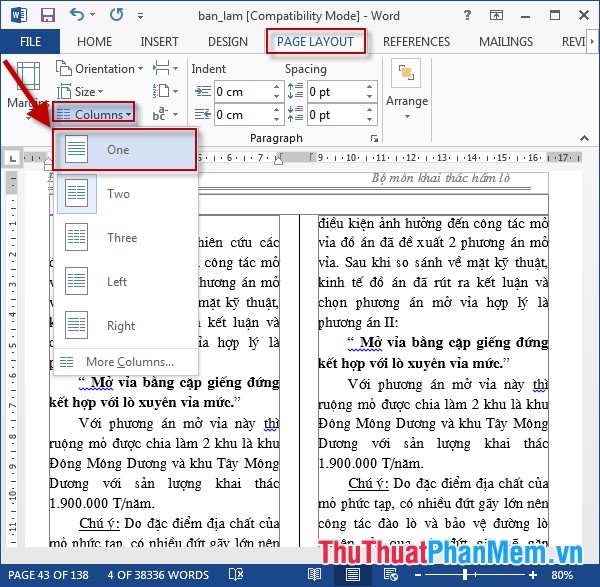
Step 2: Highlight the headline -> PAGELAYOUT -> Columns -> One:
- Result created column headers:
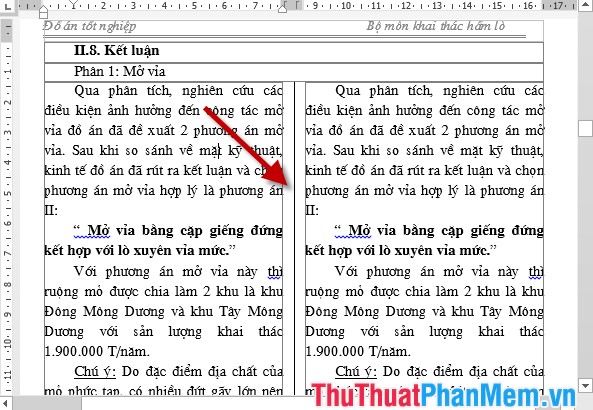
2.5 Adjust spacing between columns
- Quick access to the Columns dialog box -> in the Spacing section enter the value corresponding to the distance between the 2 columns, because in this example there are only 2 columns, so enter only once the distance -> click OK to confirm the selection:

- Results after adjusting the distance between the columns:
2.6 Break the column after division
For example, your paragraph is on 2 columns, where the content at the beginning of the second column has only a few lines. You want to adjust the head of column 2 corresponding to the beginning of paragraph 2 as the example below:
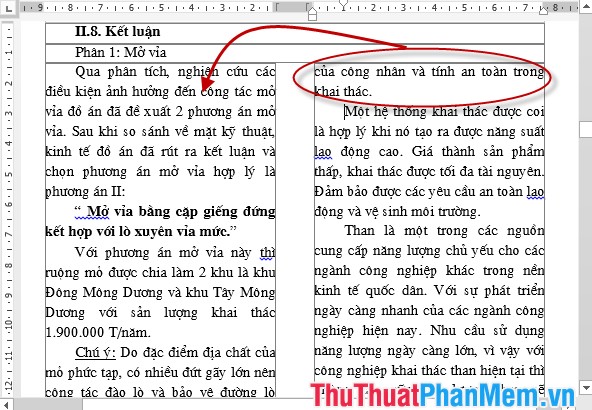
- Place the mouse cursor at the beginning of paragraph 2 on the column (note the position of the mouse cursor) -> PAGELAYOUT -> Break -> Column:

- The remaining content of paragraph 1 is pushed to the first column. The beginning of column 2 is the beginning of paragraph 2:

2.7 Align content between columns
To perform Aligning content between columns, apply column breaks and use additional alignment, line spacing, etc., which will give you a good looking and eye-catching text.
Above are instructions on how to split columns in Word and tips or handle columns in Word. Good luck!
FAQ
What should I know about Split Columns in Word and Tips or Handle Columns in Word?
Focus on the key features, requirements, limitations, and practical use cases explained in this guide.
How do I get the best results with Split Columns in Word and Tips or Handle Columns in Word?
Follow the recommended steps, use current software or information, confirm compatibility, and review settings before major changes.
Are there any risks or limitations?
Potential limitations depend on compatibility, data quality, cost, privacy, support, and how the product or method is used.
Related Articles
 Tips for Handling Columns in Microsoft Word: Text Column Tricks7 minutes read
 How to Split Text Into Multiple Columns in Word3 minutes read
 How to Split Tables, Join Tables in Word2 minutes read
 How to Split Columns in Word - Instructions on Dividing Columns in Word4 minutes read
 Word 2016 Complete Guide (Part 13): Divide the Text Column4 minutes read
 How to Split First and Last Names into 2 Columns in Excel6 minutes read
Reader Comments 0
Sign in with email or Google to join the discussion.