How to Add Columns in Microsoft Word
This wikiHow teaches you how to create columns of text (similar to a newspaper or magazine) in Microsoft Word. Open Microsoft Word. Its icon resembles a blue background with a white 'W' on top.
Table of Contents
Method 1 of 2:
Using Column Presets
-
 Open Microsoft Word. Its icon resembles a blue background with a white "W" on top.
- If you'd rather edit an existing document, simply double-click the document in question.
-
 Click Blank document. It's in the top-left corner of the templates page.
- If you're editing an existing document, skip this step.
-
 Click the Layout tab. It's at the top of the Word window, to the right of the Home, Insert, and Design tabs.
 -
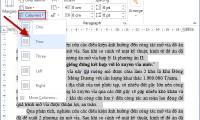
 Click Columns. This option is below and to the left of the Layout tab. Clicking it will prompt a drop-down menu with the following options:
- One - Default setting for Word documents.
- Two - Splits the page into two distinct columns.
- Three - Splits the page into three distinct columns.
- Left - Concentrates most of the text on the right side of the document, leaving a narrow column on the left.
- Right - Concentrates most of the text on the left side of the document, leaving a narrow column on the right.
- If you highlight a part (or all) of your document before clicking a column option, your document will be reformatted to appear in columns.
-
 Click a column option. Doing so will apply invisible columns to your document; as you type, you'll notice that your text jumps to a new line before reaching the standard right-most margin. Once you reach the bottom of the page, your text will continue in the next column until you reach the bottom of the page again, and so on.
Method 2 of 2:
Creating Custom Columns
-
 Open Microsoft Word. Its icon resembles a blue background with a white "W" on top.
- If you'd rather edit an existing document, simply double-click the document in question.
-
 Click Blank document. It's in the top-left corner of the templates page.
- If you're editing an existing document, skip this step.
-
 Click the Layout tab. It's at the top of the Word window, to the right of the Home, Insert, and Design tabs.
 -
 Click Columns. You'll find this option below and to the left of the Layout tab.
 -
 Click More Columns. It's at the bottom of the Columns drop-down menu.
 -
 Click a number of columns. You'll see options like One, Two, Three, and so on at the top of this window. Clicking an option will apply it to your document.
- If you highlighted text, your settings will be applied only to the highlighted text.
-
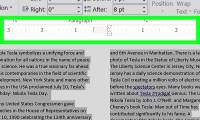
 Modify the column width and separation. You can do this by clicking the up or down arrow to the right of "Width" and the "Spacing" values, respectively.
- You can also uncheck the box next to "Equal column width" in order to make one column wider than the other.
-
 Check the box next to "Line between" to draw a divider. Doing so will place a visible line between your columns.
- If you don't want a visible divider, leave this option unchecked.
-
 Click the "Apply to" drop-down menu. Doing so will allow you to click Selected text or Whole document to apply your column settings to the respective amounts of text.
 -
 Click OK. This will apply your settings and divide any selected text as per your customized column rules.
Was this article helpful?
Your feedback helps us improve.
Related Articles
 Tips for handling columns in Microsoft Word7 minutes read
 How to add columns and delete columns in Word4 minutes read
 How to Make Two Columns in Word2 minutes read
 How to split columns in Word and tips or handle columns in Word4 minutes read
 Word 2013 Complete Guide (Part 13): Divide the text column3 minutes read
 Instructions on how to break columns in Word simply and quickly3 minutes read
Reader Comments 0
Sign in with email or Google to join the discussion.