How to set up Windows Deployment Services on Windows Server 2016
WDS (Windows Deployment Services) is a server role, providing a simple and secure means to remotely deploy the Microsoft operating system to computers over the network. This tutorial introduces how to set up WDS Server 2016.
Table of Contents
In order for WDS to install the operating system on a remote computer, the computer must have PEE enabled.
Set up WDS Server 2016 (installation options)
WDS can be installed as a Transport or Deployment Server or both. These options are available when installing roles using Server Manager.
Transport Server
This option provides a subset of the functions of WDS. It only contains the main network parts that you can use to transfer data on a standalone server. The transport server uses Multicasting technology to transfer data.
You can also use the transport server if you want a PXE server that allows clients to perform PXE booting and download your own custom setup application. You should use this option if you fall into either of these categories, but don't want to combine all the components of WDS.
Deployment Server
This option provides the full functionality of Windows Deployment Services, providing all the options for configuring and installing the Windows operating system remotely. The Deployment server depends on the core parts of the Transport Server.
You can install the WDS server role through the Server Manager or by using Windows PowerShell. After the Windows Deployment Services role is installed, the server must be configured before it can be used to deploy Windows operating systems automatically.
WDS can be configured as a standalone server or Active Directory integration. This tutorial introduces how to set up WDS Server 2016 as an Active Directory integrated WDS server.
Set up WDS Server 2016
- The Deployment Server requires DNS and DHCP server on the network.
- Both the Deployment and Transport server require NTFS partitions for file storage.
- After installation, you must configure WDS using WDSUtil.exe or run the Windows Deployment Services Configuration wizard.
- You must add at least one boot image and one install image to the image store.
The boot image provides the initial environment in which you boot the computer, while the install image is the operating system image.
This manual does not cover DNS and / or DHCP settings.
In order for PXE clients to rent out an IP address, configure the DHCP scope for both DHCP and BOOTP.
Steps to set up WDS Server 2016
There are 3 main steps to setting up WDS Server 2016:
1. Install the Windows Deployment Services Role (WDS Server 2016)
 Install the Windows Deployment Services Role (WDS Server 2016)
The first step to setting up WDS Server 2016 is to install the WDS server role.
Here are the steps to take:
- Log into the server and open the Server Manager (should launch by default).
- From Server Manager , click Manage , then select Add Roles and Features .
- On the Before you begin screen , click Next.
- Next, select Role-based or feature-based installation and click Next.
- Next, on the Select Destination server page , select the server you want to set up WDS Server 2016.
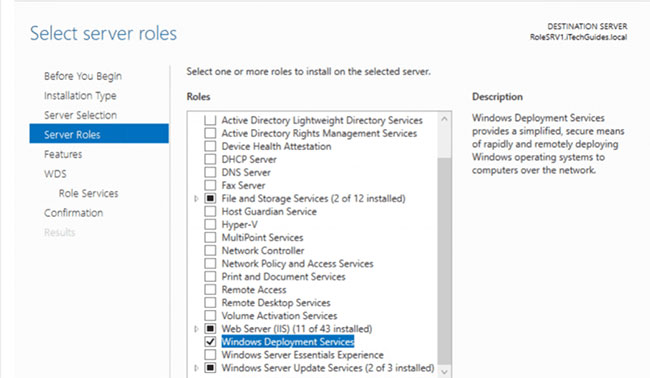
- On the Server Role page , check the box next to Windows Deployment Services. A page will load asking you to confirm additional features to install. Click Add Features . Then click on Next.
- On the Select roles services page , select both the Deployment Server and the Transport Server. Note that if you choose the Deployment Server, you must also choose the Transport Server. However, you can choose the Transport Server without selecting the Deployment Server.
- When you get to the Confirmation page , review the options, then click Install.
To install the Windows Deployment Services role with Windows PowerShell, run the following command:
Install-WindowsFeature –Name WDS –IncludeManagementTools2. Set up WDS Server 2016 (configure Windows Deployment Services)
 Set up WDS Server 2016 (configure Windows Deployment Services)
After installing the role, the next step to setting up WDS Server 2016 is to configure the role.
Here are the steps to take:
- Open Server Manager. Then click Tools and select Windows Deployment Services . The WDS management console will open.
- Expand Servers. Then right-click the WDS server and select Configure Server. The configuration wizard opens.
- On the Before You Begin page , read the requirements, then click Next.
- Select the option Integrate with Active Directory . Click Next.
- Enter a path for your remote installation directory or accept the default option.
Important tips:
In a production environment, you should have the remote installation directory in a drive other than C.
- Note the information on the Proxy DHCP Server page, then click Next.
- Configure settings for PXE server.
- Finally, wait for the wizard to complete the configuration. Click on Finish.
- Start the Windows Deployment Services (WDS) service: Right-click on the server, point to All Tasks and click Start.
The above task can also be performed by running the following command:
WDSUtil.exe /Initialize-Server /Server:RolesSRV1 /REMINST:"D:RemoteInstall"To revert the changes made during server configuration or initialization, execute the command:
WDSUtil.exe /UnInitialize-Server /Server:RolesSRV13. Configure and manage boot, install, discover image
 Configure and manage boot, install, discover image
After configuring the Windows Deployment Services server, the final step to completely set up WDS Server 2016 is to add the required image files.
The following images are required:
- Boot Image: Boot Image is a Windows PE image that you boot the client computer to perform operating system installation. In most cases, you should use the Boot.wim file from the operating system installation media.
- Install Image: Install Image is the image of the operating system that you deploy to the client. You can also use the Install.wim file from the operating system installation media.
- Discover Image: In some cases, the computer may not have a network card that supports PXE. In this situation, the discover image can be created and used to install the operating system on those computers.
The Discover image can be saved on media (CD, DVD or USB) and then the client computer can be booted with the media. Discover image on the Windows Deployment Services server and the deployment server installs the image onto a computer.
Discover images are not required to use Windows Deployment Services.
Prepare boot and install image for Windows Deployment Services
Copy boot.wim from DVD Windows 10 (if you have Windows 10 ISO, mount it. Boot.wim is in the source directory.
To create install.wim from a Windows 10 DVD, follow the steps below:
- Open Command Prompt with admin rights.
- Run the following command:
dism /Get-WimInfo /WimFile:D:sourcesinstall.esdHere is the output of the command. Note the index number of the version you want to create install.wim for it. For example, creating an install.wim file for Windows 10 Pro. The index number is 6.
 Note the index number of the version you want to create install.wim for it
To create install.win for Windows 10 Pro, execute the command below:
dism /Export-Image /SourceImageFile:D:sourcesinstall.esd /SourceIndex:6 /DestinationImageFile:C:WimFilesinstall.wim /Compress:Max /CheckIntegrityThe export process will begin. See image below. When it reaches 100%, the wim file is ready.
 When it reaches 100%, the wim file is ready
Add boot and install image to Windows Deployment Services (WDS)
To add an install image, follow the steps below:
- From Server Manager, open Windows Deployment Services. Expand Servers Node. Then expand your WDS server name.
- Right-click Install Images , then select Add Install Image .
- On the Image Group window , enter a name, then click Next.
- Enter the path to install.wim, then click Next.
- Select Operating System Image , then click Next.
- On the Summary page , click Next. Wait for the image to be added.
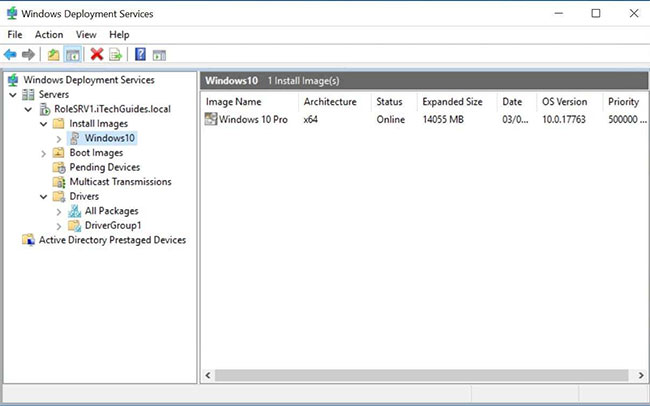
Install image Windows 10 is now available in Windows Deployment Services!
You can add multiple image Install.wim. For example, you may have an image for different versions of the same operating system. Additionally, you can add images for different operating systems.
The steps below will guide you how to add a boot image.
- From the WDS panel, right click on Boot Images and select Add Boot Image .
- Enter the path to your boot.wim file. Click Next.
- Rename the boot image to a more friendly name. The image name will be displayed for selection during PXE-boot.
- On the Summary page , click Next. Then wait for the image to be imported.
Boot image is available.
Create discover image
To create a discover image, follow the steps below:
- Right-click on the boot image you created earlier and select Create Discover Image .
- On the Metadata and Location page , enter all the information. For the name of the Windows Deployment Services server, click Browse then use the Active Directory search tool to search the server. When you're done, click Next.
Was this article helpful?
Your feedback helps us improve.
Related Articles
 Create private cloud with Hyper-V (Part 2)7 minutes read
 Steps to prepare for installing Windows Server 200823 minutes read
 KMS activation deployment for Windows 10, Windows 8.1, Windows Server 2012 R2, Windows Server 201621 minutes read
 Create private cloud with Hyper-V (Part 4)6 minutes read
 How to start and stop services in MS SQL Server3 minutes read
 How to install IIS in Windows Server 20122 minutes read
Reader Comments 0
Sign in with email or Google to join the discussion.