Create private cloud with Hyper-V (Part 2)
Part 1 of this series showed you how to download, install, and configure the Microsoft Deployment Toolkit. Now that we have created a deployment share, it's time to start creating some image files of the operating system that we can master in that folder..
TipsMake.com - The article will continue to mention the steps to build a private cloud by focusing on the procedure of creating executable image files to be used in the cloud.
>>> Create private cloud with Hyper-V (Part 1)
Introduce
Part 1 of this series showed you how to download, install, and configure the Microsoft Deployment Toolkit. Now that we have created a deployment share, it's time to start creating some image files of the operating system that we can master in that folder.
Additional operating systems
Adding the operating system to the public folder is very simple. When you go into the previously created public folder, you will see that the public folder contains a subdirectory called Operating Systems. Right-click the folder and select New Folder from the context menu. The new folder creation window is launched.
The initial screen will require naming and description for the folder. Here we name the folder Windows Server 2008 R2 . Then, click Next . Check the information entered in the summary screen and click Next . When Windows finishes creating the folder, click Next .
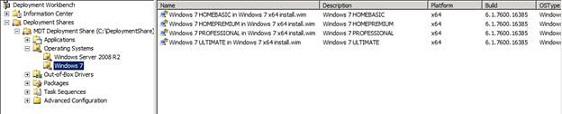
After creating the directory for the operating system, create any additional folders that you may need. In this article, we will create a Windows Server 2008 R2 folder and a Windows 7 folder.

Next, import the operating system files into the created folder. Insert the installation disk of the operating system you want to import into the machine, right-click the created folder and select Import Operating System from the context menu. Windows will launch the Import Operating System Wizard installation window.
The first screen requires providing the type of operating system you want to add. Select the Full Set of Source Files option and click Next. Next, point to the source file by pointing to the DVD drive.
Click Next to name the destination folder. The destination directory is advertised automatically and by default may be appropriate for your purpose. In this article, the destination directory auto-program is Windows Server 2008 R2x64.
Click Next to see general information about the options we have provided. Assuming everything is fine, click Next . The program will now import the operating system from the installation media. The completion time depends on the server configuration and the operating system selected. Once completed, all different Windows versions are listed in the corresponding folder.
Building task sequence (task sequence)
Next, we will deploy a virtual machine management server and some Hyper-V master servers. However, there is no need to manually create these servers because we have created an executable image file. The final executable image files are used to create virtual machines inside the private cloud, but now we can use it to build the virtual cloud infrastructure as well. The first step is to build the task sequence used to execute a generic Windows Server 2008 R2 machine.
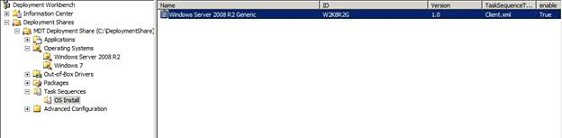
To create this task sequence, go to the public folder and then right-click on the Task Sequences folder. Select New Folder from the context menu and then use the installation window to create a folder called OS Install. When the folder is created, right-click the folder and select New Task Sequence from the context menu.
Windows will now launch the Task Sequence installation window. First, we have to grant an identifier for the task that is being created and named. In this article, we name the task sequence as Windows Server 2008 R2 and use the ID as W2K8R2G.
After entering the name and ID, click Next . The program will ask what type of task template you want to use. Select the Standard Server Task Sequence option and click Next .
Now, select the operating system you want to perform as part of the task and click Next . The screen then gives the option to specify a product key. If there are multiple activation keys for Windows Server 2008 R2, enter here. If not, select the option to not specify the product key at this time.
Click Next to enter your username, organization name and homepage for Internet Explorer. Enter information and click Next . Next, you must enter the local admin password that will be used on the servers deployed from this image file.
Click Next to review the task sequence options. If all is right, click Next to create the string. When the process is complete, click Finish . You will see a new task sequence listed in the OS Install folder.
As mentioned earlier, we will use executable image files to build our own cloud infrastructure and finally create virtual machines in the cloud. Since we are going to use image files to help create our own cloud infrastructure, we need a series of tasks that can be used to deploy a Hyper-V server.
Now, create a task sequence like the one we just created. The difference is that this name and string ID reflects that it will be used to deploy Hyper-V master servers. The next section will show you how to change the task sequence to allow you to complete the desired task.
Conclude
Now we have created some executable image files. It's time to make some minor changes to the task sequences and then start deploying the infrastructure servers.