Table of Contents
This updated guide examines Click: How to Scan on a Mac and organizes the essential facts, background, and practical takeaways in clear American English.
Part 1of 2:
Connecting Your Scanner
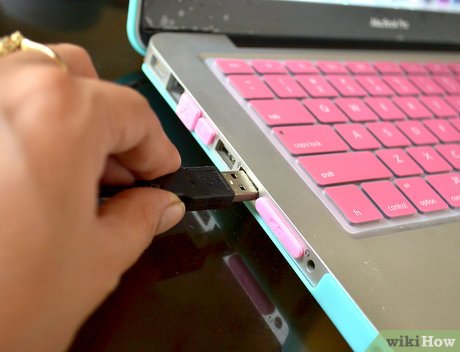 Plug in your scanner or multifunction printer. In most cases, you'll connect it to your Mac with a USB cable that attaches from the scanner's (or printer's) port to the back or side of your Mac.
- Alternatively, you can use a wireless-enabled printer or scanner through your local Wi-Fi connection.
- If you prefer to communicate with the scanner wirelessly, go through the setup procedure on your scanner. Make sure it is connected to the same strong wireless network as your Mac.
- Open the Apple menu
 . Click the Apple logo in the top-left corner of the screen. A drop-down menu will appear.
 - ClickSystem Preferences…. It's in the drop-down menu. Doing so opens the System Preferences window.
- ClickView. This menu item is at the top of the screen. Clicking it prompts a drop-down menu.
- ClickPrint & Scan. It's in the drop-down menu. A pop-up window will open.
- Click+. This is in the lower-left side of the window. Clicking it opens a menu with the currently connected printers and scanners.
- Select your scanner. Click your scanner's name in the menu.
- Follow any on-screen prompts. You may be asked to confirm the scanner's installation; if so, click through the on-screen prompt(s).
- Update your scanner's software if necessary. Once your scanner is installed on your Mac, you can check its software to make sure it's up to date:
- macOS Mojave and up — Click the Apple menu
 , click Software Update , and click Update All if prompted.
 - macOS High Sierra and down — Click the Apple menu
 , click App Store , click the Updates tab, and click UPDATE ALL if available.
- macOS Mojave and up — Click the Apple menu
Part 2of 2:
Scanning a Document
- Place your document in your scanner. Your paper should go face-down in the scanner's tray.
- Open Spotlight
 . Click the Spotlight icon, which resembles a magnifying glass, in the top-right corner of the screen.
 - Open Preview. Typepreviewinto the Spotlight text box, then double-click the Preview result. Doing so opens the Preview window.
- ClickFile. It's in the upper-left corner of the screen.
- SelectImport from Scanner. This is in the drop-down menu. A pop-out menu will appear.
- ClickInclude Networked Devices. It's in the pop-out menu.
- Select your scanner. Once you've prompted Preview to look for networked scanners, you can do the following:[1]
- Click File .
- Select Import from Scanner .
- Click your scanner's name.
- ClickFile, then clickExport as PDF…. Doing so opens the Save As window.
- Enter a name. In the "Name" text box, type in the name you want to use for your scanned file's PDF.
- Select a save location. Click the "Where" box, then click the folder in which you want to save your PDF in the resulting drop-down menu.
- ClickSave. It's at the bottom of the window. Doing so will save your scanned document as a PDF in your specified location.
FAQ
What is Click: How to Scan on a Mac about?
It provides a structured overview of click, explains the main context, and highlights practical takeaways for readers.
Why does this topic matter?
Understanding the main concepts helps readers evaluate the issue, avoid common mistakes, and make better-informed decisions.
How should readers use this information?
Use the guidance as a practical starting point, confirm details that may have changed, and follow current product, safety, or security recommendations.
Related Articles
 How to Scan Documents Using Notes App on iOS4 minutes read
 Applications Scan Documents to PDF on iOS4 minutes read
 Instructions for Scanning Documents with 3 Simple Steps4 minutes read
 How to Scan Documents in Windows6 minutes read
 3 Types of Virus Scans and the Right Time to Use9 minutes read
 How to Scan Old Photos with Your Phone10 minutes read
Reader Comments 0
Sign in with email or Google to join the discussion.