How to scan documents in the Files app on iOS
Since iOS 11, Apple's Notes app has had an impressive built-in tool to scan documents and save them as notes. In iOS 13, Apple added a similar tool to the Files app , which lets you scan documents and save them as PDFs at your chosen location.
After scanning the document, you can save it anywhere in iCloud Drive or any third-party cloud service associated with the Files app. The following steps guide you through the process of scanning a document and save it to your preferred location.
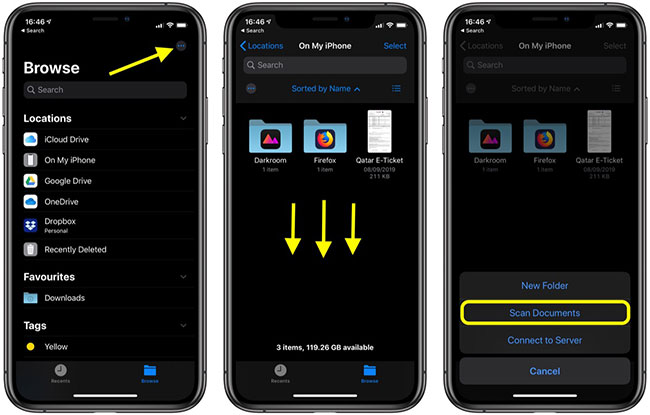
1. Launch the Files app on iPhone or iPad.
2. On the Browse screen , touch the button with a ellipsis (circle containing three dots) in the upper right corner of the screen. Then navigate to the folder in which you want to save your scans, then swipe down on the screen to display the folder options bar and press the ellipsis button on the left.
3. Select Scan Documents from the pop-up menu.

4. By default, the camera tries to detect documents in the viewfinder and automatically captures them. If you don't want this to happen, press Auto in the upper right corner of the camera interface to change it to Manual settings .
5. Touch the three circles icon at the top to select one of the Color, Grayscale, Black and white and Photo options for the scan. The default option is Color.
6. Touch the flash icon if you need to adjust the flash options. The default is Auto . This option causes the flash to turn off, if you are in a room with low lighting.
7. Point the camera at the document, making sure the yellow box is aligned with the edges of the document.
8. When aligning, tap the camera's shutter button to take a photo.

9. Adjust the edges of the scan for a perfect alignment. The application will automatically correct any incline.
10. If you are satisfied with the scanning process and do not want to scan any more pages, click Done, then click Save when you return to the scanning interface. If you want to try scanning again, select Retake.
11. If you start scanning from the Files app's Browse screen, you will be asked to select a folder to save the scanned document. Otherwise, the scanned document (s) will be automatically saved as PDFs in the directory you previously navigated.
Apple's document scanning tools are well-designed and impressive, creating dozens of clear scans in the tests conducted, with great performance on everything from photos to documents. Apple's scan engine can even become a competitor to well-established third-party document scanners and easily replace them.
Hope you are succesful.