How to Reduce a Microsoft Word File Size
This wikiHow teaches you how to reduce the file size of a Microsoft Word document. If your Word file is too big, it's often because the images in your document weren't inserted properly or aren't compressed enough. You can reduce the size...
Table of Contents
Method 1 of 5:
Inserting Images Properly
-
 Click Insert. It's a tab in the menu bar at the top of the screen. This will reveal a new set of options at the top of the page.
- It's better to use the "Insert" option to add images to a Word document instead of using Copy & Paste. When you copy and paste an image you lose compression, change the file type, and bring in extra data that can increase the file size.[1]
-
 Click. Click the "Pictures" button that resembles a photo with a computer screen on the bottom-right corner of it. It's located at the top of the menu to the right of the "Table" icon. This will open a file browser where you can browse and select the images you want to add.
- On Mac, this opens a small drop-down menu. Select Picture from File... in the menu.
-
 Select the image you want to insert. Use the file browser window to navigate to the location of an image and click the image file to select it.
 -
 Click Insert. It's the button on the bottom-right corner of the file browser window. This will insert the image into the Word document in a format that works best with Word documents, without copying any unnecessary extra data.
Method 2 of 5:
Compressing Images
-
 Select an image in your Word document. Click on any image on the page of your Word document to select it. This will open the "Format" menu in the blue menu bar at the top.
- On Mac this tab is labeled "Picture Format" at the top of Word.
-
 Click. Click the "Compress Pictures" button which resembles a photograph with blue arrows on each corner. It's located in the top-left section of the menu at the top of your Word document.
- On older versions of Word, click Format at the top and select Compress Image from the drop-down menu.
-
 Select which pictures you want to compress. If you want to apply compression to all the pictures in the document, select "All pictures in this file" unchecked. If you only want to compress only the image you selected, Select "Selected pictures only".
- If you've cropped any images in Word you can also check the box for "Delete cropped areas of pictures" which will delete the cropped areas permanently. This will reduce the file size, but you'll no longer be able to adjust the cropping.
-
 Select a resolution. Click the radio button for the level of compression you want to use, ranging from HF (Maximum image size), (HD 330 PPI) to Email (96 PPI). The lower the PPI, the more you will lower the file size of your Word document which will also decrease the image quality of the picture as well.
- Some options may be unavailable if the images in your document are already compressed below the higher PPI resolutions.
- Lower PPI resolutions are designed to be viewed on a computer screen. The image may look fuzzy in print format.
-
 Click Ok. It's at the bottom of the window. This compresses the images in your document which will reduce the file size of your Word file.[2]
Method 3 of 5:
Deleting Auto-Recovery Versions
-
 Click File. It's the first option in the top-left of the blue menu bar at the top of Word.
 -
 Click Info. It's the first option at the top of the blue column on the left.
 -
 Click Manage Document. It's the icon with several yellow pages and a magnifying glass. This will open a drop-down menu.
-
 Click Delete All Unsaved Documents. It's the option on the bottom with the icon of three yellow pages and a red "X." This will delete all the recent copies of any unsaved auto-recovery versions of your document.
Method 4 of 5:
Turning Off Thumbnails
-
 Click File. It's the first option in the top-left of the blue menu bar at the top of Word.
 -
 Click Info. It's the first option at the top of the blue column on the left.
 -
 Click Properties. It's at the top of the right side of the page. This opens a small drop-down menu with one option.
-
 Click Advanced Properties. It's the only option that appears next to the icon of a small bullet-point list. This will display the Properties window for your document.
 -
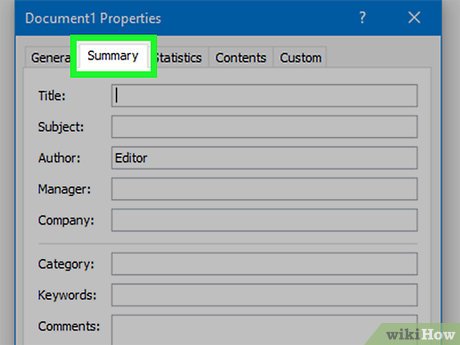 Click the Summary tab. It's the second tab at the top of the window.
 -
 Uncheck the boxfor "Save Thumbnails for All Word Documents." It's at the bottom of the "Summary" page. If your document has a lot of images, disabling this feature will reduce the file size of your Word document even more.
-
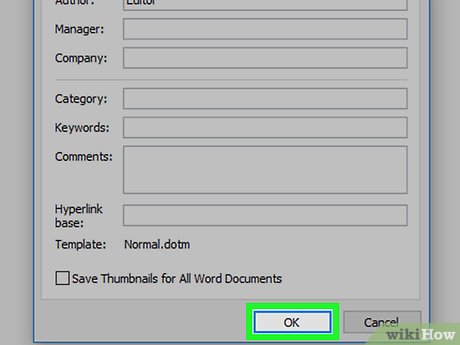 Click OK. This will save the changes to your document.
Method 5 of 5:
Turning Off Embedded Fonts
-
 Click File. It's the first option in the top-left of the blue menu bar at the top of Word.
 -
 Click Options. It's the last option at the bottom of the blue column on the left. This will open the main settings for Microsoft Word.
 -
 Click the Save tab on the left. Click the "Save" tab on the left-side column to open all the settings to customize how Word saves your documents in the pane on the right.
 -
 Uncheck the boxfor "Embed Fonts in the file." When this option is turned off, fonts that are not on the computer will not be used in the document, which can reduce the file size of your Word document if you used uncommon fonts.
-
 Click Ok. It's at the bottom of the Save menu. This will save your changes in Microsoft Word.
- When this option is disabled, use only the standard common fonts in your Word document so other users will not have problems viewing your document correctly.
Was this article helpful?
Your feedback helps us improve.
Related Articles
 How to reduce Word file size25 minutes read
 How to reduce the size and size of Word document files containing images2 minutes read
 How to reduce image size in Word 2007, 2010, 2013, 20163 minutes read
 Reduce the size of Word files with FileMinimizer3 minutes read
 Top 3 software to reduce Word file size best 20204 minutes read
 How to reduce the size of Excel files2 minutes read
Reader Comments 0
Sign in with email or Google to join the discussion.