How to merge a hard drive in Windows 10 does not lose data with MiniTool Partition Wizard
You are struggling to find ways to merge hard drives to increase capacity but still want to retain data quickly and safely. Some tools that you have applied before have undesirable shortcomings that make you uncomfortable and insecure. So, TechNews will introduce you the tool to merge hard drives, separate hard drives simple, effective and safe below, invite you to consult.
Why need to merge the hard drive
In many cases you want to merge the hard drive into 1 for more storage capacity without losing old data. Sure, many people will use Disk Management to merge hard drives, however, Disk Management cannot merge them directly, you can only merge 2 hard drives into 1 when they are next to each other. For example, you want to merge drive C into drive D. If you use Disk Management, you must delete drive D, which means that the data of drive D will be lost.
So is there a way to merge the hard drive without losing data? The answer is yes. With MiniTool Partition Wizard, you can merge hard drive on Windows 10 without losing data.
What is MiniTool Partition Wizard?
MiniTool Partition Wizard is a complete and advanced Windows partition management tool to help you manage your hard drive professionally. MiniTool Partition Wizard not only has a merge function, but MiniTool Partition Wizard also has many other features such as partitioning the hard drive, converting GPT drive to MBR drive, converting FAT32 to NTFS and recovering lost hard drive partitions.
How to merge hard drives without losing data
Method 1: Use Merge Partition with an internal hard drive
Step 1: Run MiniTool Partition Wizard -> select the source hard drive you want to merge -> select Merge Partition.

Step 2: Select the hard drive to merge -> click Next . Note, only NTFS partitions can be merged, so you will need to convert to NTFS if the partition you want to merge is FAT16 / 32.

Step 3: Select the hard drive that will be merged with the hard drive you selected in step 2. You can name the folder containing the contents of the selected hard drive -> select Finish .

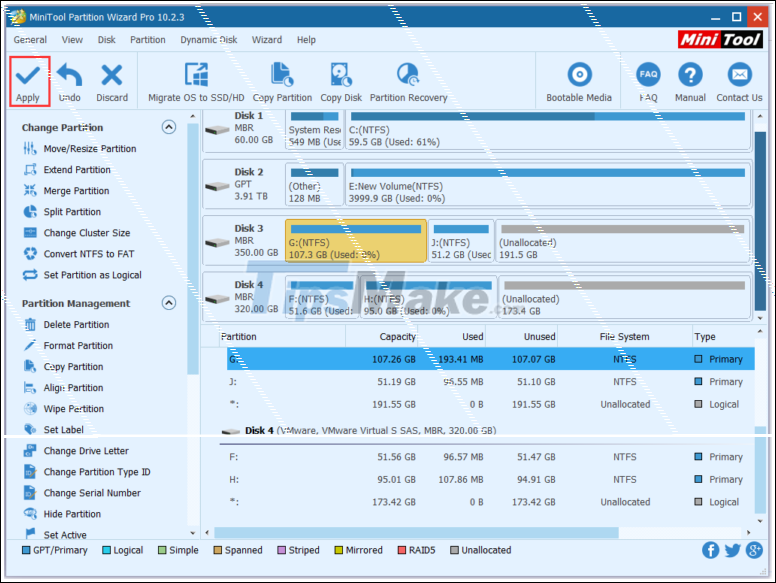
Step 4: In the main interface, you can check whether the hard drive has been successfully merged or not. If you want, choose Apply .

Method 2: Extend Partition with external hard drive
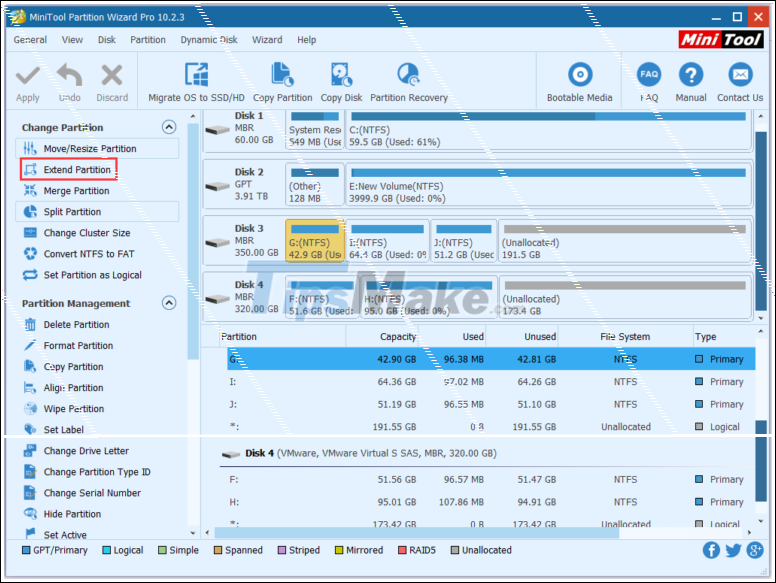
Step 1: Select the hard drive to expand -> select Extend Partition in Change Partition.

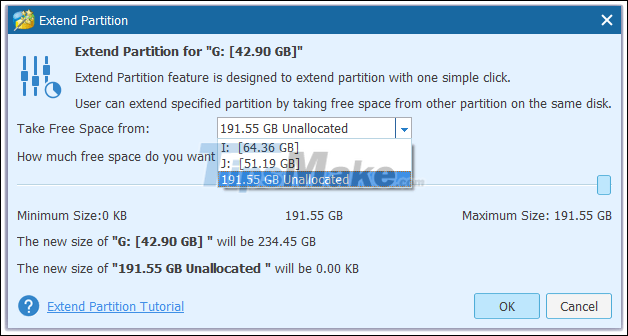
Step 2: In the Take Free Space from box , scroll down and select Unallocated . Next, in the How much free space do you want section , choose the free space to use. Then, select OK .

Step 3: Now you will see on the screen the hard drive you chose in step 1 has more capacity. Click Apply to finish.

Good luck.
You should read it
- ★ Instructions to divide and merge drives right in Windows 7
- ★ Steps to divide hard drive using MiniTool Partition Wizard software
- ★ How to split the hard drive, merge the partition on Windows XP without worrying about losing data
- ★ Instructions to mount the hard drive into a folder on Windows 10
- ★ Instructions for dividing hard drives right in Windows 10