How to Install Windows 95
Windows 95 is a closed source operating system aimed at home users. It was released on the 15th of August 1995, but support for it ended on the 31st of December 2001. It was a major improvement over Windows 3.1. For example, its desktop...
Table of Contents
Part 1 of 4:
Preparing for installation
-
 Insert the Windows 95 installation disk.
 -
 Boot up your computer.
Part 2 of 4:
Installation
-
 Wait for the screen message to appear. When this screen appears, press ↵ Enter.
 -
 Configure. If you haven't already allocated a partition to your hard drive, make sure 'Configure unallocated disk space' is highlighted and ↵ Enter.
 -
 Select whether you would like large disk support.
- This is a matter of personal preference but 'Yes' was chosen in this tutorial.
- This message may not come up if your hard drive is smaller than 512mb.
-
 Ensure the Windows 95 Boot Disk is in Drive A and press ↵ Enter.
 -
 Press ↵ Enter to continue with the installation.
 -
 Click Continue to continue with the installation.
 -
 Accept the license agreement.
- It's a good idea to read the agreement so you know what you're agreeing to.
-
 Click Next
 -
 Select where on your hard drive you want Windows 95 to install and click Next >.
- Normally it is best to choose where Windows recommends.
-
 Select what kind of setup you would like and click Next >
- For this tutorial, 'Typical' was chosen.
-
 Type in your product key and click Next >
- The product key should have come with your Windows 95 setup disks.
-
 Type in your name and click Next >.
- It's not essential to put a company in
-
 If you have any of the hardware, click the check boxes which relate to your hardware and click Next >.
- For this tutorial, none of the check boxes were selected.
-
 Choose whether you want to install the most common components for Windows or to choose the components yourself and click Next >
- For this tutorial, 'Install the most common components' was selected.
-
 Choose whether you want to create a startup disk or not and click Next >
- The startup disk is a disk which can be inserted into your computer should Windows fail to boot and can then repair or reinstall Windows.
- For this tutorial 'No' was selected.
-
 Click Next
 -
 Remove any disks from their drives e.g. floppy disks as well as the installation disk and click Finish
 -
 If you get confronted with this error, please see Method 4 ' Fixing "Windows protection error"'
 -
 Click OK
 -
 Type in a Computer name and a Workgroup and click Close
- Computer description is not required.
-
 Reinsert the Windows 95 installation disk and click OK
 -
 Ensure your date and time settings are correct and then click Close.
 -
 Decide whether you want to install a printer.
- If so click Next > otherwise choose Cancel (Cancel was chosen in this tutorial).
-
 Remove any disks in your computer and click OK to restart your computer.
 -
 The Windows 95 installation is complete. Enjoy.
Part 3 of 4:
Shutting down
-
 Click Start.
 -
 Click Shutdown
 -
 Ensure the 'Shut down the computer?' option is checked and then click Yes.
Part 4 of 4:
Fixing "Windows protection error"
If you see this error, chances are your processor is too fast to run Windows 95. Fortunately, there is a cure.
-
 Firstly, got to http://www.msfn.org/board/topic/141402-windows-95-21ghz-cpu-limit-broken/
 -
 Scroll down until you see FIX95CPU_V3_FINAL.ZIP and click this hyperlink to begin the download.
 -
 Click the little arrow next to FIX95CPU_V3_FINAL.ZIP as shown in the picture and click Show in folder.
 -
 Right click the folder, and extract using the default Windows service by click Extract All... to a destination of your choosing.
- You can also use a 3rd party program such as 7-Zip.
-
 Read the readme.
- This is so you can decide which file you need to use:
- FIX95CPU.ISO and FIX95CPU.IMA is for use in a virtual machine
- FIX95CPU.ISO can be used to burn to a CD
- FIX95CPU.EXE is for writing to a floppy disk
-
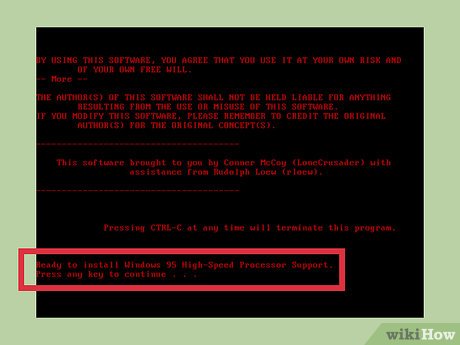
 Make sure the file you want to use is in the appropriate format (e.g. a CD), insert it into your computer and boot the computer and press any key to continue when confronted with the message shown in the picture.
 -
 Decide whether you want to read the readme by press Y for Yes or N for No.
- No was selected here as the readme is exactly the same as the one in the zip folder.
-
 When confronted with this message, press any key to continue.
- This will begin to fix the processor issues.
-
 Press any key to restart the computer and remove the 'CD' from the computer.
- If you don't remove the 'CD', it will begin an endless loop into this setup screen.
Was this article helpful?
Your feedback helps us improve.
Related Articles
 How to install Windows 8.1 from USB7 minutes read
 How to install Windows 10 from USB with ISO file6 minutes read
 Install Windows 10 with a super fast USB in just a few simple steps4 minutes read
 Install Win 10 for Android tablet4 minutes read
 How to install Windows 7 using USB - Create a bootable USB to install Windows 76 minutes read
 Install Windows XP from a USB Flash drive5 minutes read
Reader Comments 0
Sign in with email or Google to join the discussion.