Automate maintenance tasks for Windows computers
QuanTriMang - Most people usually do some action after their computer is slow:
- Speed up your computer by buying more RAM
- Try adjusting some computer settings
- Abandoned because they discovered that the device was too old, could not do anything else. It's time to buy a new computer.
All of these solutions help speed up your computer. However, what made your new, fast-running computer become slow after only a few months of use? Even a heavily fragmented hard drive is also capable of slowing down a computer with a "terrible" configuration.

A user choice should be made to create a computer maintenance plan - the computer maintenance schedule is easy to set up and done so you don't have to pay attention to it. The plan this article provides will use tools that are already built into the Windows operating system, including Disk Defragmenter.
This article will provide information on how to create and automate a maintenance schedule to keep your computer running 'smoothly'. The methods mentioned below will vary with each version of the operating system, but generally you will find them effective for Windows 7, Windows Vista, and Windows XP.
Plan computer maintenance
When feeling that the performance of the device becomes slow, the most common reason is the hard drive. The computer hard drive is a place that cannot be moved, containing all the information contained in the device. Over time, hard drives gradually lose their ability to store data efficiently.
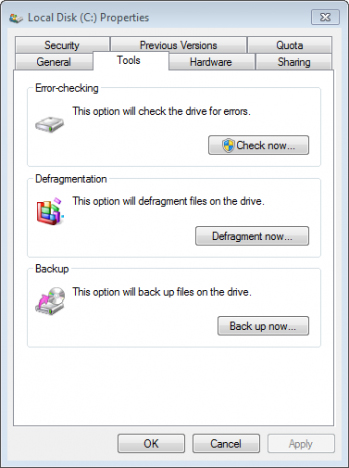
The Windows operating system offers 3 great tools to keep your hard drive running smoothly, including Disk Cleanup, Disk Defragmenter, and Check Disk. Better yet, every week users should delete temporary files from the computer, optimize (defragment) the drive and check if the drive has errors. However, the possibility that you will not have much time to monitor and implement this calendar. The best solution is to have Windows automatically do those tasks.
Windows allows you to set up and automate such tasks. Remember that the above tools will require user or decentralization impact to be able to operate. The sections below will guide you in more detail.
Tip: In Windows 7 and Windows Vista, you can go directly to the above tools. Just click on the Start button, in the Search dialog box, type the name of the tool you need to use. When you see the name of the tool displayed in the search list, click on it.
Clean up the hard drive
Computers 'accumulate' temporary files over time. These files can come from a variety of sources, with the source mostly coming from websites. After a period of accumulation, they will slow down the speed of the computer.
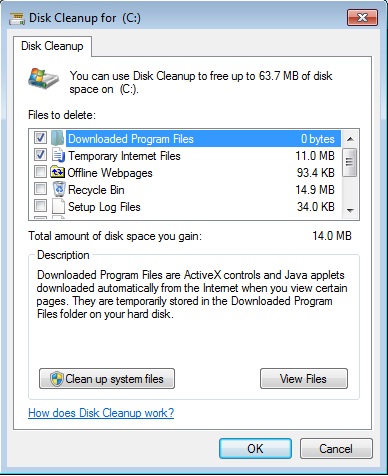
Once a week, you should run the Windows Disk Cleanup tool to delete these files from your computer. This tool requires user impact to complete tasks. Therefore, we recommend that when you schedule this tool to run automatically, you should choose when you are still using your computer to make a decision. When using the Create Basic Task Wizard, select the Open the Properties dialog box for this task when I click Finish . This gives you access to many other properties related to the task in progress. On the Settings tab , select the Run task as soon dialog box as possible after a scheduled start is missed to make sure the task will start at the time you log on to the next machine.

Disk Cleanup scheduler runs automatically:
In Windows 7
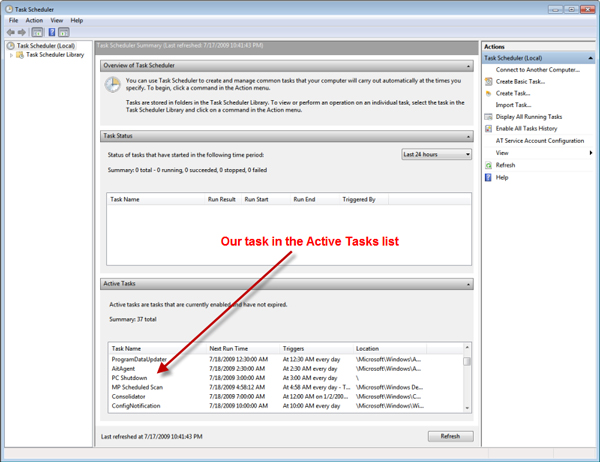
1. Open Task Scheduler : Click the Start button → Control Panel → Administrative Tools , double-click Task Scheduler . If required to enter an administrator password or confirm, enter the password or provide the required information.
2. Click the Action menu → Create Basic Task. This will open the Create Basic Task Wizard .
3. Enter a name for the task and note (optional). Then, click Next .
4. To schedule performance based on a specific time, click on Daily , Weekly , Monthly , or One time - equivalent to daily, weekly, monthly or only once. Next, click Next .
5. Determine the calendar you want to use and click Next .
6. Click Start a program, and then click Next .
7. Select Browse , and in the File name dialog box, type cleanmgr.exe , click Open , and click Next .
8. Finally, select Finish .
In Windows Vista
1. Open Task Scheduler : Click the Start button → Administrative Tools → Task Scheduler. If required to enter an administrator password or confirm, enter the password or provide the required information.
2. Click the Action menu → Create Basic Task.
3. Enter a name for the task and note (optional). Then, click Next .
4. To schedule execution based on a specific time, click on Daily , Weekly , Monthly , or One time . Next, click Next .
5. Determine the calendar you want to use and click Next .
6. Click Start a program , and then click Next .
7. Select Browse , and in the File name dialog box, type cleanmgr.exe , click Open , and click Next .
8. Finally, select Finish .
In Windows XP
1. Click Start → Control Panel.
2. In the Control Panel, click Performance and Maintenance .
3. Under icon or pick a Control Panel icon , click Scheduled Tasks .
4. In the Scheduled Tasks window, double-click Add Scheduled Task .
5. In the Scheduled Task Wizard , click Next .
6. Scroll down and find Disk Cleanup in the list of applications, click it or highlight and select Next .
7. Under the Perform this task section , select Weekly , and then click Next .
8. Set the time and date of the week you want to run the Disk Cleanup tool. For the best results, choose a time when you are still using your computer. Next, click Next .
9. Enter the password in both dialog boxes Enter the password and Confirm password , then click Next.
10. Finally, select Finish .
Optimize fragmented files
Whenever a user stores a file that is too large on a hard drive location, the computer will split the file into several pieces (pieces). Even so, you don't have to worry too much. The computer can still track all the pieces, connecting them to each other whenever the user accesses the file.
However, when fragmented files are 'accumulated' on the hard drive, the computer will also slow down. This is because the computer must search all parts of the file to connect them to a complete part.
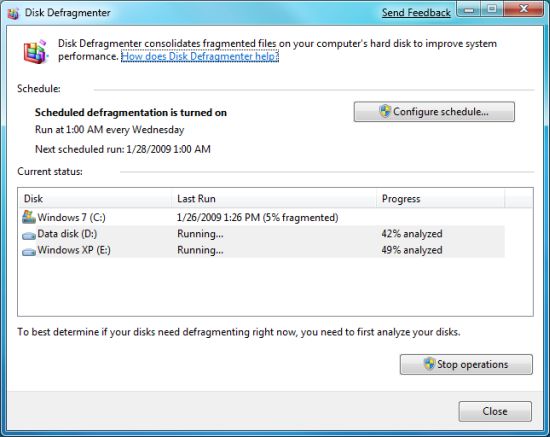
Although you have no way to prevent file splitting, Windows has a tool (Disk Defragmenter) to solve this problem. Disk Defragmenter will arrange the file fragments, help recover the free space on the hard drive as well as make the machine work faster.
Therefore, once a week you should run the Windows Disk Defragmenter tool.

Note : Windows 7 and most versions of Windows Vista have been configured to run the Disk Defragmenter tool weekly. Follow the instructions below to check whether this tool has been set up or change the current calendar.
Set up Disk Defragmenter to run automatically:
In Windows 7
1. Open Disk Defragmenter : Click the Start button → All Programs → Accessories → System Tools → Disk Defragmenter. If required to enter an administrator password or confirm, enter the password or provide the required information.
2. Click Configure schedule .
3. In the Disk Defragmenter: Modify Schedule dialog box, select the frequency for the tool: what day and time of the day you want to run defrag, run on any drive. Then, click OK .
4. Click OK .
In Windows Vista
1. Open Disk Defragmenter : Click the Start button → All Programs → Accessories → System Tools → Disk Defragmenter. If required to enter an administrator password or confirm, enter the password or provide the required information.
2. Click Modify schedule .
3. In the Disk Defragmenter: Modify Schedule dialog box, select the frequency for the tool: what day and time of the day you want to run defrag, run on any drive. Then, click OK .
4. Click on OK .
In Windows XP
1. Click Start → Control Panel.
2. Select Performance and Maintenance.
3. Under or pick a Control Panel icon , click Scheduled Tasks .
4. In the Scheduled Tasks window, double-click Add Scheduled Task.
5. In the Scheduled Task Wizard , click Next .
6. Click Browse .
7. In the File name dialog box, type % systemroot% system32defrag.exe , and then click Open .
8. Under Perform this task section , click Weekly → Next.
9. Set the time and day of the week you want to run the defragmentation tool for your hard drive. To get the best results, choose when you usually use the device. Next, click Next .
10. Enter the password in both dialog boxes Enter the password and Confirm password , then click Next .
11. Check the Open advanced properties for this task when I dialog box Click Finish , then click Finish .
12. In the Run dialog box, add C: to the currently displayed command. Remember to have a space before ' C: '. Then, click OK .
13. In the Set Account Information dialog box, enter the password in both the Password and Confirm password dialog boxes, then click OK .
Check for errors on the hard drive
If you are using any software that has an error, your computer may have created an error on the hard drive. These errors even slow down the performance of the device. However, Windows can 'save' you in this case with the Check Disk tool. This tool will solve all such errors on the hard drive, making the computer work better.
Once a week, you should run the Check Disk tool. When Check Disk is active, a window will appear. If you're working on a computer when this window is open, you can ignore it. The window will automatically close when the Check Disk tool completes the job.

Note: Users need to login with an administrator account to perform the steps below. If logging in is not an admin account, you can only change the settings that apply to user accounts.
Set up Check Disk to run automatically:
In Windows 7
1. Open Task Scheduler : Click the Start button → Control Panel → Administrative Tools → Task Scheduler. If required to enter an administrator password or confirm, enter the password or provide the required information.
2. Click the Action menu → Create Basic Task.
3. Enter a name for the task and add a description for it (optional). Next, click Next .
4. Perform one of the following actions:
To schedule execution based on a specific time, click on Daily , Weekly , Monthly , or One time - equivalent to daily, weekly, monthly or only once. Next, click Next .
To select a calendar based on a recurring event, click When the computer starts or When I log on , then click Next .
To create a calendar based on a specific event, click When a specific event is logged → Next , select the event log and other information via the drop-down list, then click Next .
5. To schedule a software to start automatically, click Start a program → Next.
6. Click Browse to find the software you want and select Next .
7. Finally, click Finish .
In Windows Vista
1. Open Task Scheduler : Click the Start button → Administrative Tools → Task Scheduler. If required to enter an administrator password or confirm, enter the password or provide the required information.
2. Click the Action menu and select Create Basic Task.
3. Enter a name for the task and add a description for it (optional). Next, click Next .
4. Perform one of the following actions:
- To schedule execution based on a specific time, click on Daily , Weekly , Monthly , or One time - equivalent to daily, weekly, monthly or only once. Next, click Next .
- To select a calendar based on a recurring event, click When the computer starts or When I log on, then click Next .
- To create a calendar based on a specific event, click When a specific event is logged → Next , select the event log and other information via the drop-down list, then click Next .
5. To schedule a software to start automatically, click Start a program → Next .
6. Click Browse to find the software you want and select Next .
7. Finally, click Finish .
In Windows XP
1. Click Start → Control Panel.
2. Click Performance and Maintenance.
3. Under the or pick a Control Panel icon , select Scheduled Tasks .
4. In the Scheduled Tasks window, double-click Add Scheduled Task .
5. In the Scheduled Task Wizard , click Next .
6. Click Browse .
7. In the File name dialog box, type % systemroot% system32chkdsk.exe , and click Open .
8. Under Perform this task , click Weekly . Then, click Next .
9. Set the time and date of the week you want to run Check Disk . Similar to the above 2 tools, users should choose when to use the computer. Next, click Next .
10. Enter the password in both dialog boxes Enter the password and Confirm password , and click Next .
11. Finally, click Finish .
Follow the steps in Task Scheduler to schedule a software to run at a certain time.
Note: Check Disk does not appear in the list of software you choose from Task Scheduler. Therefore, you will have to choose it manually. To select, click Browse . Then navigate to windowssystem32chkdsk.exe . Next, select chkdsk.exe , and click Open .
Schedule tasks
The best way to schedule the above tasks depends on how you use your computer. For example, if you turn off your computer every day, schedule tasks to be performed for a period of time while you're still using the device. Users can do this by editing the Task properties properties described in the steps above. On the Settings tab , check the Run task as soon dialog box as possible after a scheduled start is missed when creating a new task. This will ensure that the tasks will start on the next computer login if you accidentally turn off the computer at the time it is scheduled to run. If you set the computer to Hibernate or Sleep and want to schedule running tasks in these states, in the Conditions tab, check the Wake the computer dialog box to run this task . If you do not want to set these parameters during the initial installation, you can go back and access them via Task Scheduler . Just search for the task in the Task Scheduler Library , and double-click it. Then, the Properties dialog box of the task you choose will appear.

Let Windows do all the work
These automated tasks are the foundation that your computer performance depends pretty much. Fortunately, Windows can do it. Users will no longer have to worry about these tasks anymore. You just need to set up the maintenance task once, automate them and let Windows do the rest.