How to fix Aw Snap error on Google Chrome
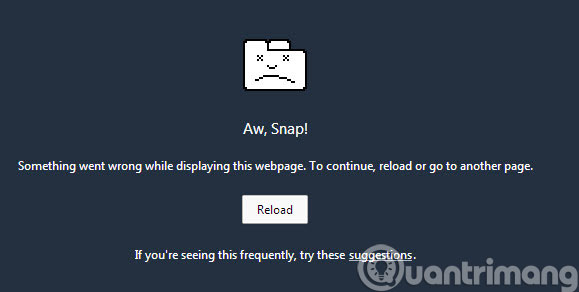
If you are extremely frustrated because you cannot access the website on Chrome Aw, Snap! - Oh, If it's broken, this article's answer will definitely help you fix the error. Aw, Snap! occurs when the website you are trying to access crashes suddenly and you have no other choice but to close your browser.
Here are some causes of this access obstruction:
- Website access is temporarily disconnected from the server
- Incompatible or corrupted extensions
- Browser infected with viruses or malware
- Profile error
- Outdated Chrome version
- Firewall blocks website access
- Memory problem
Let's follow TipsMake to see how to fix each error.
1. Reload the web page
The easiest fix for this problem is to reload the website you are trying to access . Try visiting other websites in a new tab and try reloading the page that's crashing Aw, Snap! .
If other websites also cannot load, you need to close the browser, then reopen it and continue accessing the website that caused the above error. In some cases, this method is also quite effective.
One thing to note is that you need to make sure to close all other tabs before reloading the website you need, because Google Chrome loses a lot of resources when running many tabs at the same time, this may be the cause of this error.
2. Restart your PC
Restarting your PC is a fix for many problems when you use a personal computer, so let's try using this method for our problem. Try fixing Aw, Snap! simply by restarting the device. However, this method may or may not work, depending on your computer system configuration.
If that doesn't work, try loading the page on another PC to check if you have the same problem. If so, you don't need to worry at all because the cause here is related to the website server. Sit back and relax until the website administrator fixes the error.
3. Rule out problems with Internet connection
A weak or unstable Internet connection can prevent Google Chrome from loading pages, leading to the 'Aw Snap!' page crash error. Therefore, it is important to ensure that your Internet connection is working properly. A quick way to test your Internet connection on Windows is to open an application that uses the Internet, such as Microsoft Store, and see if the application loads well.
If there are problems with the Internet, try some of the helpful suggestions to resolve Internet problems on Windows or switch to an alternative network connection.
4. Use incognito windows
When troubleshooting problems with any browser, such as Chrome, an effective method is to load the website in an incognito window. This can help you determine whether the problem is caused by your Chrome configuration alone or by a faulty third-party extension.
To open an incognito window in Chrome, click the three-dot menu icon in the top right corner and select New incognito window . Then, try visiting a few websites and see if they load well.
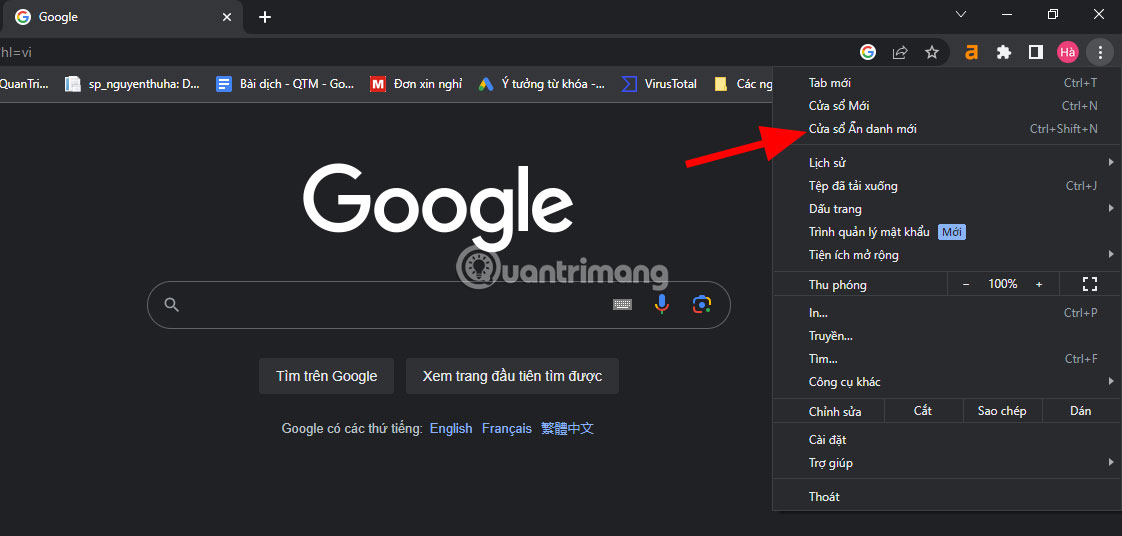
If you don't get the 'Aw Snap!' Furthermore, there is a possibility that the problem is caused by one of the extensions or a corrupt Chrome configuration.
5. Delete Chrome's browsing history
Step 1: Open Google Chrome and press Ctrl+ Hto go to the browser history section.
Step 2: Click Clear browsing data from the left panel.
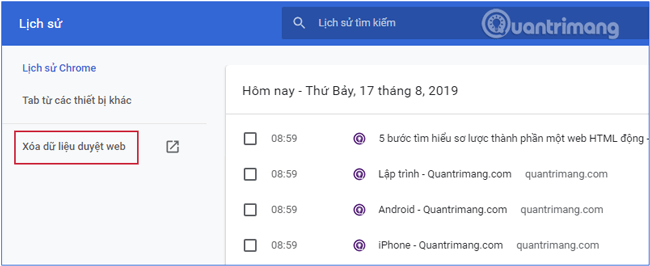
Step 3: Select Time Range as All Time and switch to the Advanced tab.
Step 4: Select to mark and delete the following items:
- Browsing history
- Download history
- Cookies and other site data
- Files and images are stored in cache
- Passwords and other login data
- Data automatically populates forms
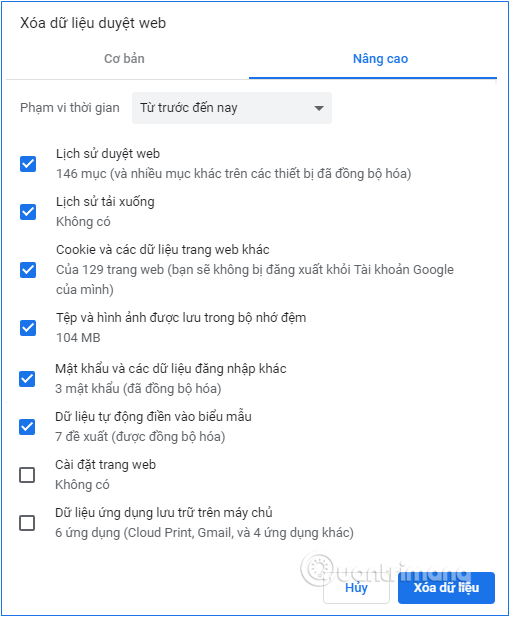
Step 5: Now click Clear data and wait until it finishes.
Step 6: Close your browser and restart your PC. Try visiting the page you want to open again in Chrome.
6. Disable apps and extensions
Step 1: Open your Chrome browser, click on the 3 vertical dots icon in the top right corner of the screen.
Step 2: Click on Other Tools → Extensions.
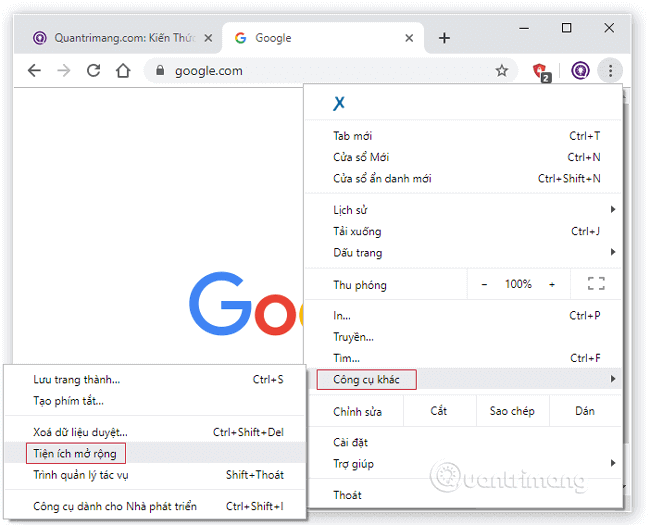
The screen will now display a list of all the extensions that you installed on your browser.
Step 3: Disable all widgets by moving the side slider to the left. If the website accesses normally after the extension is disabled, this is definitely the cause of the error. Re-enable each extension to find the culprit and then remove them using the Remove button.
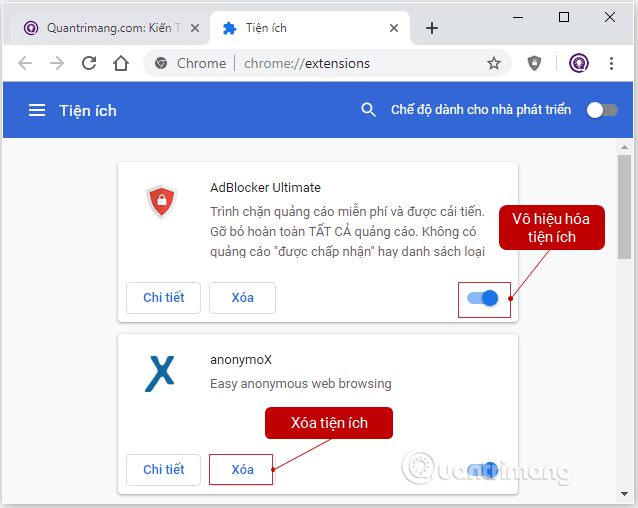
Step 4: Close the browser and reopen it, try accessing the page you want to open again on Chrome.
7. Reset Chrome to factory settings
Step 1: Open your Chrome browser, click on the 3 vertical dots icon in the top right corner of the screen.
Step 2: Click Settings → Advanced .
Step 3: Next scroll down the screen, find and select the Reset and clean option → Restore settings to factory defaults and click Reset settings to return the Chrome browser to its original state. head.
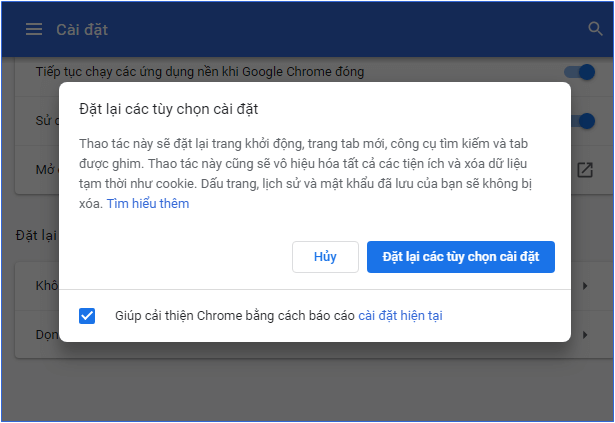
Step 4: Finally, log in to Google Chrome with your Google account and check if the Aw, Snap! has been resolved or not.
8. Update Google Chrome
Step 1: Open your Chrome browser, click on the 3 vertical dots icon in the top right corner of the screen.
Step 2: Click Help → About Google Chrome .
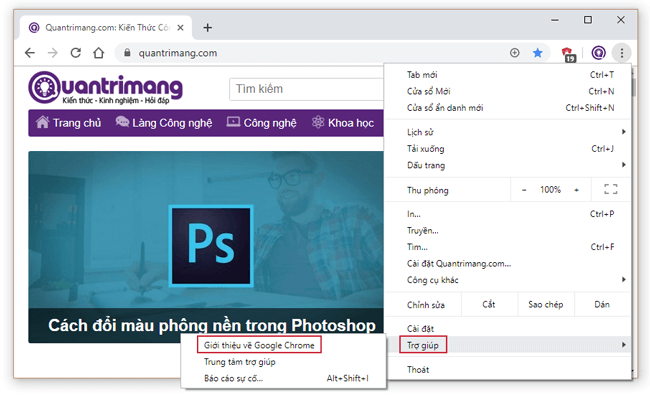
Chrome will check if the current version is the latest and then automatically start the update process if you are using an older version. If your browser is up to date, you will see a notification that Google Chrome has been updated.
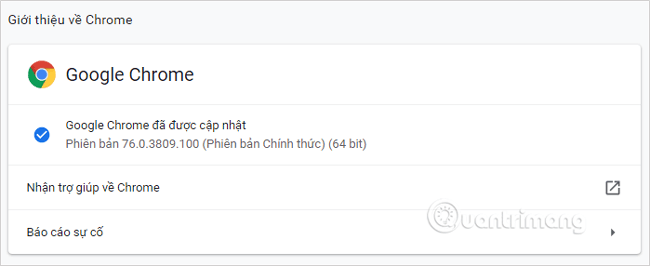
Updating Google Chrome to the latest build can help you Fix Aw, Snap! . Try again with the website you are having problems with
9. Disable hardware acceleration
Step 1: Open Settings in Google Chrome, scroll to the bottom and click on Advanced to display Advanced settings .
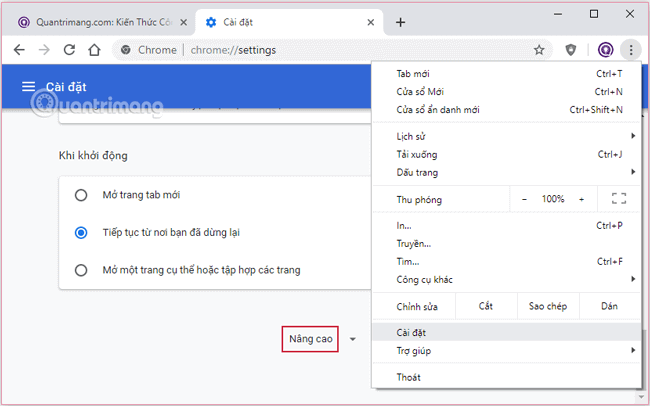
Step 2: Scroll down and find the System section , turn off Use hardware acceleration when available by moving the slider next to it to the left.
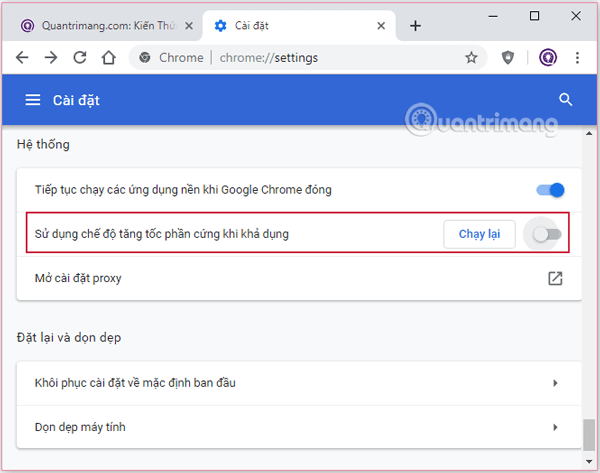
Step 3: Restart Chrome and this will help you fix the Aw, Snap!
10. Use Windows Memory Diagnostic
Step 1: Search for the keyword memoryin your computer's Windows search bar and select Windows Memory Diagnostic in the results that appear.
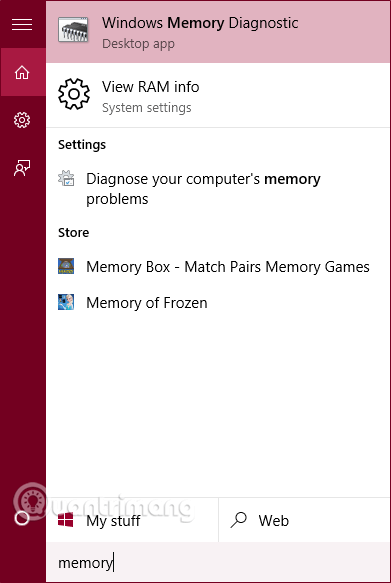
Step 2: In the displayed dialog box, click Restart now and check for problems.
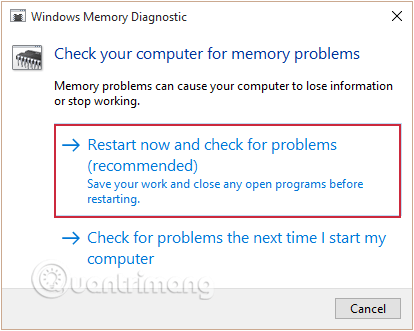
Step 3: Wait a few minutes for Windows to check for possible errors in RAM and hope that is the reason for the Aw, Snap! on your Chrome
Step 4: Restart your PC to save the changes.
11. Temporarily disable Antivirus and firewall
Sometimes firewalls or anti-virus programs can be the cause of Aw, Snap! because it blocks unsafe Web sites so you cannot access them.
If you have applied the above methods and you still cannot fix the error, then try disabling the firewall or anti-virus programs.
Disable firewall
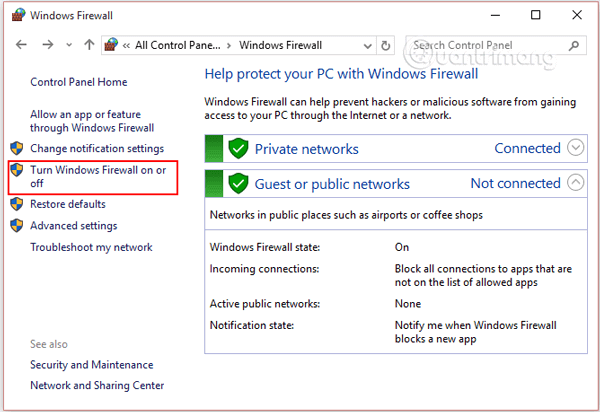
Step 1: Go to Control Panel, select System and Security, find and click Windows Firewall.

Step 2: In the left column of the interface, select Turn Windows Firewall on or off to adjust the firewall settings.
Step 3: Here, you disable the Firewall by checking Turn off for both Private and Public network modes and then OK.
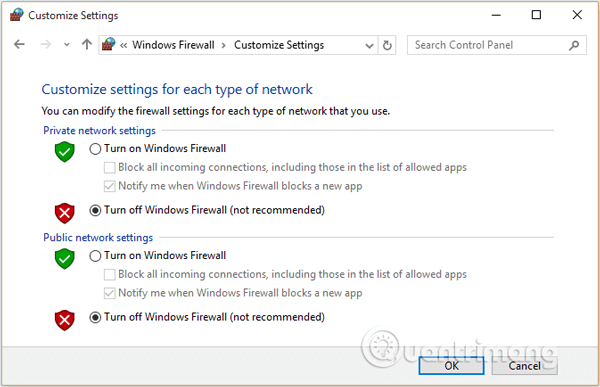
Step 4: Finally restart your browser to check if the error has been fixed or not.
If the above method doesn't work, follow the same steps to re-enable your Firewall.
Disable anti-virus program
Step 1: Right-click the antivirus icon from the system tray and select Disable.

Step 2: Choose the time period to disable the program. You should only disable it for a certain period of time to test if this is the cause of Aw, Snap! or not, in case it is not, the program will automatically turn back on after the specified time has elapsed.
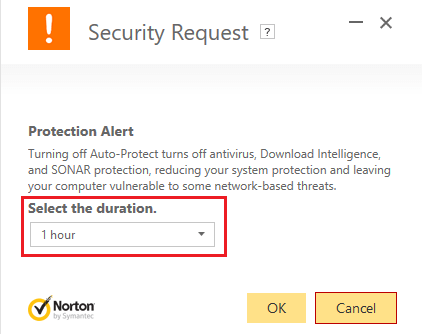
Note: Just choose the smallest amount of time possible, about 15, 30 minutes is the most reasonable.
Step 3: Once completed, try connecting again to open Google Chrome and check if the error is resolved or not.
12. Use Chrome Cleanup Tool to check for malware
It cannot be ruled out that your system is infected with malware and this is the cause of Aw, Snap!. The Google Chrome Cleanup tool helps scan and remove malware that can cause problems with Chrome like the one you're experiencing.
Step 1: Open Settings in Google Chrome, scroll to the bottom and click on Advanced to display Advanced settings.
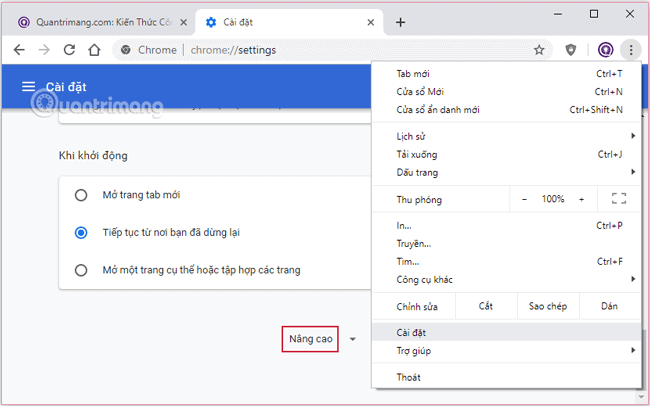
Step 3: Next scroll down the screen, find and select the option Reset and clean → Clean up computer to get to the cleaning tool.

Step 4: If you don't want Chrome to collect information about detected malware and your system settings and processes, uncheck the box below.
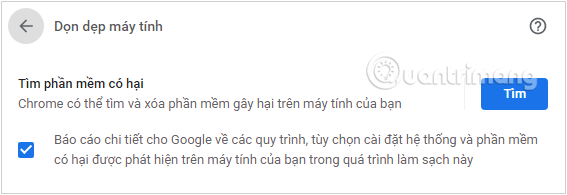
Step 5: To start the tool, click Find.

If Chrome's cleanup tool encounters malware, you'll be notified and can remove it immediately.
13. Create a new User Profile
The main cause of the above Aw Snap error may be due to an error in the user's profile during use. Therefore, the best way is to create a new Profile.
Step 1: Open the Run dialog box with the Windows+ key combination Rand then enter Open the following command line:
%USERPROFILE%AppDataLocalGoogleChromeUser DataStep 2: After the User Data window appears, find the file named Default and delete it. This will delete all your old chrome user data, bookmarks, history, cookies and cache.
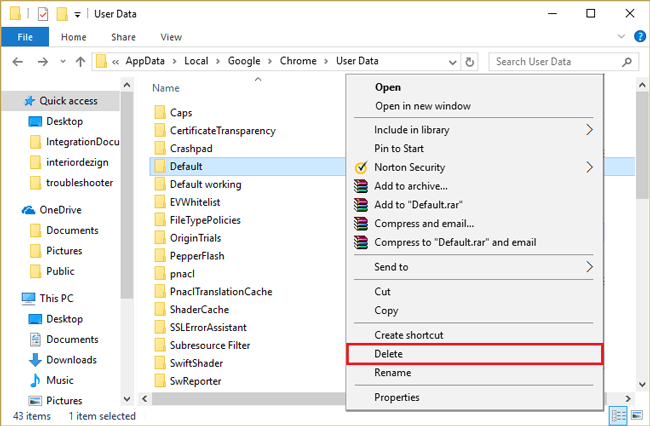
Step 3: Restart Chrome browser similar to method 5 above. At this time, another new Default folder will automatically be created.
Next, try to see if the error is fixed.
14. Turn off Sandbox mode
Be sure to turn off Chrome before doing this.
Step 1: Find the Chrome shortcut on your desktop, then right-click and select Properties.
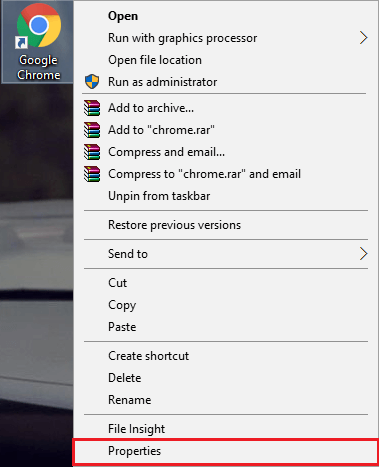
Step 2: Switch to the Shortcut tab and add –no-sandboxor -no-sandboxafter the quotation mark "at the end of the Target box. Note to add a space/space before the added element.
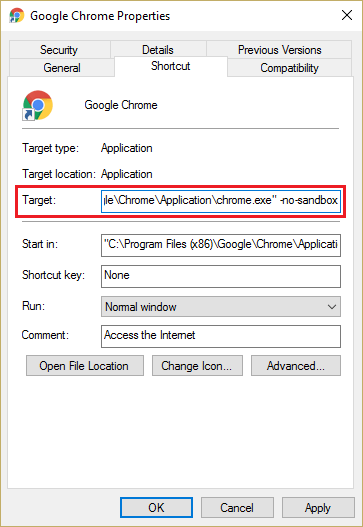
Step 3: Click Apply, then OK.
Step 4: Reopen Chrome with this Shortcut, and now the Sandbox is disabled. Check if the website is accessible.
15. Reinstall Chrome browser
If you've tried everything and still can't fix the error, you need to reinstall Chrome again.
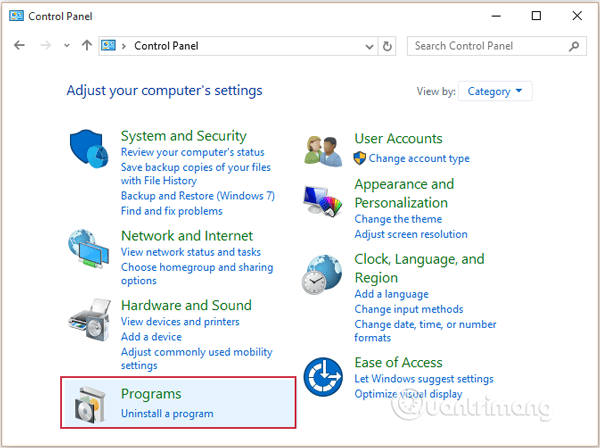
Step 1: Access Control Panel, then find and click Uninstall a program and then uninstall Chrome browser from your computer.
Step 2: Navigate to the following path and delete everything in the folder.
C:Users%your_name%AppDataLocalGoogle 
Step 3: Download the latest version of Chrome browser to your device and install.
Step 4: Restart your computer, then reopen Chrome browser to see if the error persists.
These are the most effective error correction methods. Try each method one by one to see what your problem is. Good luck!
 How to fix 'Network Change Was Detected' error in Chrome
 5 great tools to search for song names through melodies. Did you know?
 Google Chrome does not automatically save passwords, how to quickly fix it
 Uninstalling extensions can improve Chrome performance
 How to reset Edge browser on Windows quickly
 Arc browser officially launched on Windows 11, what's hot?