How to Edit Screenshots on iPhone or iPad
Part 1 of 4:
Taking a Screenshot
-
 Find something that you want to screenshot. Go to a webpage, screen, or item that you want to take a screenshot of.
 - Press the Home button and the Power button together. The Home button is the circular button at the bottom of your iPhone or iPad, while the Power button is the long, thin button in the top-right side of the iPhone or on the top of the iPad. Pressing these buttons at the same time takes a screenshot.
-
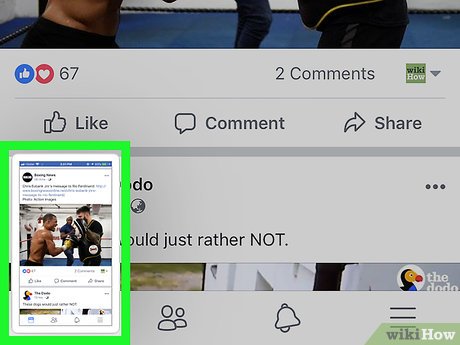
 Wait for the screenshot to appear. After a brief moment, you should see a preview of the screenshot show up in the bottom-left corner of your iPhone or iPad screen.
 -
 Tap the screenshot. It's in the bottom-left corner. Doing so will open the screenshot, from which point you can begin editing it.
Part 2 of 4:
Editing the Screenshot
-
 Crop your screenshot. Tap and drag one of the corners or sides of the blue outline around the screenshot inward.
- You can also place your fingers on the screenshot and pinch them away from each other to zoom in.
- You can revert any change that you make by tapping the backward-facing arrow that's in the top-right corner of the screen.
-
 Draw on the screenshot. Select a pen style at the bottom of the screen, then tap and drag your finger around the screenshot. You have three drawing options available:
- Medium lines - Tap the far-left pen.
- Thick lines - Tap the highlighter-like pen.
- Thin lines - Tap the pencil-like icon.
- You can also erase lines by tapping the pencil eraser icon and then tapping and dragging over lines you've already drawn.
-
 Change the pen color. Tap the white circle near the bottom-right corner of the screen, then tap the color that you want to use and tap the pen icon on the left side of the row of dots.
Part 3 of 4:
Adding Effects
-
 Tap +. It's in the bottom-right corner of the screen.
 -
 Add text to your screenshot. Tap Text in the pop-up menu, tap and hold the "Text" box on the screenshot, tap Edit, and then type in your preferred text.
- You can also tap the text after you've typed it to change the color or font at the bottom of the screen.
-
 Add a signature to the screenshot. Open the + menu again, tap Signature, and use your finger to sign the field at the bottom of the screen. Tap Done to save your signature.
- You can tap and drag the signature around the screenshot.
-
 Magnify part of your screenshot. Open the + menu again, tap Magnifier, and tap and drag your magnifier around the screenshot.
- You can enlarge the screenshot by tapping and dragging the blue dot in or out.
- You can also increase or decrease the magnification by dragging the green dot clockwise or counterclockwise, respectively.
-
 Place shapes in your screenshot. Open the + menu again, then tap a shape at the bottom of the menu to place it in the screenshot.
- You can resize a shape by tapping and dragging the blue dot on it, or you can drag the shape around the screenshot to reposition it.
Part 4 of 4:
Saving the Screenshot
-
 Make sure your screenshot is sufficiently edited. Add any effects, drawings, or alterations that you need to complete your screenshot's editing before continuing.
 -
 Tap Done. It's in the top-left corner of the screen.
 -
 Tap Save to Photos when prompted. This option is at the bottom of the screen. Doing so will save your edited screenshot to your iPhone's or iPad's Photos app.
Share by
Micah Soto
Update 05 March 2020


