How to Take a Screenshot on a Dell
This wikiHow teaches you how to take and save a photo of your screen on a Dell computer. Navigate to a page on which you wish to take a screenshot. Anything that's on your screen (other than your mouse cursor) will be captured when you...
Table of Contents
Method 1 of 3:
Using Windows 8 and 10
-
 Navigate to a page on which you wish to take a screenshot. Anything that's on your screen (other than your mouse cursor) will be captured when you take your screenshot, taskbar included.
- For example, you might open a Facebook conversation you had with a friend.
-
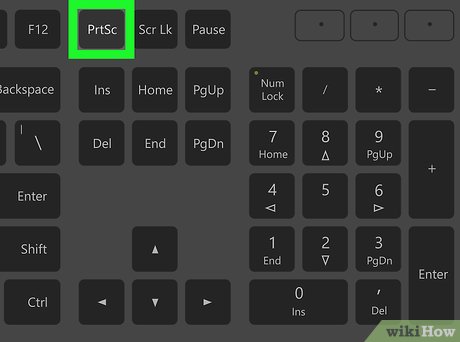
 Locate the ⎙ PrtScr key. The "Print Screen" key is typically found in the upper-right side of Dell keyboards. Unlike other computer manufacturers' keyboards, the "Print Screen" key usually doesn't have anything else written on it.
- The "Print Screen" key may be written a number of different ways, but "PrtSc" and "Prnt Scr" are the two most common variations.
-
 Locate the ⊞ Win key. This key, which has the Windows logo on it, is typically in the bottom-left corner of any Windows computer.
 -
 Press ⊞ Win and ⎙ PrtScr simultaneously. Your screen should dim briefly, indicating that your screenshot was taken.
- If the screen doesn't dim, try holding down ⊞ Win and firmly pressing down on the ⎙ PrtScr key.
-
 Open the Start menu. To do so, either press the ⊞ Win key or click the Windows logo in the bottom-left corner of the screen. The Start menu will open with your mouse cursor in the "Search" field.
 -
 Type screenshots into Start. You'll see a folder entitled "Screenshots" appear at the top of the Start window.
 -
 Click the Screenshots folder. Doing so will open it; you'll be able to find your screenshot inside.
- The Screenshots folder is created in your Pictures folder after you take your first screenshot.
Method 2 of 3:
Using Windows XP, Vista, and 7
-
 Navigate to a page on which you wish to take a screenshot. Anything that's on your screen (other than your mouse cursor) will be captured when you take your screenshot, taskbar included.
- For example, you might open a Facebook conversation you had with a friend.
-
 Locate the ⎙ PrtScr key. The "Print Screen" key is typically found in the upper-right side of Dell keyboards. Unlike other computer manufacturers' keyboards, the "Print Screen" key usually doesn't have anything else written on it.
- The "Print Screen" key may be written a number of different ways, but "PrtSc" and "Prnt Scr" are the two most common variations.
-
 Press ⎙ PrtScr. Doing so will copy an image of your screen onto your computer's clipboard, from which you can paste it into an application that will allow you to save it as a picture.
- Some Dell keyboards have "PrtSc" written in a different color than the regular key color (e.g., white). If so, you'll need to press Fn in the left corner of the keyboard while pressing ⎙ PrtScr.
-
 Open the Start menu. You can do this by clicking either the Windows icon (Windows Vista and 7) or Start (Windows XP) in the bottom-left corner of the screen, or you can press the ⊞ Win key.
 -
 Type paint into the Start menu. You should see the Paint application pop up at the top of the Start menu's window.
- For Windows XP, click All Programs and then select the Accessories tab.
-
 Click the Paint icon. It resembles a cup full of brushes (Windows XP and Vista) or a painting palette (Windows 7).
 -
 Hold down Ctrl and press V. This will paste your screenshotted image into Paint.
 -
 Click File. It's in the top-left corner of the Paint window.
 -
 Click Save. This will prompt a window wherein you can name your file.
 -
 Type in a name, then click Save. Doing so will save your screenshot to your computer's default save location, which is usually the Documents folder.
- You can change the save location by clicking on a folder in the left-hand sidebar.
Method 3 of 3:
Using the Snipping Tool
-
 Open the Start menu. To do so, either press the ⊞ Win key, or click the Windows logo in the bottom-left corner of the screen.
- The Snipping Tool is not available for Windows XP.
-
 Type snipping tool into Start. This will pull up the Snipping Tool icon at the top of the Start window.
 -
 Click the Snipping Tool's icon. It resembles a pair of scissors. Doing so will open the Snipping Tool app.
 -
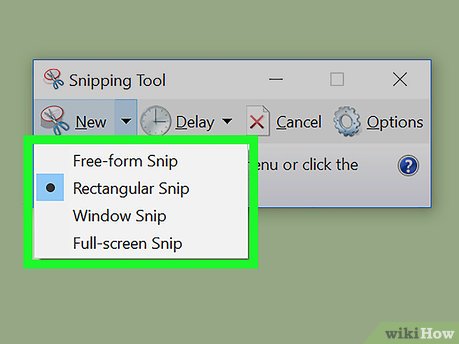
 Click Mode or ▼. This will prompt a drop-down menu with the following screenshot shape options:
- Free-form Snip – This lets you draw any shape with your mouse. The inside area of the shape will be captured for the screenshot.
- Rectangular Snip –This is the default shape, and lets you draw a box of any proportions to use as the screenshot.
- Window Snip – This takes a screenshot of a specific window, much like holding Alt and pressing Print Screen. You will be able to select which window you want to use.
- Full-screen Snip – This takes a screenshot of the entire screen, but doesn't show the Snipping Tool window.
-
 Click a shape. It will be applied to your screenshot template.
 -
 Change the border. By default, all snips will have a red border around them. You can change this by clicking the Options button. This will open a new window, allowing you to disable the border or change the color.
 -
 Click New. It's on the left side of the Snipping Tool bar. Your screen will dim, and your mouse's cursor will turn into a crosshair.
 -
 Click and drag your mouse across the screen. As you do so, a rectangle will appear and encompass your selected area.
- If you selected Full-screen Snip, clicking New will take the screenshot.
-
 Release the mouse button. This will take a screenshot of anything within the rectangular area.
 -
 Click File. It's in the top-left corner of the screenshot's page.
 -
 Click Save as. This option is near the middle of the drop-down field.
 -
 Type in a name, then click Save. Doing so will save your screenshot to your computer's default visual media save location, which is typically the Pictures folder.
- You can change the save location by clicking on a folder in the left-hand sidebar.
Was this article helpful?
Your feedback helps us improve.
Related Articles
 How to take a screenshot of Dell laptop2 minutes read
 How to screenshot Dell laptop for all Windows generations from XP to 106 minutes read
 Take a screenshot of a Dell laptop, take a screenshot of a Dell computer8 minutes read
 How to take screenshots of Dell computers you need to know6 minutes read
 How to Take a Screenshot on a Dell Computer7 minutes read
 How to take a screenshot on Windows 117 minutes read
Reader Comments 0
Sign in with email or Google to join the discussion.