How to edit and enhance screenshots with MS Paint
While hoping to have a favorite tool for both capturing and editing screenshots, sometimes you feel confused and wondering how to edit screenshots in Microsoft Paint.
Table of Contents
Taking screenshots is a basic but important computer skill that all users should have. And while hoping to have a favorite tool for both capturing and editing screenshots, sometimes you feel confused and wondering how to edit screenshots in Microsoft Paint.
While not ideal, TipsMake.com will show you how to perform basic screenshot editing in MS Paint. Knowing how to do this is useful in case you use a friend's or someone's computer and can't install anything.
Basics of taking screenshots on Windows
Before learning how to edit screenshots on a PC, you need to know how to take screenshots in the first place. The most basic method involves Microsoft Paint.
First, press the Print Screen key (possibly abbreviated to PrtScn or similar on your keyboard) to copy everything on the desktop to the clipboard. If you have multiple screens and just want to take a screenshot of the current screen, press Alt + PrtScn instead.
Next, open Microsoft Paint. You can do this easily by opening the Start menu and typing 'paint' to search for the program.
Once you've opened Paint, just press Ctrl + V (the common shortcut key for pasting) to place the screenshot into Paint. If you don't need to edit the print screen output, simply press Ctrl + S (or go to File> Save as ) to open the Save dialog box and name the image.

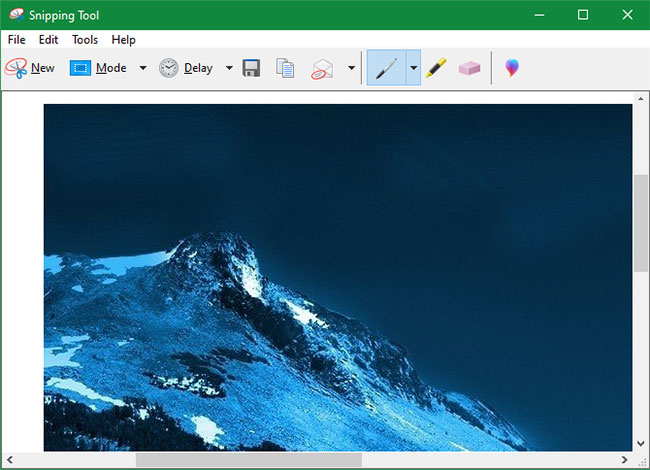
If you want a slightly more powerful but still built-in tool for taking screenshots, try the Snipping Tool . Enter snipping into the Start menu to find it. Instead of capturing your entire screen with PrtScn , this tool allows you to select an area or window on the screen to capture. Doing so to cut down on editing screenshots needs to be done later.
In future versions of Windows 10, the Snipping Tool will switch to the new Snip & Sketch application. You can access it with the keyboard shortcut Win + Shift + S
How to edit screenshots in Microsoft Paint
Now, let's learn some common screenshot editing forms that you should know how to do in Paint. This section shows how to edit screenshots on Windows 10, but these methods also work in previous versions.
How to crop screenshots
Chances are, when you capture the entire window in your screenshot, you don't want to show all the windows. Crop is an easy solution for this.
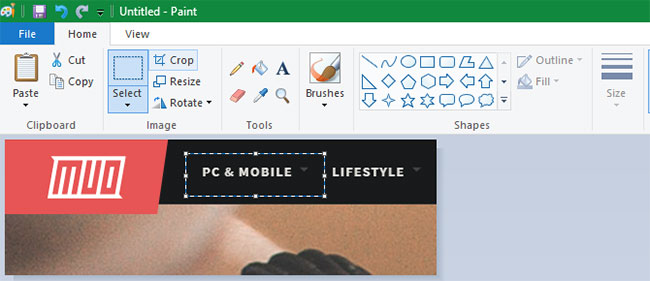
To crop the screenshot, simply select the Select tool from the Ribbon. If you don't see this tool, double-click the Home tab to open it.
The default is a rectangular selection; Click the arrows below to change that. Drag the mouse over the area you want to keep, then click the Crop button on the top bar to crop the image correctly by selecting it.
If you prefer to cut from the edges, grab one of the white boxes on the bottom, right or bottom right of the canvas in Paint. You can drag this to easily trim unwanted bits from the edges. If you drag the edges out, you will make the canvas bigger.
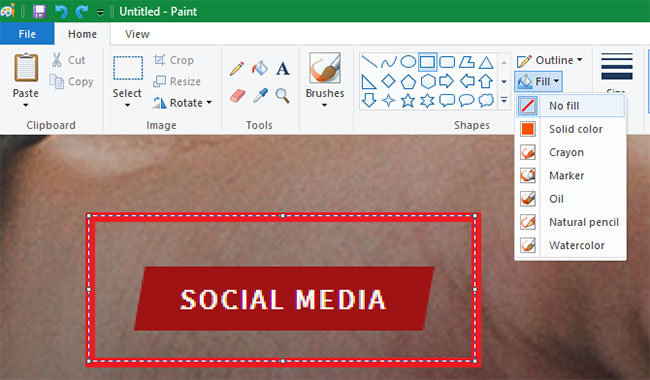
Highlight elements using boxes
An easy and non-annoying way to highlight certain parts of a screenshot is to use boxes. Paint has them built in on the Shapes section of the Ribbon.
First, select the rectangular or rectangular option with rounded corners. Next, under Outline, choose Solid color and set Fill to No fill. Select the thickness ( Size ) for the outline and a color to the right of it. Red is generally a good color to attract attention.
From there, drawing the box wherever you want is simple. Hold Shift as you draw to create a perfect square. After selecting a location, you can use the white boxes on each side to resize the shape. Press Ctrl + Z to undo and try again if you set the execution incorrectly.
Add arrows to screenshot
If the box is not the right option, the arrow can help you point out something in the screenshot. Because they are in the same Shapes menu , they work just like the boxes above.
Choose one of the 4 arrows based on the direction you need, then choose the line size and color for them. With the arrow, you can choose Solid color under Fill to make the arrow easier to see. Paint will use Color 2 as the fill color, so make it the same as Color 1 for consistency.

Like the box, just use your mouse to draw an arrow. Hold Shift to keep it symmetrical.
How to blur screenshots using Paint
Typically, screenshots contain sensitive information, such as serial numbers or photos of friends you want to delete before sharing. Paint does not have a simple solution to blurring the image, but you can do it manually.
The easiest way to do this neatly is to use the Select tool to highlight the area you want to hide. Grab one of the small handles at the corner of the image, shrink the selection down and let go. Then, using the same handle, resize the selection to its original size.
After you do this, the text or image will be blurred and unrecognizable. The smaller you make the selection, the more it will become blurred. If not satisfied, press Ctrl + Z and repeat the whole process.
If you don't like this method, you can use a rectangle or something else from the Shapes tool and simply paint over the sensitive parts to blur them out. For best results, you should use the Eyedropper tool to make the box the same color as the background.
How to add text to the screenshot
Sometimes you may need to add some text on the screenshot for further instructions. Paint makes this easy with the Text tool , indicated by the letter A on the Ribbon. Select it, then click on the image where you want to place some text.
When clicked, you will see a text box and can start typing immediately. By default, it may be preset a small font size that you cannot see, so you will want to use the Text tab that appears on the ribbon to change it.
Here, you can adjust the font and its size, choose a transparent or translucent background and change the text color. To change the properties of existing text, press Ctrl + A to select all, then make adjustments. Click and drag the box around the text to move it or use the handle to resize it as needed.
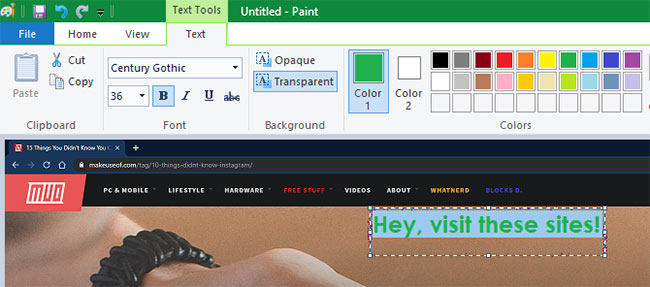
Be careful during this process, because once you click on the text box, Paint will keep the changes permanent. You cannot move it later, so you will need to press Ctrl + Z and try again if not done correctly.
How to resize and rotate screenshots
If you need to create more space for screenshots or want to adjust the entire image, you can use the Resize and Rotate buttons on the Image section .
With the frame rate maintenance box selected, the Resize tool allows you to shrink the image size without significantly reducing quality. You can choose to resize as a percentage or in absolute pixels.
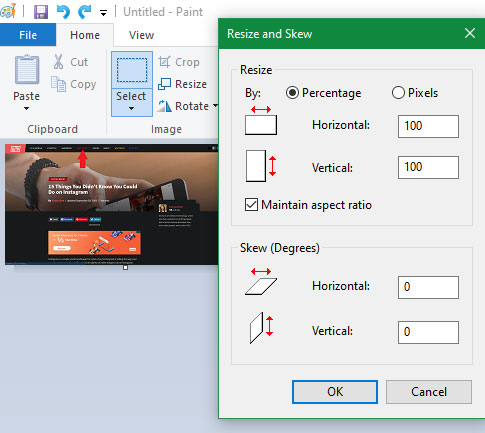
The Rotate and Skew tools are not useful for editing screenshots, but they are available if you need them.
Save the screenshot
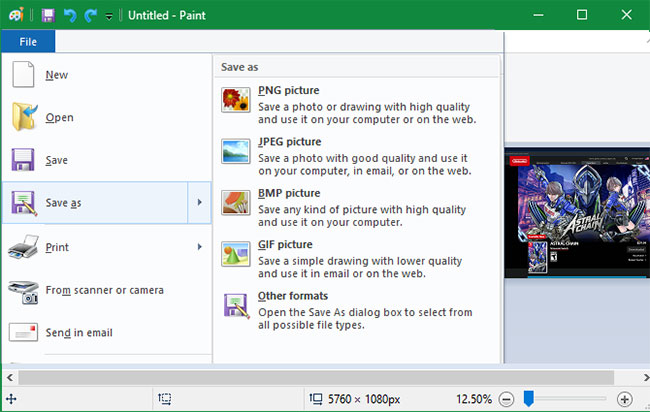
After editing is complete, the final step is to save the screenshot. Like most image editors, Paint offers you several file format options.
In general, you can always choose PNG or JPEG. PNG images are of a higher quality, but take up more storage space. JPEG images are more spatially effective but are often distorted.
Unless you need the smallest file size possible, you should save the screenshot as PNG for best quality. You can always make a JPEG copy to share later.
The article examined the basic principles of how to edit screenshots on PC using MS Paint. While it may work when you don't have any other options, it's best to switch to better tools for taking and editing screenshots if you're constantly working with them.
The preeminent screenshot tools give you more ways to take screenshots and make common editing operations, like blur, much simpler.
Check out the best screen capture tools for Windows and the best free photo editing software on your computer to upgrade in both ways.
Hope you are succesful.
Was this article helpful?
Your feedback helps us improve.
Related Articles
 Learn how to use Paint to edit photos on Windows25 minutes read
 Instructions on how to use Paint to draw and edit images on the computer11 minutes read
 How to use Paint 3D to edit images6 minutes read
 How to Edit in Paint6 minutes read
 3 Quick Ways to Take Screenshots in Windows 83 minutes read
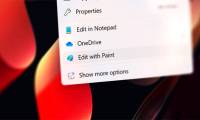 How to Remove 'Edit with Paint' Option in Windows 114 minutes read
Reader Comments 0
Sign in with email or Google to join the discussion.