Complete the Photos app on iPhone / iPad - Part 4: Edit photos
Summarize tips and tricks when using Photos app on iPhone and iPad. Part 4 will guide how to cut, rotate, edit photos, add effects to photos on applications Photos iPhone / iPad and how to delete red eyes when taking photos on iPhone / iPad.
Through 3 parts of the Series we have learned quite a lot of good features of Photos app on iPhone and iPad such as positioning photos, photo albums and anniversary features (Memories). Coming to the 4th part of the Complete Series of Photos app on iPhone / iPad, quantrimang.com will show you how to edit photos, add effects to photos on Photos app, as well as how to delete the eye phenomenon Red when taking photos with Flash.
- Part 1: Complete the Photos app on iPhone / iPad - Part 1: Positioning and Album
- Part 2: Complete on Photos apps on iPhone / iPad - Part 2: Anniversary features (Memories)
- Part 3: Complete the Photos app on iPhone / iPad - Part 3: Photo editing
V. Edit photos in Photos app on iPhone / iPad
When taking photos, most of us have errors such as tilted images, the frame is too big or too small, the color is too dark or too bright, the eyes are red when using flash . So Apple provided some photo editing tools in Photos app, allowing users to rotate, crop, scale images, adjust colors, apply effects to photos or even remove red eyes when using flash quickly and easily. As a result, you can make your photos more balanced and beautiful at will.
1. How to rotate photos in Photos app on iPhone / iPad
Image rotation mode is especially useful in case you accidentally take photos in the wrong way you want.
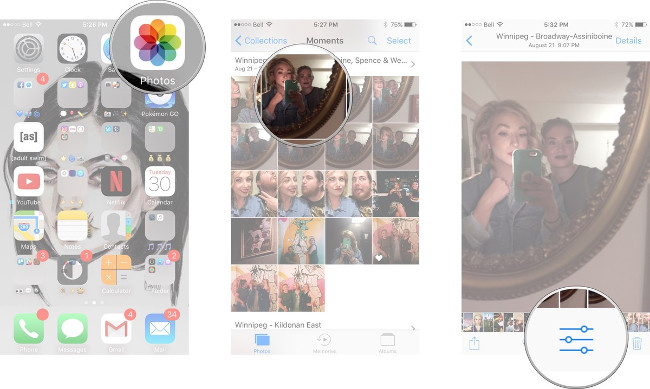
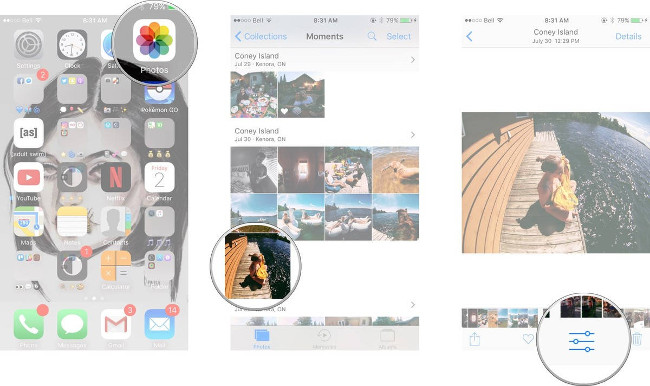
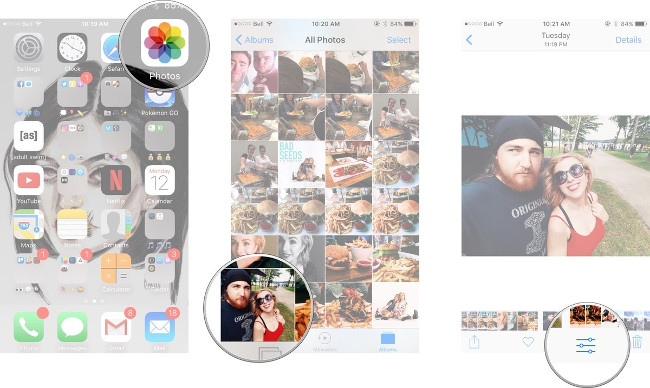
- Open the Photos app at the main screen of the iPhone / iPad.
- Find the picture you want to rotate, then open it.
- Click on the icon with 3 dots located on 3 small parallel lines at the bottom of the screen.

- Clicking on the icon like the square has 2 arrows around.
- Continue to click the image rotation icon with a white square and an arrow rotate counterclockwise. Continue to press until the image has been rotated according to what you want.
- Click Done .
2. Straighten photos in Photos app on iPhone / iPad
For photos that you take that are tilted, you can correct them by:
- Open the Photos app at the main screen of the iPhone / iPad.
- Find the picture you want to straighten it, then open it.
- Click on the icon with 3 dots located on 3 small parallel lines at the bottom of the screen.
- Clicking on the icon like the square has 2 arrows around.
- The screen will display a ruler and the application will automatically rotate the image for you.
- If you feel unsatisfied, rotate by your own will by touching the ruler and moving it to the left or right.
- After you are satisfied, click Done .

If you want the image to return to its original state, click Reset (reset) before clicking Done .
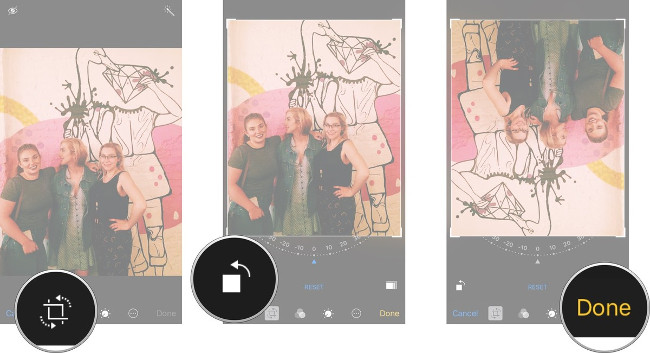
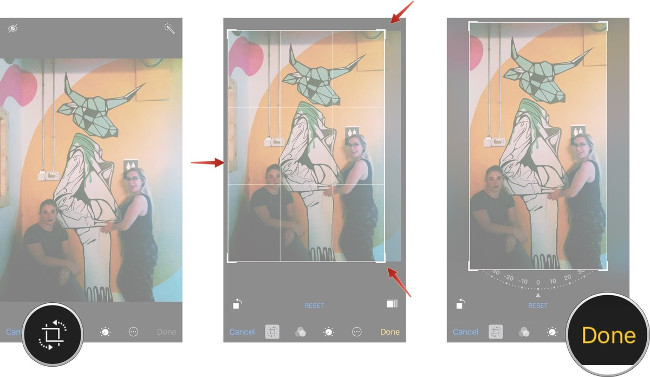
3. How to crop photos in Photos app on iPhone / iPad
If you feel your photos have unbalanced layouts, there are no accents. Please use the cropping feature in Photos app.
- Open the Photos app at the main screen of the iPhone / iPad.
- Find the photo you want to cut, then open it.
- Click on the icon with 3 dots located on 3 small parallel lines at the bottom of the screen.
- Clicking on the icon like the square has 2 arrows around.
- The screen will show 4 white photo corners. Click on any corner of the image then drag in or out until you feel satisfied.
- Click Done to crop the image.
4. How to proportionalize Photos in Photos app on iPhone / iPad
- Open the Photos app at the main screen of the iPhone / iPad.
- Find the photo you want to cut, then open it.
- Click on the icon with 3 dots located on 3 small parallel lines at the bottom of the screen.
- Clicking on the icon like the square has 2 arrows around.
- Continue clicking on the rectangular icon with 2 smaller rectangles inside the bottom right of the screen.
- Select the ratio of the image you want to cut.
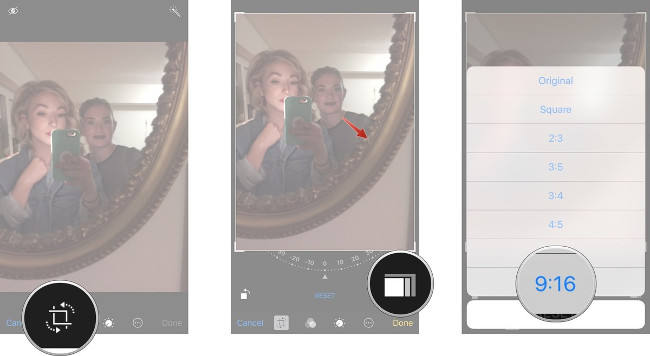
- Place your hand in the center of the image and pull it so that it is balanced.
- Click Done after feeling satisfied.

5. How to adjust the color, brightness, contrast of images automatically in Photos app on iPhone / iPad
- Open the Photos app at the main screen of the iPhone / iPad.
- Find the photo you want to adjust, then open it.
- Click on the icon with 3 dots located on 3 small parallel lines at the bottom of the screen.
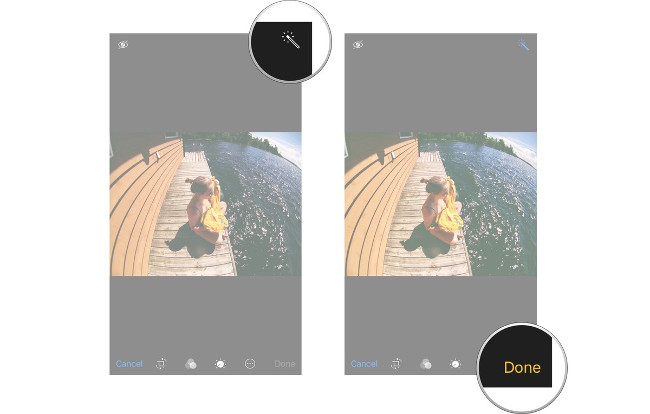
- Click on the magic wand-shaped icon located in the upper right corner of the screen to automatically adjust the color, brightness and contrast for you.
- You can click on the image to view the original image.
- Click Done if you are satisfied.
6. How to adjust the image brightness in Photos app on iPhone / iPad
- Open the Photos app at the main screen of the iPhone / iPad.
- Find the picture you want to adjust the brightness, then open it.
- Click on the icon with 3 dots located on 3 small parallel lines at the bottom of the screen.
- Click on the sun-shaped icon at the bottom of the screen.
- Choose Light .
- Drag the small red bar to the right and left to adjust the brightness of the image.
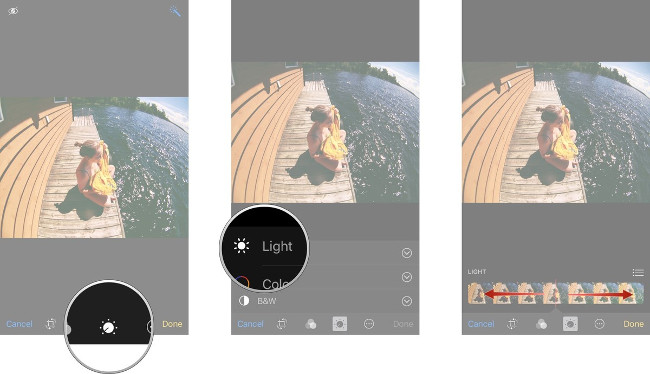
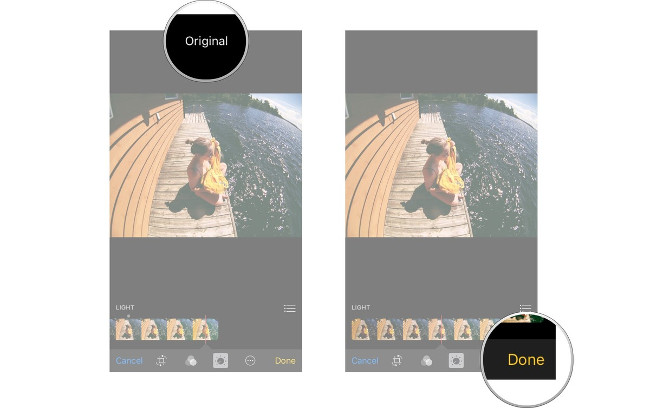
- If you want to compare with the original image, press and hold the image.
- Click Done if you are satisfied.
7. How to adjust the color of photos in Photos app on iPhone / iPad
- Open the Photos app at the main screen of the iPhone / iPad.
- Find the picture you want to color, then open it.
- Click on the icon with 3 dots located on 3 small parallel lines at the bottom of the screen.
- Click on the sun-shaped icon at the bottom of the screen.
- Select Color.
- Drag the small red bar to the right and left to adjust the color of the image.
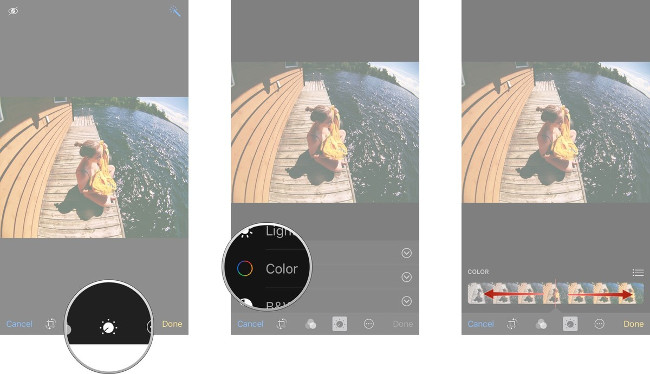
- If you want to compare with the original image, press and hold the image.
- Click Done if you are satisfied.
8. How to convert images into black and white images in Photos app on iPhone / iPad
- Open the Photos app at the main screen of the iPhone / iPad.
- Find the image you want to turn into black and white, then open it.
- Click on the icon with 3 dots located on 3 small parallel lines at the bottom of the screen.
- Click on the sun-shaped icon at the bottom of the screen.
- Choose B&W (D&T) .
- Drag the small red bar to the right and left to adjust the image's black and white.
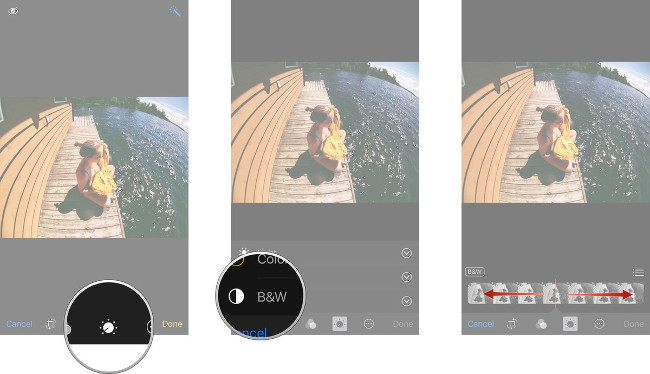
- If you want to compare with the original image, press and hold the image.
- Click Done if you are satisfied.
9. How to adjust advanced brightness, color or black and white of Photos in Photos app on iPhone / iPad
- Open the Photos app at the main screen of the iPhone / iPad.
- Find the photo you want to adjust, then open it.
- Click on the icon with 3 dots located on 3 small parallel lines at the bottom of the screen.
- Click on the sun-shaped icon at the bottom of the screen.
- Click the down arrow icon located on the right side of Light ( Color ) , Color (color) or B&W (D&T) .
- Select the item name you want to adjust (brightness, contrast, saturation .).
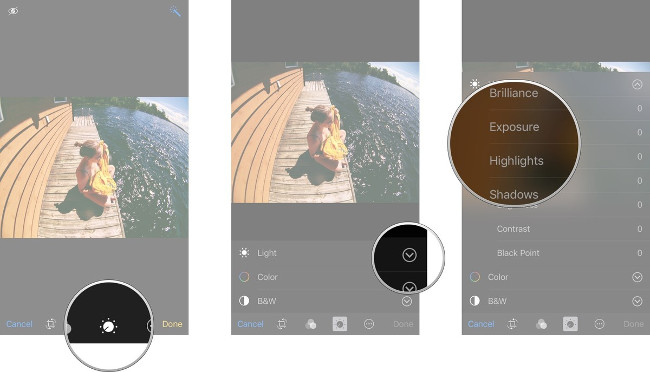
- Drag the small red bar to the right and left to adjust the level you want.
- If you want to compare with the original image, press and hold the image.
- Click Done if you are satisfied.
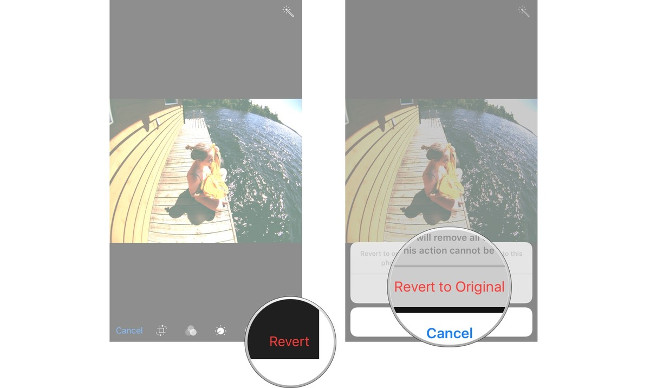
10. How to restore the edited image to the original image in the Photos app on iPhone / iPad
- Open the Photos app at the main screen of the iPhone / iPad.
- Find the image you want to restore to the original image, then open it.
- Click on the icon with 3 dots located on 3 small parallel lines at the bottom of the screen.
- Click on the word Revert (recovery) at the bottom right of the screen.
- Select Revert to Original (restore to the original image) .
11. How to use the filter function (color filter) available in Photos app on iPhone / iPad
For previous iOS versions, Photos apps do not have filters, so users have to use other third-party apps to filter colors and add photo effects to make your photos look better with Light and different tones. However, with the recent improvements of Camera Apple, we can use this function right in Photos app on iPhone / iPad.
Reference: What is a filter? How to use Filter in photography?
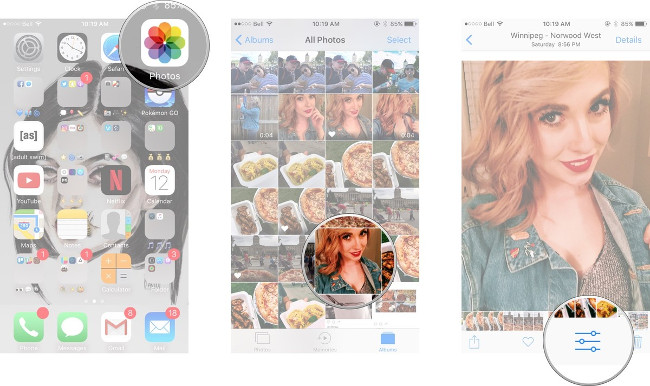
- Open the Photos app at the main screen of the iPhone / iPad.
- Find the picture you want to edit, then open it.
- Click on the icon with 3 dots located on 3 small parallel lines at the bottom of the screen.
- Click on the Filters icon with 3 circles intersecting.
- Select the effect you want to add to the photo.
- Click Done.
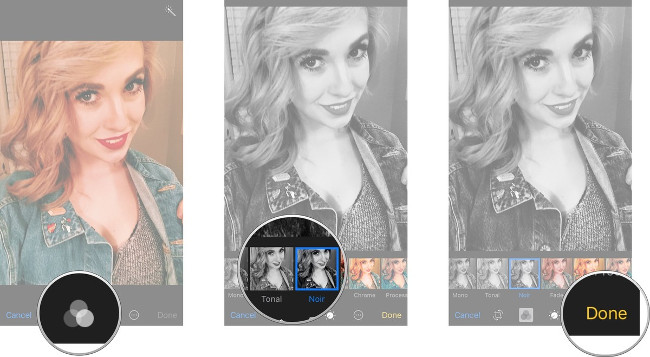
If the effects inside the Photos app do not satisfy you, you can download some other photography apps on the App Store to use.
12. How to delete red eyes when using flash in Photos app on iPhone / iPad
Using Flash when taking photos will be useful in some cases, but sometimes its consequences will be to leave red eyes in the picture. That's why Apple has released red-eye detection and deletion in recent iOS versions. And especially, you won't be able to use this feature if there are no red eyes in the image.
- Open the Photos app at the main screen of the iPhone / iPad.
- Find the picture you want to edit, then open it.
- Click on the icon with 3 dots located on 3 small parallel lines at the bottom of the screen.
- Click on the eye-shaped icon with a diagonal across.
- Click the red eye inside the picture.
- Click Done.
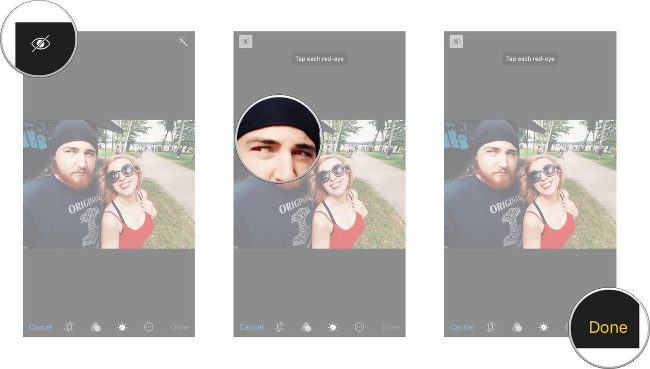
At this time, the application will automatically fix "red eye" disease in the picture for you. No need to worry when shooting Flash anymore!
(continue)