Table of Contents
This practical guide explains how to download and Install Fonts on Windows 11 Simply in a clear sequence, including preparation, key settings, common mistakes, and troubleshooting steps.
What This Guide Covers
- Instructions for downloading and installing additional Fonts for Windows 11
- 1. Install fonts on Windows 11 via Microsoft Store
- 2. Install fonts on Windows 11 via Settings
Like Windows 10, Windows 11 also provides many ways to install new fonts, install full fonts via Microsoft Store, Settings and File Explorer. Each method has its own advantages and disadvantages, you can choose the method according to your specific needs.
Instructions for downloading and installing additional Fonts for Windows 11
1. Install fonts on Windows 11 via Microsoft Store
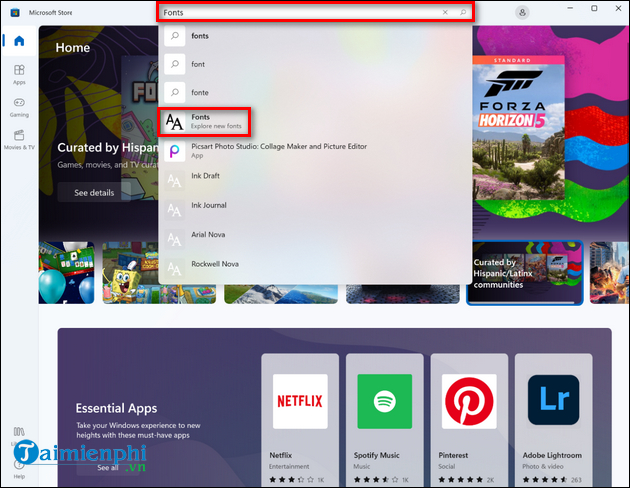
Step 1: Enter the keyword Microsoft Store into Windows Search and click on the corresponding search result. Step 2: In Microsoft Store , enter the keyword Fonts in the search bar and click Fonts - explore new fonts from the search results.
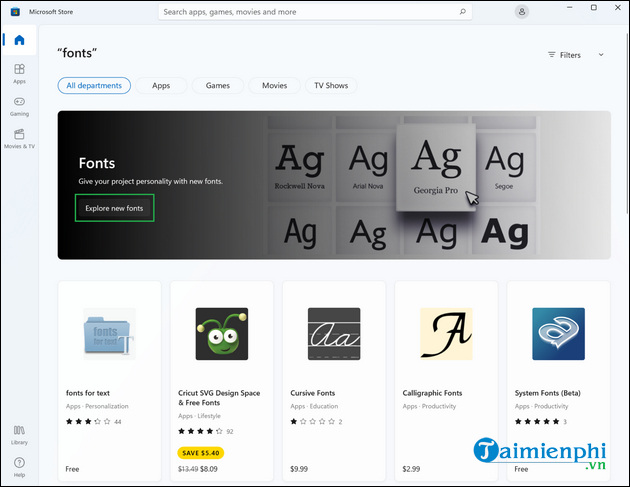
Step 3: You will see many different fonts to choose from, including free and paid.
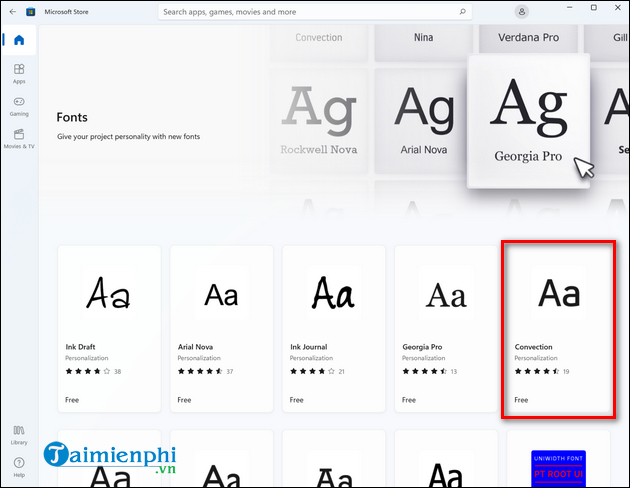
- Choose any font you like, such as Convection.
Step 4: Next, click the Free button to download the font.
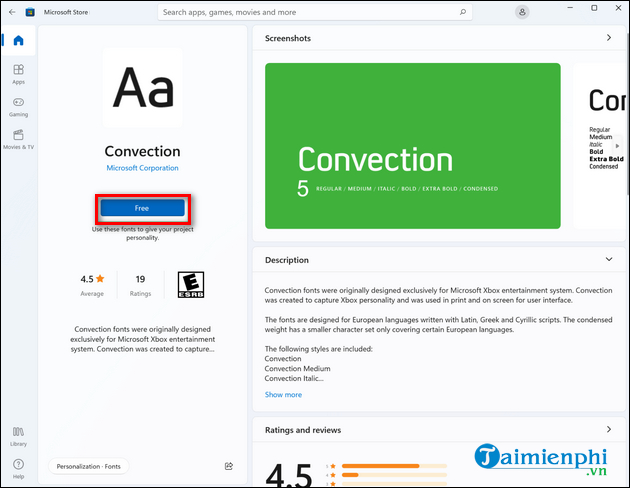
Step 5: After the new font has been downloaded, the previous Free button will change to the Launch button . Click the Launch button to install the font. That's it, your new font is now ready to use in Microsoft Office applications.
2. Install fonts on Windows 11 via Settings
In addition to the Microsoft Store, you can also download and install fonts for Windows 11 from external sources. There are many websites that offer free fonts and professional fonts. The problem is that you need to find a reputable address to avoid downloading malicious files. In this article, TipsMake will use Google Fonts - Google's diverse font library, providing hundreds of different fonts. You can download Google Fonts from the download link provided below.
- Download Google Fonts here. - After downloading the font you want to your computer, follow the steps below: - Note: If the downloaded file is compressed (possibly a ZIP file), you will have to decompress it before installing. put.
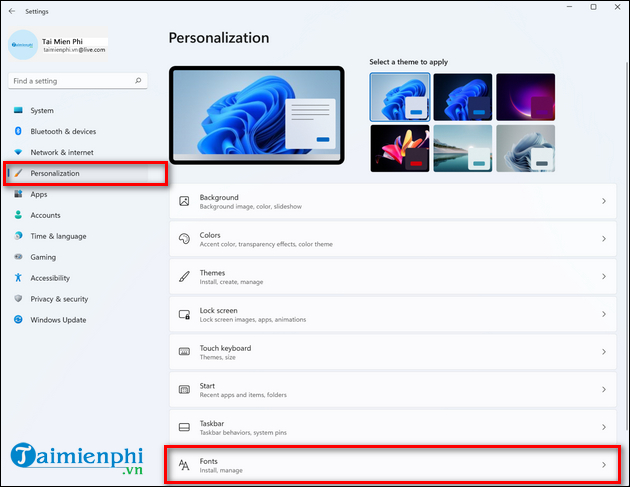
Step 1: Click on the Windows icon on the taskbar and select Settings or press the keyboard shortcut Windows + I to open Settings . Step 2: Select Personalization in the left panel and Fonts in the right panel. Another way to access the Personalization section in Settings is to right-click on the Desktop and select Personalize.
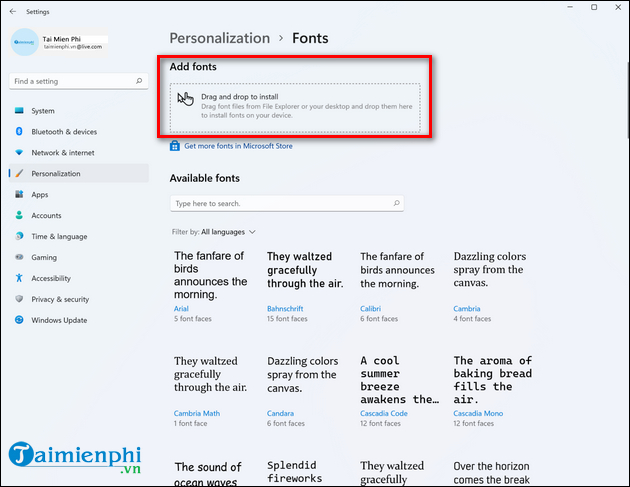
Step 3: Drag the downloaded (and extracted) font into the Drag and drop to install area under Add fonts.
Note: You can't drag and drop an entire folder, but you can select multiple files within the folder and drop them into the designated area to install your new font.
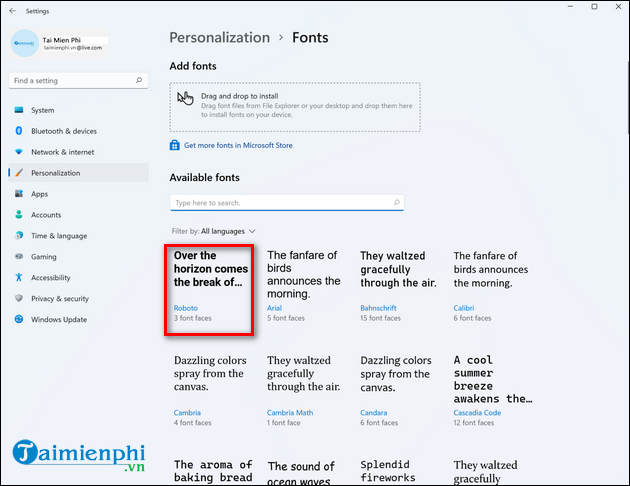
Once installed, the new font will be displayed as the first option in the list of installed fonts under Available fonts.
3. Install fonts on Windows 11 via File Explorer
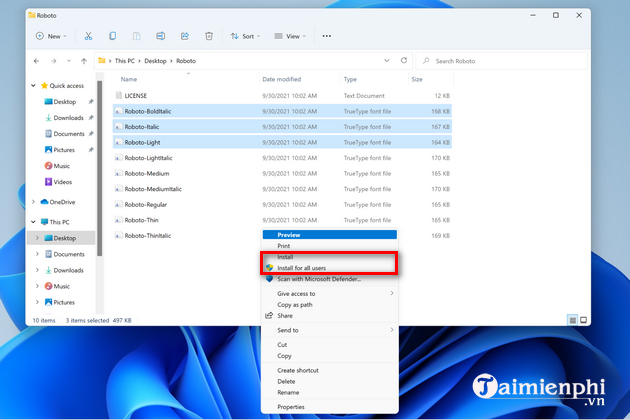
How to install fonts on Windows 11 via File Explorer is similar to via Settings. You do the following:
Step 1: Download the font you want and extract the file if necessary. - Download beautiful fonts here.
Step 2: Select all files or just font files as desired.
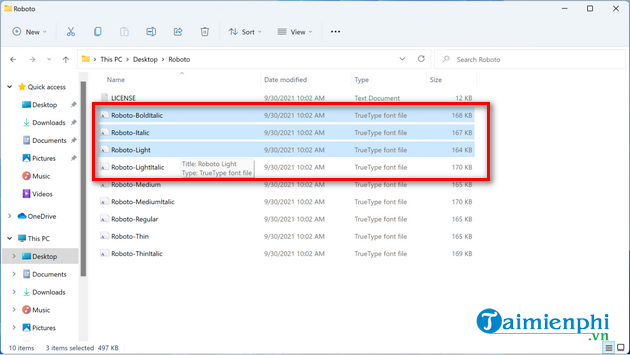
Step 3: Right-click on the files and select Show more options > Install (or Install for all users ) to install the font on Windows 11.
As you can see, installing fonts on Windows 11 is not difficult. You can choose any of the methods shared in the article to download and install new fonts on your computer. Or you can reset Windows 11 to its original state to reinstall it to your liking.
Final Thoughts
Use the instructions and checks above in order, verify the result after each major step, and keep a backup whenever the process changes important files or system settings.
FAQ
What should I check before starting?
Confirm that your device or software version matches the instructions, save important data, and note the original settings before making changes.
What should I do if the steps do not work?
Restart the app or device, install available updates, review any error message, and repeat the steps carefully in the same order.
Can I undo the changes?
Many changes can be reversed, but the exact method depends on the feature. A backup or restore point gives you the safest way to recover.
Related Articles
 How to Install and Remove Fonts on Mac: Install Fonts on Mac11 minutes read
 How to Install Fonts on Windows Simply and Quickly4 minutes read
 How to Download Fonts7 minutes read
 How to Install and Uninstall Fonts on Windows 11: Step-by-Step Guide5 minutes read
 How to Download Fonts on Dafont4 minutes read
 How to Download, Install and Use Google Fonts on Ubuntu5 minutes read
Reader Comments 0
Sign in with email or Google to join the discussion.