How to Create an Animated GIF Image with GIMP
Animated GIF images can be found all over the Internet. They are used in buttons, links, icons, backgrounds, dividers, and banner ads, these eye-catching images can be an excellent tool for personal expression. This wikiHow teaches you the...
Table of Contents
Part 1 of 2:
Creating Frames For Your Animation in GIMP
-
 Open GIMP. GIMP is a free and open-source image editing program that has similar tools to Photoshop. GIMP has an icon that resembles a fox with a paintbrush in its mouth. Click the icon in your Windows Start menu, or Applications folder on Mac and Linux.
- You can download and install GIMP for free from gimp.org.
-
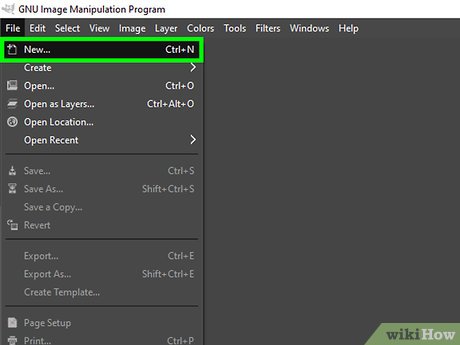 Create a new file. The size of the file you create depends on it's intended use. Banner advertisements are generally between 60 and 120 pixels tall and 400 to 800 pixels wide. Buttons are usually about 40 pixels high and 300 pixels wide. Different website software and banner exchange systems will list their own requirements. Use the following steps to create a new image file:
- Click File.
- Click New
- Type the width in pixels next to "Width".
- Type the height in pixels next to "Height".
- Click Ok.
-
 Select a background color for your image. The active foreground and background color are displayed in overlapping rectangles below the toolbar to the left. To select a color, click the rectangle on top. Click a color in the rainbow-colored strip to select a color. Use the box to the left of the rainbow-colored strip to select a shade for the color. This selects the active foreground color.
 -
 Use the paint bucket tool to add a background color to your image. The paint bucket tool has an icon that resembles a bucket pouring paint. It's in the toolbar to the left. Click the image artboard in the center of the screen to fill the image with your background color.
- You can also use other tools, such as the brush tool to draw any other non-moving objects on the background layer.
-
 Add a new layer. The Layers panel is to the right of the artboard in the lower-right corner. To add a new layer, click the tiny icon that resembles a sheet of paper with a plus sign (+). Click this icon in the lower-left corner of the Layers panel to add a new layer. Create a layer for each moving object in your image.
 -
 Add a moving object to the image. Use the new layer(s) you created to add moving objects to your image. You can use the brush tool to draw an object, or the text tool to add text to your image. Make sure each moving object in your image is placed in its own layer.
 -
 Create the first frame of your image. After you have created each moving object of your image on its own layer, place all objects at the starting frame of your animation.
 -
 Save the first frame of your image as a still image. An animation is made of many still images called frames. We need to save each image of the animation as a still image. Use the following steps to save the first frame of your animation:
- Click File
- Click Export As.
- Type "[Animation file name] frame 1" next to name.
- Click Select File Type.
- Click JPEG image.
- Click Export
- Click Export again.
-
 Use the move tool to slightly move objects in the frame. The move tool has an icon that resembles a cross-arrow pointing up, down, left, and right. Use the move tool to slightly move the moving objects in your image to their frame 2 positions. The recommended frame rate for a GIF animation is between 10-30 frames per second. So you only need to move each object very slightly between each frame.
- To help keep the movement between each frame smooth and consistent, you may want to turn on the grid. To turn on the grid, click View, followed by Show Grid.
-
 Save the second frame of your animation. After you have all the moving parts in place or the second frame, use the following steps to save the second frame of your image:
- Click File
- Click Export As.
- Type "[GIF file name] frame 2" next to "Name."
- Click Select File Type.
- Click JPEG image.
- Click Export
- Click Export again.
-
 Repeat for all additional frames. Continue in this fashion. Use the Move tool to place each moving object in your animation slightly and then save the image as a frame. Make sure each image contains the frame number in the file name (i.e. Text Scroll Frame 1, Text Scroll Frame 2, Text Scroll Frame 3, and so on).
 -
 Save your work as a GIMP file. It's a good idea to save your work as a GIMP (.xcf) file, in case you need to redo or change any frames later on. Name the file something like "[Animation name] artboard.xcf". Use the following steps to save your work:
- Click File
- Click Save As.
- Type a file name next to "Name".
- Click Save.
Part 2 of 2:
Creating an Animated GIF in GIMP
-
 Create a new file in GIMP. After you create still images for each frame of your animation, create a new file in GIMP. Make sure the the width and height of the file match the width and height of your animation frames. Use the following steps to open a new file in GIMP.
- Click File.
- Click New
- Type the width in pixels next to "Width".
- Type the height in pixels next to "Height".
- Click Ok.
-
 Open each frame of animation as a new layer. GIMP creates animations using each layer as a separate frame of animation. The bottom layer is the first frame of animation and the top layer is the last frame of animation. Use the following steps to open your image frames as a new layer. You can select multiple images by holding the Shift key and selecting the first and last image frame:
- Click File
- Click Open as Layers.
- Hold Shift and click the first image frame file.
- Click the last image frame while still holding Shift
- Click Open.
-
 Add the frame rate in milliseconds to each layer name. By default, GIMP exports GIF animations at a frame rate of 10 frames (100ms) per second. You can add the frame rate in milliseconds at the end of each frame to change the frame rate to something a little faster, you can add the frame rate in parentheses to the end of each frame name in the list of the frames. For example, if you add "(33ms)" at the end of each layer name, that will give you a frame rate of about 30 frames per second.
 -
 Preview your animation. Before you export your animation as a GIF, you can preview it. This allows you to see how the animation looks. If you need to edit any of the frames in the animation artboard file. Use the following steps to preview your animation:
- Click Filter.
- Click Playback.
- Use the "fps" drop-down menu to select the Frames per Second.
- Click the Play button in the upper-right corner.
-
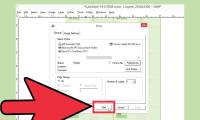
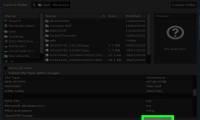
 Export your file as a GIF. If you are satisfied with how your GIF animation looks, use the following steps to export it as a GIF animation.
- Click File
- Click Export As.
- Type a file name next to "Name."
- Click Select File Type.
- Click GIF image.
- Click Export
- Click Export again.
- Click As animation.
- Type the frame rate (i.e. 30) next to "Delay between frames where unspecified:".
- Click Export
Was this article helpful?
Your feedback helps us improve.
Related Articles
 How to easily create GIF animations using GIMP on your PC.3 minutes read
 How to turn an image into transparent with GIMP6 minutes read
 How to create X-ray effects in GIMP7 minutes read
 How to Make Business Cards with GIMP10 minutes read
 How to design professional leaflets with GIMP29 minutes read
 How to Recolor Anything on Gimp9 minutes read
Reader Comments 0
Sign in with email or Google to join the discussion.