How to Make a Transparent Image Using Gimp
This wikiHow teaches you how to make an entire image transparent when using the GIMP editor, as well as how to remove a background's image. You can do this on both Windows and Mac versions of GIMP. Keep in mind that GIMP's default export...
Table of Contents
Method 1 of 2:
Making a Whole Image Transparent
-
 Open GIMP. The GIMP app icon resembles a dog-like face holding a paint brush in its mouth.
- GIMP may take a few minutes to open if you haven't recently opened it.
-
 Open an image in GIMP. Click File in the top-left corner of the window (Windows) or the screen (Mac), then click Open... in the drop-down menu, select an image to open, and click Open.
- You can repeat this process for multiple photos if you want to layer the transparent image over a non-transparent one.
- If you open a second image in a second window, select it, press Ctrl+C (or ⌘ Command+C on Mac), select the first image, and press Ctrl+V (or ⌘ Command+V.
-
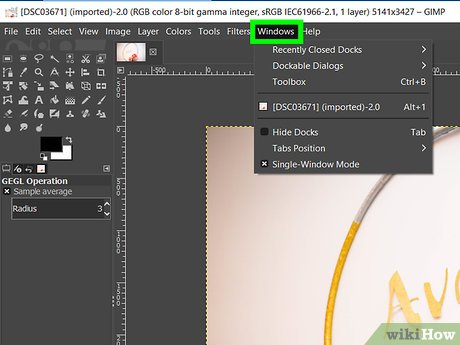 Click Windows. This tab is at the top of the window (or the screen if you're on a Mac). A drop-down menu will appear.
 -
 Select Dockable Dialogs. It's near the top of the Windows drop-down menu. Selecting it prompts a pop-out menu.
 -
 Click Layers. You'll find it near the top of the Dockable Dialogs pop-out menu. A small "Layers" window will open.
 -
 Select your image. Click the name of the image that you want to edit. It should be in the middle of the "Layers" window.
 -
 Lower the "Opacity" value. Click and drag the "Opacity" slider at the top of the window to the left, or click the downward-facing arrow next to it to lower the opacity.[1]
- Make sure that you're monitoring your image while lowering the opacity.
- Lowering the opacity from 100 to 50 should be enough to make your image transparent.
-
 Exit the "Layers" window. Click the X in the top-right (Windows) or top-left (Mac) corner of the "Layers" window.
 -
 Click Image. It's at the top of the GIMP interface. A drop-down menu will appear.
 -
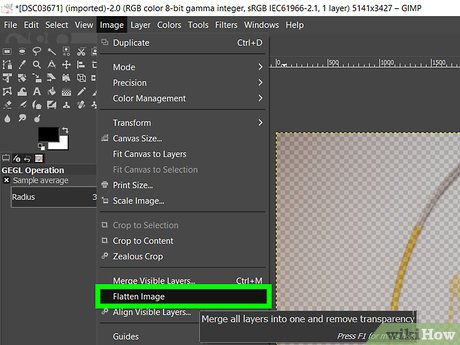 Click Flatten Image. You'll find this option near the bottom of the Image drop-down menu. Doing so "flattens" the image, thus preserving its transparency.
 -
 Export your project as a PNG file. The default export settings will save your project as a JPG, but you'll need to change this in order to maintain your image's transparent background:
- Click File.
- Click Export As....
- Find the file's name at the top of the export window.
- Change the "jpg" part of the file's name to "png" (for example, "bear.jpg" would become "bear.png").
- Click Export at the bottom of the window, then click Export when prompted.
Method 2 of 2:
Making an Image's Background Transparent
-
 Open GIMP. The GIMP app icon resembles a dog-like face holding a paint brush in its mouth.
- GIMP may take a few minutes to open if you haven't recently opened it.
-
 Open an image in GIMP. Click File in the top-left corner of the window (Windows) or the screen (Mac), then click Open... in the drop-down menu, select an image to open, and click Open.
- When removing the background from an image in GIMP, it's best to use an image in which the background is as close to one color as possible. Removing complex backgrounds will take a long time.
-
 Click Layer. It's a menu item at the top of GIMP (Windows) or the screen (Mac). A drop-down menu will appear.
 -
 Select Transparency. This is in the drop-down menu. Selecting it with your mouse cursor prompts a pop-out menu to appear.
 -
 Click Add Alpha Channel. You'll find this in the pop-out menu.
 -
 Click Tools. It's at the top of GIMP or the screen. Another drop-down menu will appear.
 -
 Select Selection Tools. This option is in the drop-down menu. Doing so prompts a pop-out menu.
 -
 Click Fuzzy Select. It's in the pop-out menu.
 -
 Select part of the background. Click a section of the background; if you have a particularly complex background with multiple different colors, you'll instead click and drag your mouse across it until a large portion is selected without selecting any of the part of the image that you want to save.
- When part of the background is selected, you'll see a dotted line appear around the selected parts.
- If the entire background is the same color, clicking anywhere on it will select the entire background.
-
 Press the Del key. Doing so will remove the selected part of the background. If your background was one color, the background should now be gone.
- On a Mac, click Edit, then click Cut.
-
 Remove the rest of the background. If pieces of the background are left over, select and remove them before proceeding.
- If you need to zoom in to make minor adjustments, click the icon next to the percentage at the bottom of the GIMP window, then click the factor by which you want to zoom in.

- If you need to zoom in to make minor adjustments, click the
-
 Export your project as a PNG file. The default export settings will save your project as a JPG, but you'll need to change this in order to maintain your image's transparent background:
- Click File.
- Click Export As....
- Find the file's name at the top of the export window.
- Change the "jpg" part of the file's name to "png" (for example, "meow.jpg" would become "meow.png").
- Click Export at the bottom of the window, then click Export when prompted.
Was this article helpful?
Your feedback helps us improve.
Related Articles
 How to turn an image into transparent with GIMP6 minutes read
 How to create semi-transparent images in GIMP2 minutes read
 6 photo editing tips with GIMP12 minutes read
 4 plugins that help GIMP become a professional tool.5 minutes read
 8 best GIMP plugins and how to install them11 minutes read
 New features of GIMP version 2.1010 minutes read
Reader Comments 0
Sign in with email or Google to join the discussion.