How to Make Skies Beautiful with GIMP
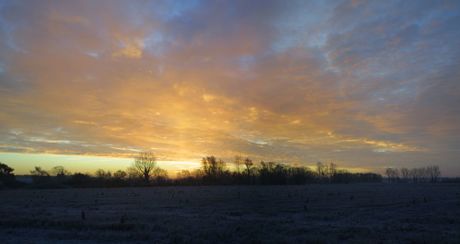
Do the skies in your photographs look somewhat 'blah'? So long as you take your photographs thoughtfully, you can make them pop with a few easy tweaks in GIMP, the renowned open-source image editor. These tweaks are also a great...
Table of Contents
Method 1 of 2:
Getting It Right To Start With
You can make your job much, much easier (or, rather, not impossible) by following a couple of steps when taking your photographs
-
 Shoot at a slow ISO speed, if your camera supports changing this. For point and shoot cameras, this should always be the slowest speed you have. If you have a digital SLR, this is less important, but you should still err towards using slower speeds. Our example used 100 ISO on an ancient Canon D30; more recent digital SLRs will be fine at much faster speeds. We'll get to the reason for this in a bit.
 - Use a graduated neutral density filter when taking your photos. Consider getting one if you don't have one. A graduated neutral density filter blocks out light in part of your photo; since skies are typically much brighter than whatever is below them, this allows you to get a more consistent exposure across your photo. But, if you don't have one, or you have no way of fitting filters to your camera or lens, don't worry about it; see the next step.
- Underexpose if you're not using a neutral density filter. This can be by as much as a stop or two; anything that ensures that your sky does not go pure white (or largely so). The lost detail in dark areas can often be recovered later. Blown highlights (from an overexposed sky) can never be. The opposite is often true of film cameras; even massive overexposure does not result in blown highlights, but shadow detail is often impossible to recover. This is part of the reason you should shoot at a slow ISO; recovering shadow detail brings out noise. Also, the technique used here will bring out any noise that is in the sky, too. If your photo is already noisy (as it will be at faster ISO speeds), then the end result will be ugly.
Method 2 of 2:
Editing your Photo with GIMP
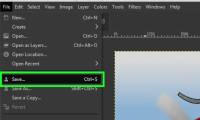
- Open your image (File -> Open).
-
 Create a duplicate layer of your photo. Open the Layers dialog (with Ctrl+L). Right click on the Background layer and go to Duplicate, or use the button.
 - Add a layer mask to your duplicated layer. Right click on the "Background copy" layer and go to Add Layer Mask.... Hit "Add"; none of the settings are relevant to you here.
- Select your gradient tool. Press L to select the gradient tool, or bring it up from your tool. Go to the main GIMP window and ensure that the foreground colour is set to black, and the background is set to white. Ensure that the gradient is set to black-to-white (one of the ones called FG to BG).

-
 Draw a gradient on your layer mask. Hold down your Control key (this ensures a straight line). Click and hold down your left mouse button on (or at some point above) the horizon line and hold down your left mouse button. Drag your mouse pointer to some arbitrary point upwards; you will have to experiment with this to see what works better for your photograph. Release your left mouse button. In the Layers dialog, right click on the "Background copy" layer and go to Show Layer Mask to ensure that you've done it right. Do the same again to turn off the display of your layer mask.
 -
 Set the layer mode to "Soft light" from the drop-down "Mode" list. You will notice that the contrast and colour of your sky has improved. This is what you want. We'll call this the "soft light layer" from here on.
 -
 Duplicate your soft light layer to taste. Zoom to 100% on your photo (View -> Zoom -> 1:1). Then, in the layers dialog, right click on your soft light layer and go to Duplicate Layer. Do this until either you're either happy with it, or until you start seeing large blocks of colour (when you hit the latter, this is sensor or film noise taking its toll).
 -
 Merge your layers by right clicking on any layer in the Layers dialog and going to Merge Visible Layers. Hit "OK"; none of the options are relevant here.
 -
 Kick up the saturation in the sky a little. This is optional. Use the freeform select tool (hit F) to loosely select the sky. Go to Select -> Feather, use a Radius of roughly 1%-2% of the height of your photo in pixels. Go to Colors -> Hue/Saturation and slide the Saturation slider over to the right to taste. As earlier, it might be best to zoom to 100% in order to ensure that you're not bringing out too much noise in the process. Hit "OK" when you're happy with it.
 -
 Recover the shadow detail from below the horizon. You can skip this step if you used a neutral density filter on the sky. Duplicate the bottom layer and add a layer mask, as we did in steps 2-5; except this time you want to do it backwards by drawing the gradient starting at or just above the horizon line, and ending at some point just below the horizon line; the end result is that the ground will be in the white area of the layer mask, and the sky will be in the black area. As before, you'll have to experiment with this. Set the layer mode to Dodge or Screen. Duplicate it to taste, then merge them, as before.
 - Do any other processing that you see fit to do. In our example, the sky was crudely de-noised a little with a selective Gaussian blur (Filters -> Blur -> Selective Gaussian Blur), then the area below the horizon was sharpened (Filters -> Enhance -> Unsharp Mask), and finally a single pass of Harry Phillips' "tone mapping" script was applied.
-
 Admire the finished result. Or don't; go away for a few minutes, come back and compare it to your original to see if it really was an improvement. Chances are good that it was; but it doesn't hurt to go back to the start and experiment with different layer masks, and so on.
Was this article helpful?
Your feedback helps us improve.
Related Articles
 Don't miss out on these 11 beautiful free brushes for GIMP7 minutes read
 4 plugins that help GIMP become a professional tool.5 minutes read
 How to Make a Bug in GIMP13 minutes read
 8 best GIMP plugins and how to install them11 minutes read
 How to create animations and GIFs using GIMP on PC4 minutes read
 New features of GIMP version 2.1010 minutes read
Reader Comments 0
Sign in with email or Google to join the discussion.