How to Easily Resize Photos in Windows XP
Method 1 of 3:
Image Resizer PowerToy
-
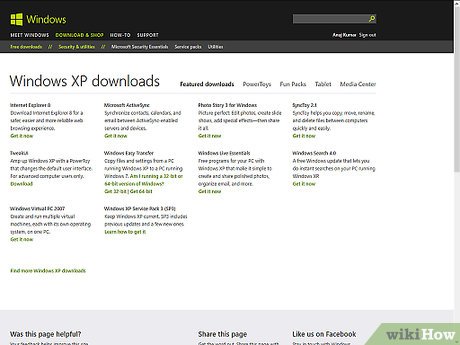
 Microsoft offers a free downloadable utility for Windows XP called Image Resize PowerToy. It lets you resize a photo in seconds with a just a couple clicks.
 - Download the Image Resizer Powertoy.
- Go to the Microsoft download page at http://windows.microsoft.com/en-US/windows/downloads/windows-xp.

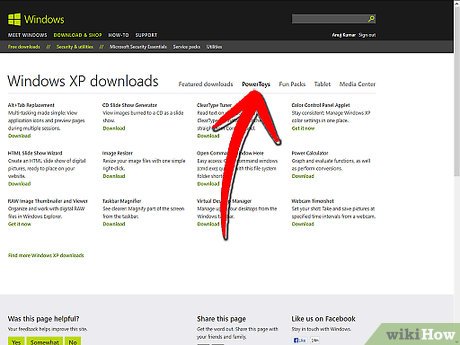
- Click on the PowerToys tab.

- Locate Image Resizer, and click on the Download link and your download should start automatically.

- Go to the Microsoft download page at http://windows.microsoft.com/en-US/windows/downloads/windows-xp.
-
 Install image resizer. Double click on the .exe file and follow the prompts for installation.
 -
 Open your pictures folder. In the Thumbnail view, right-click on the picture you want to resize, and then select Resize Pictures.
- You can select all the pictures in the folder by typing CTRL-A.

- You can select a consecutive series of pictures by clicking on the first picture, holding down the Shift key, then clicking on the last photo in your series.

- You can select non-sequential pictures by clicking on the first photo, and then holding down the CTRL key and clicking on any other photos you want to add to the selection.

- You can select all the pictures in the folder by typing CTRL-A.
-
 In the Resize Pictures dialog box, find and select the size you want by clicking on the appropriate radio button.
 -
 Click the OK button. A new, resized file will be created in the same folder as the original.
- In the Resize Pictures dialog box, you can click on the Advanced > > button and set your own custom size; confine the operation only to those pictures that would become smaller; or resize the original without making a copy.

- In the Resize Pictures dialog box, you can click on the Advanced > > button and set your own custom size; confine the operation only to those pictures that would become smaller; or resize the original without making a copy.
Method 2 of 3:
Windows Live Photo Gallery
-
 Select the photo or photos you want to resize. Use the method described above to select single images, a group of consecutive images, or a group of nonconsecutive images.
 -
 From the File menu, select Resize... You can also find this option when you right-click on the image.
 -
 Choose a size. In the Resize dialog box there is a menu. You can choose a preset value in that menu, or type in a number in the Maximum dimensions: field.
- This number will affect the longer dimension of your image, and adjust the shorter dimension proportionally.

- This number will affect the longer dimension of your image, and adjust the shorter dimension proportionally.
-
 Save to your destination folder. Click Resize and Save to save the resized file to your original folder, or click the Browse... button and choose a different folder.
Method 3 of 3:
Resizing with Paint
-
 Open Paint. Click Start, and in the search field enter 'Paint.' When the application appears, click on it to launch Paint.
 -
 Open an image that you want to resize. Click on the Paint menu button, click Open, select your image, and click Open again.
- The current image size is shown in the status bar.

- The current image size is shown in the status bar.
-
 Open the Resize and Skew settings. On the Home tab, in the Image group, click Resize.
 -
 Click the Maintain aspect ratio checkbox so that it is checked. The aspect ratio is the proportion between the height and width of the image. If you don't check this, you're picture may end up looking stretched or squished.
 - Resize the image. You can choose to resize by percentage or by pixels.
- Percentage will reduce the height and width by a set percentage. For example, if your picture is 800 x 600 px, and you want it to be 75% of the original size, enter '75' into either the Horizontal or Vertical fields, and your new image will be 600 x 450 px.

- If you select Pixels rather than Percentage, you can enter the pixel dimensions of either the Horizontal or Vertical sides, and the other will be calculated automatically. For example, if you entered 450 as the Vertical dimension, the Horizontal dimension would automatically be 600.

- Percentage will reduce the height and width by a set percentage. For example, if your picture is 800 x 600 px, and you want it to be 75% of the original size, enter '75' into either the Horizontal or Vertical fields, and your new image will be 600 x 450 px.
-
 Save the new image. Click the Paint button, select Save as, and then click the picture file type for the resized image.
 -
 Enter a new name for the image in the File name field, and then click Save.
Share by
Marvin Fry
Update 04 March 2020


