Table of Contents
This updated guide examines How to Create a Custom Macro Button in Excel and organizes the essential facts, background, and practical takeaways in clear American English.
Method 1
Excel 2003
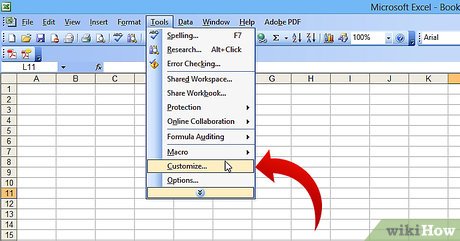 ClickTools → Customize.
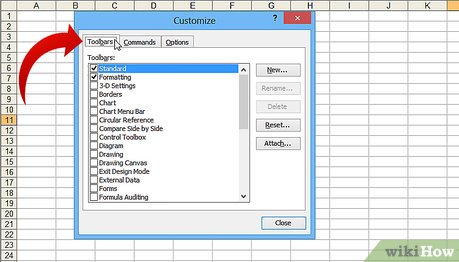 Click the Toolbars tab.
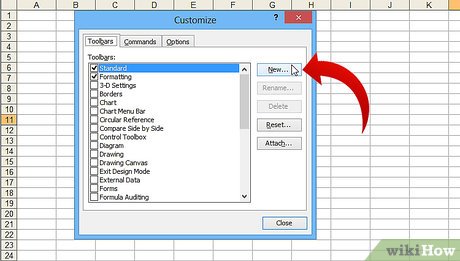 Click the New button.
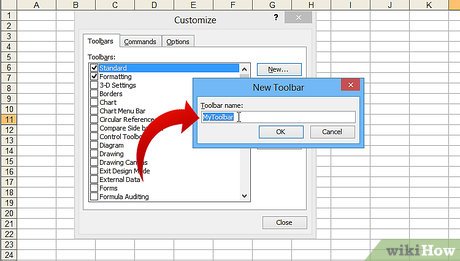 Type a namefor your new toolbar.
 Click OK.
 Click the Commands tab.
 Select Macros from the list on the left.
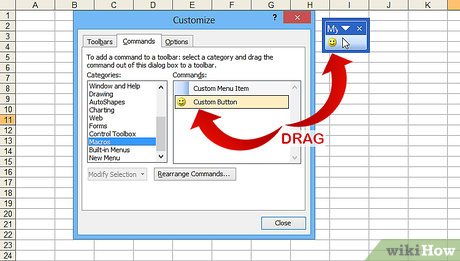 Click and drag theCustom Buttonicon from the list on the right to your new toolbar. The new button is represented by a smiley face.
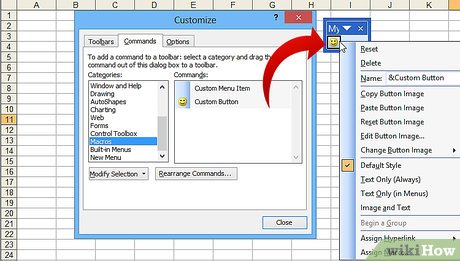 Right-clickon the newly added button.
 Rename the button to your liking or leave the default name in the Name: field.
 ClickEdit Button Image... and change the image for your button or leave it the same. The Button Editor has controls similar to the Windows Paint program.
 Click "Assign Macro."
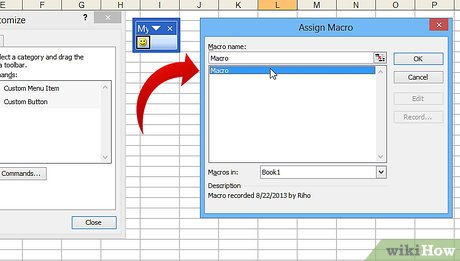 Select amacroyou created from the list.
 Click OK.
 Click Close on the Customize dialog box.
Method 2
Excel 2007
 Click the little arrow pointing down on the Quick Access Toolbar.
 ClickMore Commands.
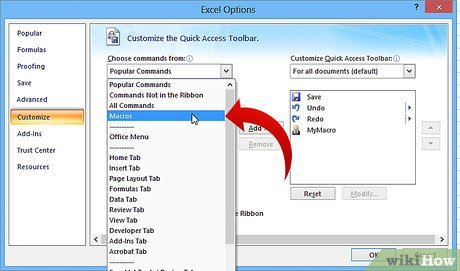 SelectMacrosfrom theChoose commands fromlist box.
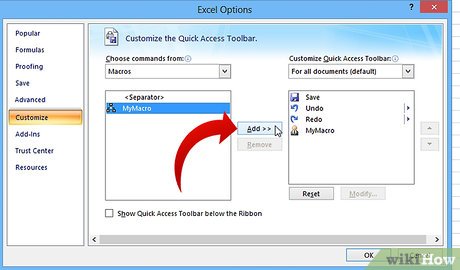 Select your macro from the left hand column and click the Add button.
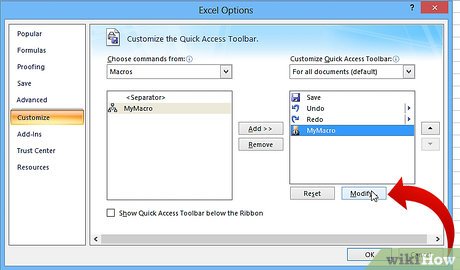 Select the macro that you just added from the right hand column and click the Modify button.
 Click the button image you want to represent your macro, type the display name you want in theDisplay nametext box and click the 'OK'button.
Method 3
Excel 2010
 Make sure the Developer tab is displayed. The Developer tab is a tab in the Ribbon at the top of Excel. If it is not displayed, follow these directions to display it:
- Click File → Options → Customize Ribbons
- Find the Developer check box in the Main Tabs section and click it. Press "OK" when you are done.
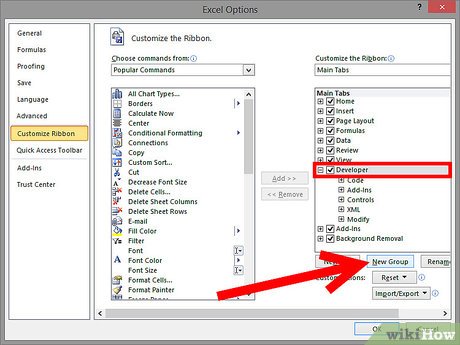 Add "New Group" under the Developer Tab to create a custom group for the command/button that will be created.
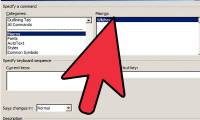
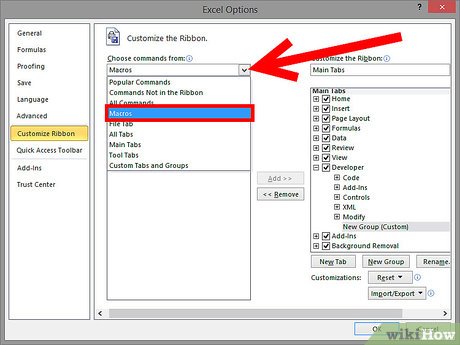 Still in the Customize Ribbon, click on the dropdown menu to choose command. Select Macro. Thereafter, all recorded macros will appear in the left box.
 Select the desired macro for button creation (make sure the newly added group is highlighted, you will know if the macro was added when it appear in the right box under your new group).
 You may now customize your button. Right-click and select Rename.
 If everything is set, Click "OK"
Method 4
Excel 2013
 Make sure the Developer tab is displayed. The Developer tab is a tab in the Ribbon at the top of Excel. If it is not displayed, follow these directions[1]XResearch sourceto display it:
- Go to Excel → Preferences → Ribbon (Under Sharing and Privacy)
- Under Customize, check the box next to the Developer tab, and press "OK"
 Click on the Developer tab and click Button. The Button icon is under the Form Controls group in the Developer tab and looks like a rectangular button.
 Place your button. Place your cursor where you'd like the button to go and drag to select the size of the button. You can make the button as small or as large as you'd like, given your needs. If you wish, you can move the button around after placement.
 Assign a macro when prompted. Excel should automatically prompt you to assign a macro to your button after you finish placing it. Once you've selected your macro, click "OK."
- If you are unfamiliar with what macros are or how to record them, You should have a macro already built before you create the button.
 Format the button. Right-click on the newly created button and select "Format Control." Select Properties → Don't move or size with cells → OK. This helps you maintain the size and placement of your button. If you don't have this property chosen, your button size and placement will change if you have it add, delete, or move cells.
 Rename the button. Change the text in the button to say whatever you'd like it to.
FAQ
What is How to Create a Custom Macro Button in Excel about?
It provides a structured overview of button, explains the main context, and highlights practical takeaways for readers.
Why does this topic matter?
Understanding the main concepts helps readers evaluate the issue, avoid common mistakes, and make better-informed decisions.
How should readers use this information?
Use the guidance as a practical starting point, confirm details that may have changed, and follow current product, safety, or security recommendations.
Related Articles
 MS Excel 2003 - Lesson 8: Excel Macro - Automate Complex Tasks4 minutes read
 A Macro in Excel: What It Is and How to Create and Run It4 minutes read
 How to Add a Button to a Macro5 minutes read
 How to Troubleshoot Macros in Excel Not Working6 minutes read
 The Easiest Way to Use Macros in Excel8 minutes read
 Stop Using These Formulas: Excel Macros Will Do It for You!6 minutes read
Reader Comments 0
Sign in with email or Google to join the discussion.