Table of Contents
This updated guide examines How to Add a Button to a Macro and organizes the essential facts, background, and practical takeaways in clear American English.
Method 1
Add a Macro to a Toolbar in Microsoft Office
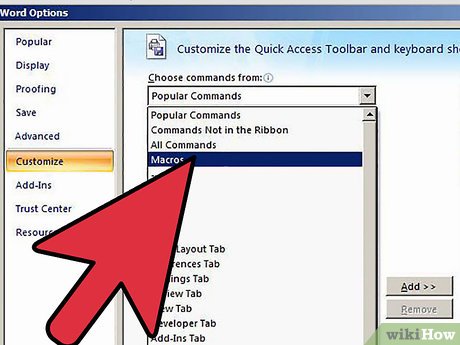 Assign a preexisting macro, saved to the macro library, to a button in the Quick Access toolbar.
- Open a new document and click the "Office" button in the upper-left corner of the application window.
- Click "Word options" located at the bottom of the pull-down menu. The Word options dialogue box will open.
- Click the "Customize" button, located in the column on the left, to display the "Customize the Quick Access Toolbar and keyboard shortcuts" dialogue box.
- Select Macros from the "Choose commands" menu located above the column on the left. The macro you wish to add to the Quick Access toolbar should be visible in the column on the left.
- Locate the macro you wish to add to the toolbar in the column on the left.
- Highlight the macro and click the "Add" button situated between the 2 columns in the "Quick Access toolbar and keyboard shortcuts" dialogue box. The selected macro will now be visible in the column on the right.
- Click "OK" to exit the dialogue box. The selected macro will now be visible in, and has been assigned to, a button in the Quick Access toolbar.
Method 2
Assign a Keyboard Shortcut to a Macro
 Access the "Customize Keyboard Shortcuts" dialogue box.
- Click the "Office" button in the upper-left corner of the application window.
- Click "Word options" located at bottom of the pull-down menu. The Word options dialogue box will open.
- Click the "Customize" button, located in the column on the left, to display the "Customize the Quick Access Toolbar and keyboard shortcuts" dialogue box.
- Click the "Customize Keyboard shortcuts" button located beneath the column on the left. The "Customize Keyboard" dialogue box will open.
 Assign a keyboard shortcut to a preexisting macro previously saved to the macros library.
- Highlight the Macros option in the "Categories" menu, located on the left side of the dialogue box. A list of the macros stored in the macro library will now be visible in the column on the right.
- Highlight the macro you wish to assign a keyboard shortcut to, which should be visible in the column on the right.
- Click inside the "Press new shortcut key" field located on the lower right side of the dialogue box so that the cursor can be seen flashing in the empty field.
- Type a combination consisting of 2 to 3 keys using your computer keyboard. The combination you've selected will be visible in the "Press new shortcut key" field. If the combination you have chosen is already being used, it will appear beneath the "Current keys" box under "Currently assigned to." Delete the key combination located inside the "Press new shortcut key" field if the shortcut is already being used and type a new one.
- Click the "Assign" button, and then click close once you have entered a key combination that is not already in use to exit the dialogue box.
- Click OK to close the "Customize the Quick Access Toolbar" and keyboard shortcuts dialogue box. A keyboard shortcut has been assigned to the macro and the macro will run whenever the combination of keys assigned are pressed.
FAQ
What is How to Add a Button to a Macro about?
It provides a structured overview of macro, explains the main context, and highlights practical takeaways for readers.
Why does this topic matter?
Understanding the main concepts helps readers evaluate the issue, avoid common mistakes, and make better-informed decisions.
How should readers use this information?
Use the guidance as a practical starting point, confirm details that may have changed, and follow current product, safety, or security recommendations.
Related Articles
 How to Create a Custom Macro Button in Excel6 minutes read
 How to Turn on / Off Macro in Word3 minutes read
 How the iPhone 16 Turns Everyday Objects into Stunning Macro Art6 minutes read
 How to Disable Macro Mode and Auto-switch on iPhone Camera4 minutes read
 How to Troubleshoot Macros in Excel Not Working6 minutes read
 Errno. H in C7 minutes read
Reader Comments 0
Sign in with email or Google to join the discussion.