Table of Contents
This practical guide explains how to color faster in krita using colorize mask with clear steps and useful context. It also covers common requirements, potential problems, and the details that can help you get better results.
1. Add a Colorize Mask Layer for the Lineart
Before you can start with the Colorize Mask, you need to prepare the appropriate lineart. You should draw lineart on a layer using the brush of your choice. The aliased brushes may yield slightly better results due to their sharp, defined edges, but the blurry anti-aliased brushes will work just fine as long as you take your time working with the edges afterwards.
You are not limited to only coloring part of your lineart. Colorize Mask is an especially powerful time-saver when you use it to animate in Krita.
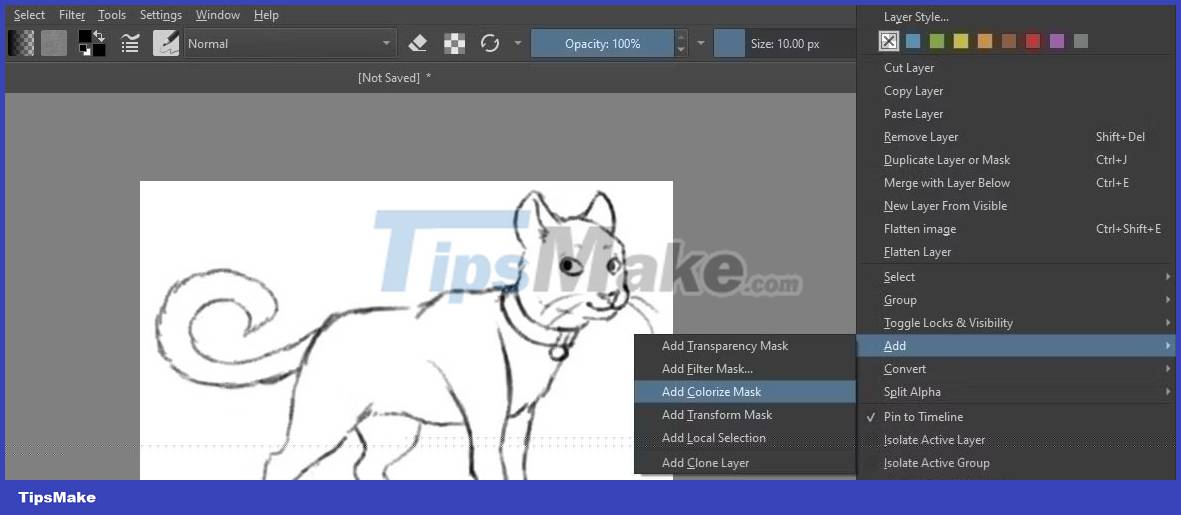
Once your lineart is ready, right click on the lineart layer and choose Add > Add Colorize Mask . Your lineart layer will become the root layer of the Colorize Mask layer.

Next, you'll need to find the Colorize Mask tool and select it from the options in the leftmost column. Finally, choose a suitable hard-edged brush from the brush options.
2. Fill Colorize Mask
Now you are ready to start coloring your drawing. You can first plan and create a palette using Procreate or any other tool if needed.

Choose your color and add small strokes of color to each part where you want a specific color. Make sure to add color to the small areas of your lineart, otherwise Krita may color them incorrectly.
If you want part of your drawing to be transparent, choose a separate color to represent the transparency and fill it with that color. For now, leave this color as is.

After coloring the lineart, you are ready to render! Select the Tool Options tab and uncheck Edit key strokes . Finally, click the Update button and see how your drawing looks. Krita will fill each area with the specified color.
You may need to add color to some points to edit the drawing. You can adjust this by re-enabling Edit key strokes and pressing Update when you add new colors.
Note : You should enable Limit to layer bounds in the Tool Options panel if you are displaying a small part of a large artboard. Enabling this option is useful because it will make each update render significantly faster.
3. Set the Colorize Mask's Transparency
Before you continue, you'll need to adjust the Colorize Mask so that the distinct color you've chosen that represents the transparency is actually displayed correctly.
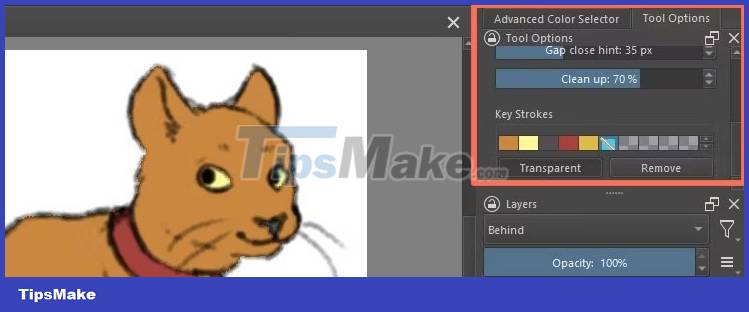
Scroll down through the Tool Options tab until you see the Key Strokes panel with swatches for each color in your artboard. Select a transparent placeholder color and then click the Transparent button. Finally, update the artboard to add transparency.
4. Convert Colorize Mask to Paint Layer
The last step you need to take after completing the Colorize Mask is to convert it into a paint layer. You can easily do this by right-clicking on the Colorize Mask layer and choosing Convert > Convert to Paint Layer . Krita will quickly process the change and convert this layer into a regular paint layer. With this, you're ready to start shading and rendering your drawing.

You can make the process of rendering your drawing easier by separating the new paint layer by color. Choose Layer > Split > Split Layer from the top row of options. Use default settings and press Apply . Finally, hold R and left click on the color of your choice to easily select different color layers. Doing this will allow you to select and display each color individually in your drawing.
Conclusion
Understanding Krita makes it easier to compare options, avoid common mistakes, and apply the information in this guide more effectively. Review the relevant requirements before making changes or choosing a solution.
FAQ
How do you color faster in krita using colorize mask?
Follow the steps in this guide in order, confirm the required settings or tools, and verify the result before making additional changes.
Is it safe to color faster in krita using colorize mask?
It is generally safe when you follow the recommended instructions, use trusted tools, and avoid changing settings you do not understand.
What should you do if the process does not work?
Recheck the requirements, restart the device or application when appropriate, and review each step for missed settings or compatibility issues.
Related Articles
 Krita AI Diffusion Plugin: Krita's Free AI Integration Makes Adobe Firefly8 minutes read
 Learn About Krita - Free Alternative to GIMP: What Is Krita8 minutes read
 Turn Black and White Image into Color Image in a Blink of an Eye4 minutes read
 10 Things to Know About Mask in Photoshop: Mask Photoshop6 minutes read
 How to Create Images with AI in Krita: Practical Guide7 minutes read
 Which Is Better Krita or GIMP: Complete Overview9 minutes read
Reader Comments 0
Sign in with email or Google to join the discussion.