How to Add or Delete Items and Categories in the All Apps Screen of the Windows 8 Start Menu
In previous versions of Windows, you were able to edit the items and folders in the All Programs/All Apps screen. The new Windows 8 Start menu lacks this ability. You can still pin and unpin custom items to the main screen of the Start...
Table of Contents
- Reference
- Steps
- Adding Items
- Removing Items
- How To Delete an Item from a Category in the Start Menu
- How to Add a Single Item to the Start Menu
- How to Add a Category to the Start Menu
- How to Add an Item Underneath an Existing Category in the Start Menu
- How To Delete an Item from the Start Menu
- How To Delete a Category from the Start Menu
Reference
- Item refers to...
- Category refers to...
- Item under a category refers to...
Steps
Method 1 of 3:
Adding Items
How to Add a Single Item to the Start Menu
-
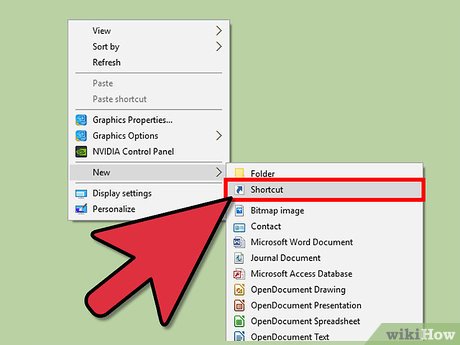 Create a shortcut on your desktop. Right click your desktop to open its context menu, hover over New in the context menu to expand another menu, then click Shortcut to create a new shortcut on your desktop. The Create Shortcut wizard will open.
 -
 Select the file or folder that you want to add to the All Apps screen as the shortcut's target. Click Browse... in the wizard, select the desired target in the Browse for Files or Folders dialog, then click OK. You can also manually type in the path of it.
 -
 Finalize the shortcut. Click Next to continue to the next screen, type a name for the shortcut, then click Finish.
 -
 Open the Run dialog. Press the ⊞ Win and R key at the same time to open the Run dialog.
 -
 Open the Start menu's directory. In the Run dialog, type C:ProgramDataMicrosoftWindowsStart MenuPrograms and click OK. File Explorer will open.
 -
 Add the item to the Start menu. Drag the shortcut that you created into an empty space in the File Explorer window to move it to the directory.
- Click Continue on the Destination Folder Access Denied dialog if it appears.
- Result:
How to Add a Category to the Start Menu
-
 Open the Run dialog. Press the ⊞ Win and R key at the same time to open the Run dialog.
 -
 Open the Start menu's directory. In the Run dialog, type C:ProgramDataMicrosoftWindowsStart MenuPrograms and click OK. File Explorer will open.
 -
 Create a new folder in the directory. Right click an empty space in the File Explorer window to open its context menu, hover over New in the context menu to expand another menu, then click Folder to create a new folder.
 -
 Name the folder the same name that you want the category to be named.
- Note that the category will not actually appear in the All Apps screen until you've added an item under it.
How to Add an Item Underneath an Existing Category in the Start Menu
-
 Create a shortcut on your desktop. Right click your desktop to open its context menu, hover over New in the context menu to expand another menu, then click Shortcut to create a new shortcut on your desktop. The Create Shortcut wizard will open.
 -
 Select the file or folder that you want to add to the All Apps screen as the shortcut's target. Click Browse... in the wizard, select the desired target in the Browse for Files or Folders dialog, then click OK. You can also manually type in the path of it.
 -
 Finalize the shortcut. Click Next to continue to the next screen, type a name for the shortcut, then click Finish.
 -
 Open the Run dialog. Press the ⊞ Win and R key at the same time to open the Run dialog.
 -
 Open the Start menu's directory. In the Run dialog, type C:ProgramDataMicrosoftWindowsStart MenuPrograms and click OK. File Explorer will open.
 -
 In File Explorer, double click the folder that has the same name as the category that you want to add the item to.
 -
 Add the item under the category. Drag the shortcut targeting the file/folder you want to add under the category into the folder.
- Click Continue on the Destination Folder Access Denied dialog if it appears.
- Result...
Method 2 of 3:
Removing Items
How To Delete an Item from the Start Menu
-
 Open the Run dialog. Press the ⊞ Win and R key at the same time to open the Run dialog.
 -
 Open the Start menu's directory. In the Run dialog, type C:ProgramDataMicrosoftWindowsStart MenuPrograms and click OK. File Explorer will open.
 -
 Delete the item. In File Explorer, right click the shortcut that has the same name as the item that you want to delete to show its context menu and click Delete.
How To Delete a Category from the Start Menu
-
 Open the Run dialog. Press the ⊞ Win and R key at the same time to open the Run dialog.
 -
 Open the Start menu's directory. In the Run dialog, type C:ProgramDataMicrosoftWindowsStart MenuPrograms and click OK. File Explorer will open.
 -
 Delete the category. In File Explorer, right click the folder that has the same name as the category that you want to delete to open the context menu and click Delete.
Method 3 of 3:
How To Delete an Item from a Category in the Start Menu
-
 Open the Run dialog. Press the ⊞ Win and R key at the same time to open the Run dialog.
 -
 Open the Start menu's directory. In the Run dialog, type C:ProgramDataMicrosoftWindowsStart MenuPrograms and click OK. File Explorer will open.
 -
 In File Explorer, open the folder that has the same name as the category that the item that you want to delete is listed under.
 -
 Delete the item from the category. In the folder that you have just opened, right click the shortcut that has the same name as the item that you want to delete and click Delete.
4 ★ | 1 Vote
- Customize and restore Start Menu Windows 10 by default
- How to Use the Windows 10 Start Menu
- How to delete options in the Windows context menu
- Instructions to remove the All apps option on Windows 10 Start Menu
- Windows 11 is hiding a second Start menu: Why should you use it?
- How to enable / disable the Start menu full screen in Windows 10
- 6 ways to customize the Start Screen screen in Windows 8
- Start Menu does not work and free applications replace
- 3 ways to fix Start Menu on Windows 10 stopped working
- How to hide the All apps list in the Windows 11 Start menu
MORE LIKE THIS
- How to Convert a Doc File to a Docx File
- How to Download Microsoft Word
- How to Insert Fillable Fields on Word on PC or Mac
- How to Copy and Paste in Microsoft Word
- How to Protect a PDF File from Copying
- How to Type in Korean on a Computer
- How to Recover Word Documents
- How to Reinstall Wireless Drivers
- How to Connect a Wireless Mouse
- How to Trim a Video on PC or Mac
-
 What is open-source AI?
-
Here are 4 ways to open the virtual keyboard on Windows 7/8/8.1/10/11.
-
How to open Command Prompt on Windows 10, Access Command Prompt on Windows 10
-
What software can be used to open .nrg files?
-
How to open PowerPoint on your computer, open ppt, pptx files.
-
How to install Open Broadcaster OBS to record screen video
 What is open-source AI?
 Here are 4 ways to open the virtual keyboard on Windows 7/8/8.1/10/11.
 How to open Command Prompt on Windows 10, Access Command Prompt on Windows 10
 What software can be used to open .nrg files?
 How to open PowerPoint on your computer, open ppt, pptx files.
 How to install Open Broadcaster OBS to record screen video