How to change the location to save screenshots on Windows
By default, you can find this folder at C:/Users/[User Name]/Pictures/Screenshots. However, you can completely change the location to save screenshots on Windows to your liking. Find out how to do it right here.
Change the location to save screenshots on Windows 10 or Windows 11
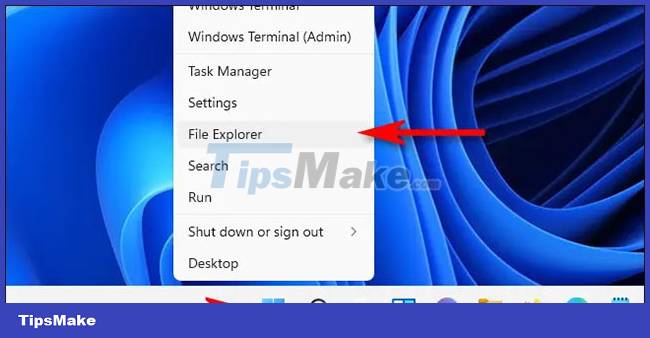
To get started, first open File Explorer by pressing the Windows + E key combination on your keyboard. Or you can right-click the Start button and select 'File Explorer' from the menu that appears.
When the File Explorer window opens, navigate to This PC > Pictures. Then, right-click on the 'Screenshots' folder and select 'Properties' in the menu that appears.

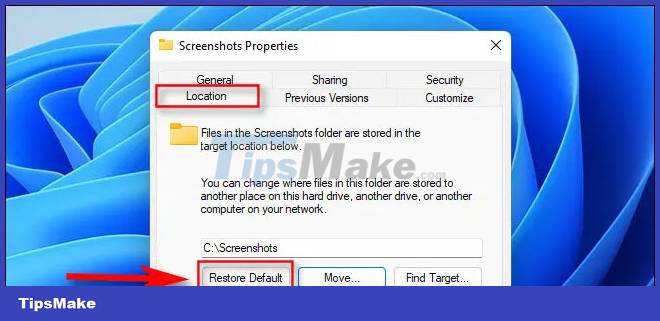
In the 'Screenshots Properties' window, select the 'Location' tab.

Using the text box in the 'Location' tab, you can enter the file path to which you want Windows to save the screenshot by default. Or click the 'Move' button and you can browse to the new location using the 'Select a Destination' window.

(Tip: You can save the screenshot anywhere. But we don't recommend using another special system folder like desktop. For example, if you want your screenshots to be visible. easily accessible from the desktop, can save them to a folder called 'Screenshots' on the desktop, instead of choosing the desktop itself as the storage area).

Once you have selected a location to save the image, click the 'Select Folder' button, then confirm the changes by clicking 'OK' in the Screenshot Properties window. If Windows asks you if you want to move the existing screenshot files to the new location, click 'Yes' or 'No' as you please.
The next time you take a screenshot using the Windows + Print Screen keyboard shortcut, the file will automatically be saved to the new location. If you want to change the screenshot location again, browse to the new screenshot folder in File Explorer, right click on it and select 'Properties', click 'Location Tab', then select 'Restore' Default'.

Hope you are succesful.
You should read it
- Windows revolution and breakthrough changes through each version
- Summary of several logout methods on Windows 8 and Windows 10
- Looking back at 27 years of 'evolution' of Windows
- Instructions on how to upgrade from Windows XP to Windows 8
- 4 ways to 'revive' Windows XP on Windows 10
- What is Windows Hello? How does Windows Hello work? How to install Windows Hello
 How to enable Virtualization (VT) on Windows 10 for BlueStacks 5
 6 ways Windows 10 wastes your Internet bandwidth
 How to Cancel Automatic Shutdown on Windows 10
 Microsoft issues an urgent warning to users of Windows 10 versions 1909 and 20H2
 Fix Excel crashes in Windows 10
 Steps to enable/disable Power Throttling in Windows 10