Tips for using Sticky Notes in Windows
Sticky Notes is a quick, simple, easy to use application and it is right there on your screen. Here are tips for Windows built-in note taking application.
Table of Contents
Sticky Notes is a quick, simple, easy to use application and it is right there on your screen. Here are tips for Windows built-in note taking application.
1. Simple to use
Open and close
Sticky Notes is preinstalled with Windows 7 and above and it can be easily accessed by clicking the Start menu, typing sticky notes and pressing Enter .

Note that Sticky Notes is not like any other application window, when you press the X button in the top right corner of Sticky Notes, it is actually just erasing the contents of the note in it. Instead, to just close and save the content in Sticky Notes, right-click on its icon in the taskbar > Close Window . The entire note will be closed. If you reopen Sticky Notes, you will see the previous note is right before you closed it, even when restarting your Windows computer.
Notes format
You can easily change the content size of Notes. At the bottom right corner of the window, hold and drag to increase / decrease the size as you like.

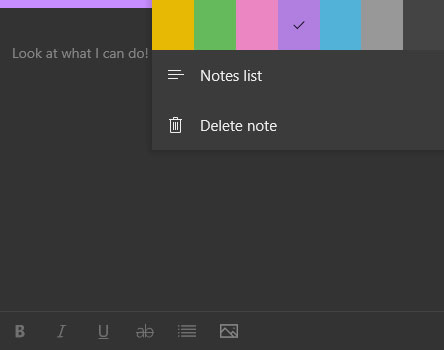
By default, the interface of Sticky Notes is yellow. To change the background color, right-click on it and choose another color. In Windows 10, you have to click on the 3 dots that appear at the top.

Add or delete a Notes
To add / delete a Notes is very simple, just click the plus sign in the top left corner to add a Notes window, and click the X in the upper right corner to delete Notes. In Windows 10, you have to click on the trash can icon.

When deleting a Notes, you will be asked to confirm the action, select yes .

The shortcut Ctrl + N also works, as long as you're in the Sticky Notes app.
At the time of writing, the Sticky Notes application creates a separate window for each note. If you want a tidy desktop, you should create a separate virtual desktop for Sticky Notes.
To do this, press Win + Tab to open Windows 10 Task View . At the top, click the New desktop option .
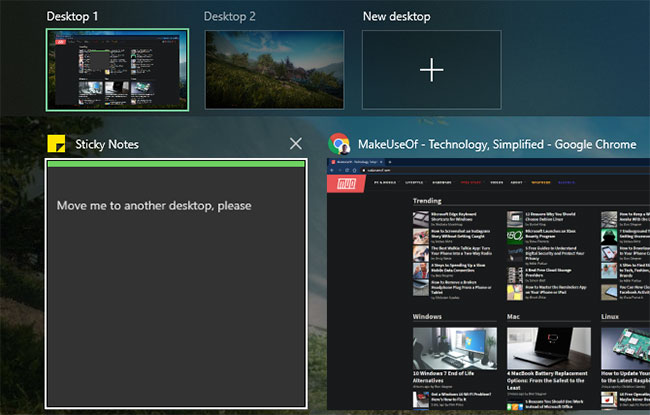
You can now use the keyboard shortcut Ctrl + Win + ← / → to easily switch between desktops. With notes on the second desktop, the main workspace will not be cluttered.
You can move existing notes by opening Task View , then dragging the Sticky Notes window (s) to the new desktop at the top.
2. Format text
Although the Sticky Notes working window has no menu system for user interaction, you can still format the text in it, such as bold, italic, etc., or add bulleted lists. .

First, select the text you need to format then use one of the following keyboard shortcuts:
- Ctrl + B: Bold text
- Ctrl + I: Italic text
- Ctrl + U: Underlined text
- Ctrl + Shift + A: Text to uppercase letters
- Ctrl + T: Text has dashes in the middle
- Ctrl + Shift + L: Create bulleted lists (press Ctrl + Shift + L repeatedly 6 times for 6 different types of lists)
- Ctrl + L: Align left
- Ctrl + R: Align to right
- Ctrl + E: Align center
- Ctrl + Shift +>: Increase the text size
- Ctrl + Shift +
- Ctrl + 1: Single line spacing
- Ctrl + 2: Double line spacing
- Ctrl + 5: Spacing 1.5 lines
3. Change note font
Windows uses the Segoe Print font, it does not support changing the default font. You can only type the text with the font style you want to use in a text editor like Word, then copy and paste it into Sticky Notes. It will display the text in that font.
4. Set up Sticky Notes to start up with Windows

To set Sticky Notes to start up with Windows, follow the steps below:
Step 1. In the File Explorer type type:% APPDATA% MicrosoftWindowsStart MenuProgramsStartup in the address bar and press Enter .
Step 2 . In the folder showing all the programs that start on the Windows system, right-click an empty space and choose New> Shortcut .
Step 3 . In the Create Shortcut box, type the address of the Sticky Notes application,% windir% system32StikyNot.exe, and then press Enter .
Now Sticky Notes will automatically open each time you start Windows (until you delete the shortcut).
5. Restore the previous note you deleted
You can easily delete a note and there is no option to save them locally or in the cloud. If you delete a note, you can restore it by following these steps:
Step 1. Access File Explorer and type in the address bar% AppData% MicrosoftSticky NotesStickyNotes.snt.
Step 2. Open the .snt file in Notepad and you will see the text from your deleted notes.
Step 3 . You may find this text a bit confusing if you use a lot of formatting shortcuts as mentioned above. Therefore, go to Format> Word Wrap for easier reading and press Ctrl + F to search for specific text.
Alternatively, if you regularly create a restore point on your computer, you can access the Sticky Notes folder (% AppData% MicrosoftSticky Notes), right-click on the .snt file, select Restore previous versions> Previous Versions Select the Sticky Notes version.
6. Backup Sticky Notes
If you've tried saving notes before, you'll notice that you can't choose this location at will. However, all of these notes are stored in a single file called StickyNotes.snt , so you can simply copy this file and replace it on any other computer to view your notes.
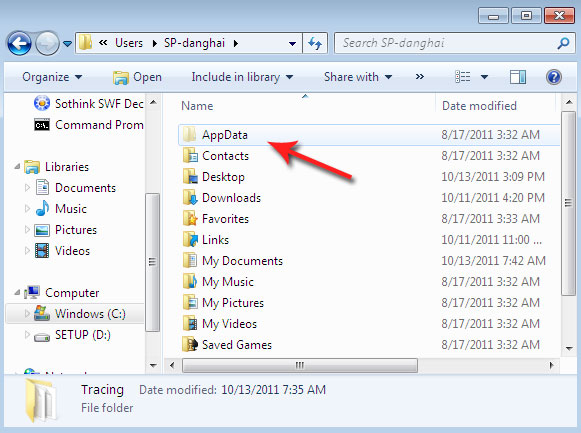
Open Windows Explorer and navigate to the following path: C : Users UserName AppDataRoamingMicrosoftSticky NotesStickyNotes.snt .

Where C: is the drive letter of Windows 7 installation, UserName is the current user name. (If you don't see AppData, go to Organize > Folder and search options . Select the View tab, select Show hidden files, folders and drives . Click OK .)
At this time, the hidden folder AppData will appear with a lighter yellow than other folders.
Starting with Windows 10 Anniversary Update version 1607, Sticky Notes has become the Trusted Windows Store application, so this procedure may not work. To backup Sticky Notes in Windows 10, do the following:
Step 1 . Copy all files and folders from the following location to another location:
% UserProfile% AppDataLocalPackagesMicrosoft.MicrosoftStickyNotes_8wekyb3d8bbwe
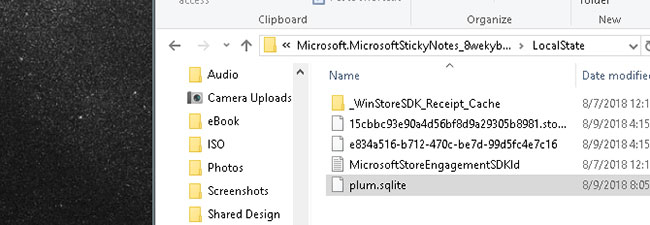
Step 2. Your note is stored in a file named plum.sqlite , this is an SQLite file, located in the following directory:
% UserProfile% AppDataLocalPackagesMicrosoft.MicrosoftStickyNotes_8wekyb3d8bbweLocalState
You can copy this plum.sqlite to another location and use it to restore on the same computer or on another Windows 10 computer.
7. Re-enable note deletion warning
If you see a message deleted but no message box appears, or you accidentally selected the Don't display this message again button , you can follow the steps below to display the message again.

Open Registry Editor and navigate to the following key:
HKEY_CURRENT_USERSoftwareMicrosoftWindowsCurrentVersionAppletsStickyNotes

Now delete the value called PROMPT_ON_DELETE or set its value to 1.
8. Customize Sticky Notes
Once in the Sticky Notes app, you'll also see a bar along the top with a few control buttons. You can click and drag here to reposition the note. For example, stacking notes saves space on the desktop.
Like most other application windows, you can click and drag from one edge to resize them.
Click the X in the upper right of the note to close it (but not delete). Select the three-dot option button, then click the menu icon to select a number of colors for the note.
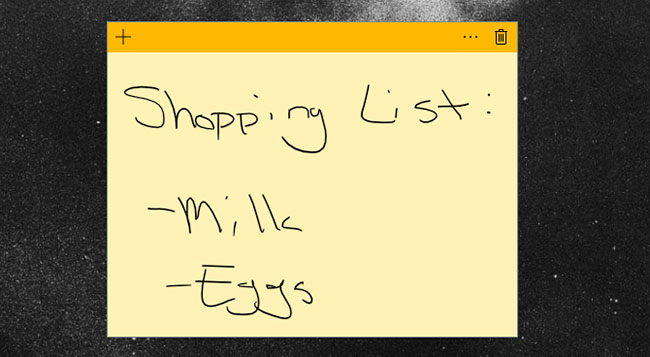
If you have a touch interface, you can use your finger or a stylus to write on Sticky Notes. Feel free to draw or sketch on your notes using the touch screen or tablet as you would with a regular pen and paper.
9. Use the Sticky Notes list
The last item on the Menu, which you can access with the keyboard shortcut Ctrl + H , is the Sticky Notes list page. This is the hub containing all your current Windows notes, including closed notes.
Double-click a note to open or right-click to delete a note you no longer need. You can also use the Search box at the top to scan the content of all notes.
Meanwhile, click Settings at the top to open a few options that Sticky Notes provides. Select Enable insights to enable identification of useful content in Sticky Notes. You can also change the theme and disable the confirmation prompt before deleting.
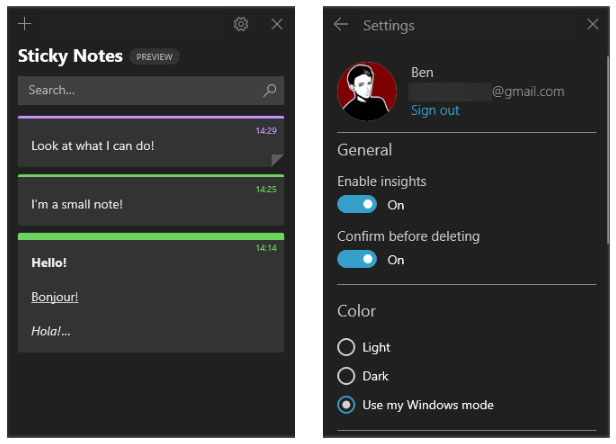
You also need to make sure you are logged into your Microsoft account to sync notes with other devices.
10. Integrate Sticky Notes and Reminders
Here is a simple reminder that is entered into a note with details enabled:
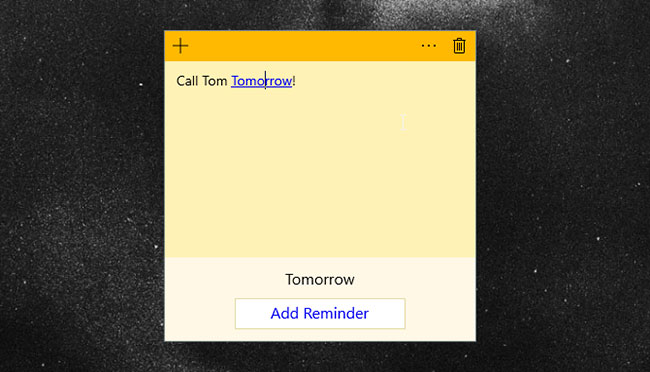
When you type (or write) a date like this, it automatically becomes a link. Click the link text, and you'll see the Add Reminder prompt at the bottom of the note.
Click here to set a reminder with Cortana. Once you've entered the date and time, just select Remind and you 're done.
11. Access Sticky Notes Windows on mobile device or web
What if you need to work with Windows notes on other devices? Thanks to free mobile apps and the web interface, your sticky notes aren't stuck in Windows 10.
Go to this page:
https://www.onenote.com/stickynotes
. to access them online from any browser, even on Mac or Linux systems. Sign in with the same Microsoft account you use for Windows 10.
Here, you will find a simple interface that allows you to read, edit and create new notes. Any changes you make here will sync with Sticky Notes on Windows 10.
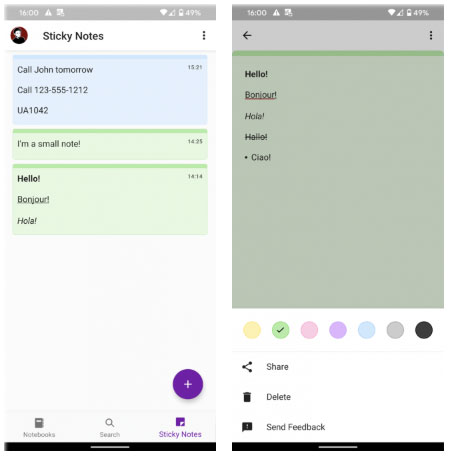
To access notes on the go, you'll need to install the free OneNote app for Android or iOS. Sign in with your Microsoft account, then click on the Sticky Notes tab to access the notes.
Like the web and the desktop, you can create new notes and change existing ones. You will also notice the Camera icon in the lower left corner of the note, allowing you to add images to them.
12. Transfer notes to the new computer
Using the above method, you can access your notes on different devices. In case you want to move them manually or keep your own backups, you can copy and move the saved notes to the new computer.
First, go to the following directory:
%LocalAppData%PackagesMicrosoft.MicrosoftStickyNotes_8wekyb3d8bbweLocalState
There, locate the file labeled plum.sqlite and copy it to a safe place. To move notes to a new PC, place (or replace) the copied file in the same folder on that computer.
If you want to make a second copy of the note, just copy the file and change its name. For example, you can copy and paste the plum.sqlite file and name it plum1.sqlite. Then, if the note disappears or fails, simply rename the backup file to plum.sqlite again to restore it.
Was this article helpful?
Your feedback helps us improve.
Related Articles
 How to Use Windows Sticky Notes as the Ultimate Productivity Tool5 minutes read
 Instructions on how to type Vietnamese on Sticky Notes3 minutes read
 How to use Windows 11 Sticky Notes on all devices8 minutes read
 Experience Sticky Notes Studio creating a note-taking space on Windows3 minutes read
 How to share Sticky Notes between computers6 minutes read
 Microsoft launched a new version for Sticky Notes on Windows 10 with a different experience2 minutes read
Reader Comments 0
Sign in with email or Google to join the discussion.