How to add useful options to the Services menu on macOS
If you didn't know about the Services menu on a Mac or never cared about it, change that today.
Table of Contents
If you didn't know about the Services menu on a Mac or never cared about it, change that today.
Menu Services can be accessed by right-clicking on the selected elements or via the menu bar at the top of the screen. The Services menu hides useful options, allowing you to perform complex actions with just one click (like the right-click menu of File Explorer on Windows).
Moreover, you can make the Services menu more useful by adding custom actions to it easily! Find out through the following article!
Learn about the Services menu

To open the Services menu for any application:
- Click on the application name (next to the Apple logo ) in the menu bar.
- Select the Services section in the menu that appears.
In all applications, the Services menu provides users with more options for tasks performed by borrowing features from other applications.
For example, if you highlight a piece of text in your browser, you may see options to search for it in the Dictionary application, read it out loud or create a note from it. You can then take any of these actions without leaving the current application.
These actions may also depend on the application on the Mac. If you've installed Evernote, you'll also see an option to add text to Evernote.
Now, suppose you highlight someone's name instead of a paragraph of text. In this case, you can use the Services menu to call that person via Skype or send an SMS.
As can be seen from the examples above, the Services menu is a context menu. This means that the content varies depending on the application being viewed, the task in progress, and the software installed on the Mac. The Services menu is very often empty because there are no options related to the current task.
In addition, if the mentioned application does not work with the service, the application's Services menu will be permanently blank.
Enable and disable services
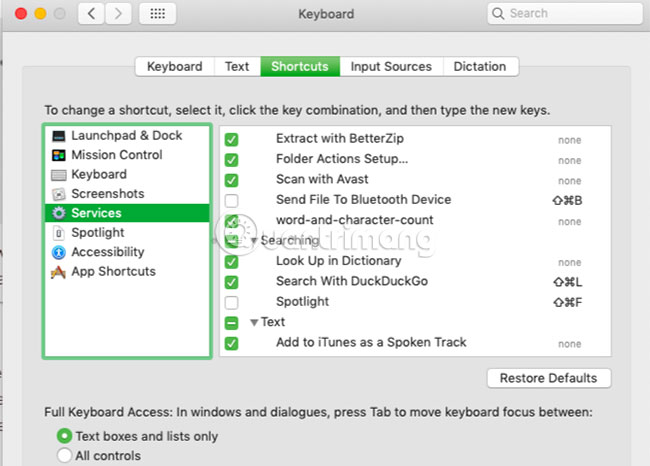
To control what is displayed in the Services menu, click Services Preferences from the Services menu in any application. The settings panel for the services will appear. You can also access via System Preferences> Keyboard> Shortcuts> Services .
In the display settings panel, you will see a list of services with check boxes next to it. Third-party applications that you have installed also add their own services to this list. Services that appear in categories such as Pictures, Text, Files and Folders , etc., make it easy to find a specific service.
As expected, enabling and disabling services is a simple matter, by selecting and unchecking the relevant checkboxes in this list. If you accidentally mess up and want to start over, you can click the Restore Defaults button .
Each service in the list allows you to add a corresponding shortcut. Therefore, it is not necessary to go through the Services menu to activate your favorite services.
To create a shortcut for the service, click on the placeholder (with None content ) next to the service in question. After that, None will be changed to Add Shortcut button . Click it and press the shortcut you want to use. This will specify the shortcuts for the corresponding service.

What can you add to the Services menu?
The default list of services displayed in the settings panel is long enough and varied, but you can expand it in several ways:
1. Install the application to bring useful service
- Dictater: Gives you control over Mac's text-to-speech function.
- Markdown Service Tools: Make writing Markdown on macOS easier, with options to convert from HTML to Markdown, etc.
- SearchLink: Allows you to create links for text after querying multiple sources, including Google.
- Gladys ( Download link: http://www.bru.build/gladys-for-macos ): Gives you the ability to drag and drop to store text, images, emails, links, messages and content Other for quick access.
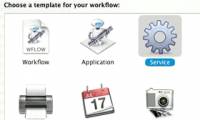
2. Create service in Automator
Automator, integrated automation application on macOS, is quite flexible. Automator offers users a myriad of ways to simplify and speed up the workflow. Service is a type of workflow you can create with Automator. Consider the following examples:
- Document store: The service sends the text of the website to Apple Books.
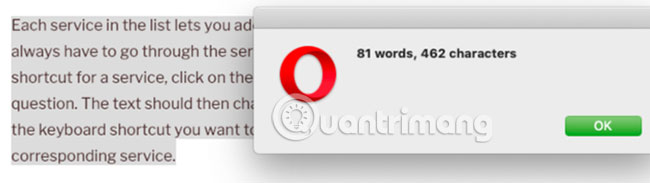
- Magnetic Counters: An Automator service can give you the total number of words of the selected text in seconds.
For more ideas, you can browse the web to see a list of useful Automator services to create.
While creating a service using an online tutorial, written for the previous macOS Mojave version, you must pay attention to several points:
- Automator service process now has a new name: Quick Action. Therefore, you will need to select Quick Action instead of Service as the document type while setting up Automator workflow.
- Ensure that the dropdown menu of Workflow receives current is set to the type of input related to the service being created. Otherwise it can return to the default Automatic (Nothing) setting .
Menu Services on macOS is easy to ignore because it is hidden in the context menu and is rarely seen. But once you take the time to explore this menu and set up custom services to speed up the work, you probably won't be able to live without this tool!
After setting up the Services menu as you like, you may want to explore a few small but useful macOS features.
Good luck!
Was this article helpful?
Your feedback helps us improve.
Related Articles
 Edit Menu Context on macOS7 minutes read
 How to display the date in the macOS menu bar3 minutes read
 How to delete options in the Windows context menu11 minutes read
 6 ways to access the Boot Options menu in Windows 107 minutes read
 How to access the Boot menu in Windows 114 minutes read
 Improve efficiency with Services in Mac 10.64 minutes read
Reader Comments 0
Sign in with email or Google to join the discussion.