How to hide - show menu items in Adobe Photoshop
You can completely hide unused options and categories to optimize the Photoshop interface as well as the working area on the screen.
Table of Contents
Adobe Photoshop is an extremely feature-rich photo editing application. This is clearly demonstrated through the large number of different menu items. The problem is that depending on your specific needs, there are some of these menu items you rarely or never use. In such a case, you can completely hide unused options and categories to optimize the Photoshop interface and working area on the screen.
How to hide menu items in Photoshop
You can hide any optional item in Photoshop.
To get started, launch Adobe Photoshop on your computer.
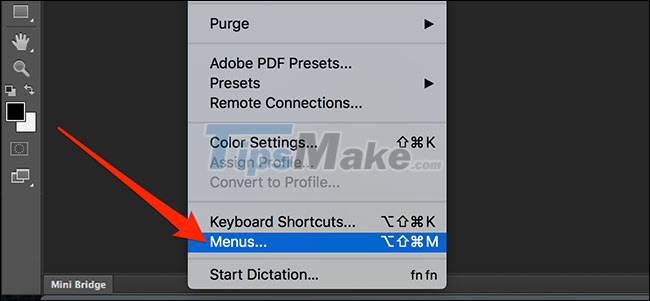
Once the app opens, click the ' Edit ' menu at the top and then click on the ' Menus ' entry .
You should see a list of all your Photoshop menus. Click on the menu you want to remove (hide) some of its options from the main interface.

The menu will expand so you can see all the available options on it. To hide an option, click the eye icon next to the option name. This removes the eye icon from the white box, which means the item is currently hidden.

Click ' OK ' in the upper right corner to save the changes. The corresponding option items are now hidden from the Photoshop interface.
In case you want to display an optional item again, just follow the same steps. Make sure the eye icon appears in the box to the right of the option you want to display again. Then, click OK to save changes.
How to highlight frequently used option items
If you don't want to hide any of the options, you can also highlight the items you use often so you can easily find it when you need it. In other words, you can assign separate colors to each of your frequently used optional items, making it easier to find them.
To do this, open Photoshop and click Edit> Menus .
Select an optional item for which you want to specify a color, and then select the color you want to assign.
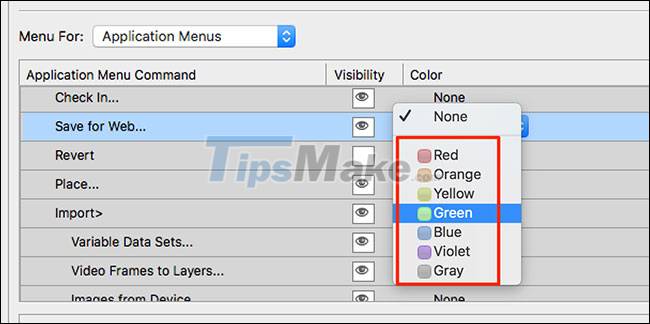
Your respective option item will now be colored differently from other menu items, making it easy to find it when you need it.

This will make it easier to find the menu you need in the middle of the menu forest when editing photos in Photoshop.
Was this article helpful?
Your feedback helps us improve.
Related Articles
 How to use Photoshop CS5 - Part 4: Basic menus14 minutes read
 Link download Adobe Photoshop CC8 minutes read
 How to clear the list of recently opened files in Adobe Photoshop2 minutes read
 How to delete options in the Windows context menu11 minutes read
 Instructions for using Photoshop for newbies18 minutes read
 How to Delete Data Items in a PDF Document Using Adobe Acrobat13 minutes read
Reader Comments 0
Sign in with email or Google to join the discussion.