Use Diskpart to remove the Read-Only attribute on Disk Windows 7
On Windows 7, users can assign Read-only properties to Disk to protect Disk. When other users access, can only read the contents on the Disk that cannot modify Disk.
Table of Contents
On Windows 7, users can assign Read-only properties to Disk to protect Disk. When other users access, can only read the contents on the Disk that cannot modify Disk.
To remove this attribute on Windows 7, please refer to the following article of Network Administrator.
Warning:
Make sure that you have selected the correct drive, if you choose the wrong drive, the Diskpart command can cause many other serious problems.
To remove the Read-Only attribute on Disk Windows 7 with Diskpart, follow the steps below:
1. Open Command Prompt, then enter Diskpart into it and press Enter.
2. Next run List Disk command and press Enter to see the list of Disk.
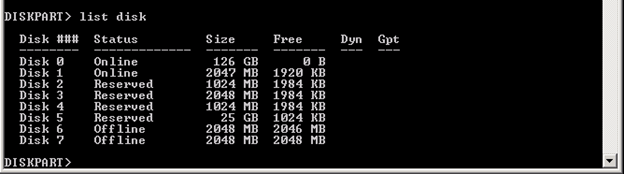
3. Consider which disk you want to edit, then run the Select Disk n command, where n is the Disk number you see in the Disk list in the previous step.

In the example below is Disk 1.
4. To see the Disk 1 properties selected, run the command: attributes disk .

As you can see, Disk is set to Read-only, so both Current Read-only State and Read-only properties are set to Yes.
5. To delete the Read-only property, run the command: attributes disk clear readonly .

Now you can see that the Current Read-only State and Read-only properties are set to No, and Disk is allowed to write (writeable).
To exit Diskpart, enter exit into the Command Prompt window and press Enter.
Refer to some of the following articles:
- How to perform Clean Boot on Windows 10/8/7
- Windows Defender is disabled or inactive, this is a fix
- Summary of tips to fix computer errors Windows 10/8 / 8.1 / 7 and Windows XP running slowly
Good luck!
Was this article helpful?
Your feedback helps us improve.
Related Articles
 Use DiskPart to format and clean up your removable hard drive on Windows 104 minutes read
 How to Remove 'Read Only' Attribute on MS Word Files7 minutes read
 About the Diskpart command line utility26 minutes read
 Attribute Selector - Attribute Selector in CSS5 minutes read
 How to convert an MBR hard drive to a GPT disk using the CMD Diskpart command3 minutes read
 How to Erase Windows 10 Drive with DiskPart3 minutes read
Reader Comments 0
Sign in with email or Google to join the discussion.