Function Tracks Change, Comments in Microsoft Word
The Tracks Change function allows you to save a draft of what you have just edited scientifically, looking at the text using the Track Change function, you will see very clearly the changes in content. How have been added, removed or edited..
The Tracks Change function allows you to save a "draft" of what you have just edited scientifically, looking at the text using the Track Change function, you will see very clearly the changes. How content has been added, deleted or edited.
The Tracks Change function, as well as the Comment, is often not used by people because it is thought to be a problem. However, this concept is gradually changing when in the new version of Word (XP, 2003), Microsoft increasingly focused on upgrading this feature for convenience and ease of use.
Turn on and off the Tracks Change mode
Method 1 : To activate Track Change mode, go to Tools -> Track Changes menu .
Method 2 : Click the Track Change icon on the Reviewing toolbar (If you don't see the Toolbar toolbar, you can make it appear by selecting the View -> Toolbar -> Reviewing menu).
When the Tracks Change mode is activated, the TRK icon in the status bar will switch from dimming to dark.
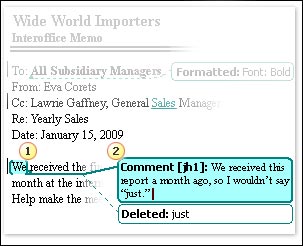
Thanks to the Tracks Change mode, in the Print Layout , Web Layout and Reading Layout status , the deleted or reformatted text appears in a marginal annotation, which looks like we often use a pen to edit the text on the writing page every day.

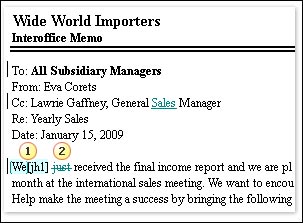
In Normal or Outline view , deleted text appears immediately in the text with the underline, not in the comment loop and changes that will directly affect the text.
Insert comments in the text
Method 1 : Select Insert -> Comment menu
Method 2 : On the Reviewing toolbar, click the Insert icon
In the Print Layout , Web Layout and Reading Layout status , you will see the following format:
Use the buttons on the Reviewing toolbar to confirm or cancel the Track changes process and to delete Comments (comments).

- Click Previous to review previous actions.
- Click Next to see the following actions until the last operation.
- Click Accept Change to confirm the proofing process.
- Click Reject Change / Delete Comment to cancel the proofing process and delete the comment section.
The format Track changes will look different in different view modes ( Print Layout , Normal , Web layout , Reading layout , Outline ). Once you have used the Track changes mode, you will find out which format is best for you.
In Print Layout view , lines of text are deleted, annotations and other text formats are displayed in the comment boxes on the margin of the text. Also appearing similar to the Print Layout mode is the mode of viewing Web Layout and Reading Layout format.
However, in Normal and Outline , there is no comment box at all. The deleted text is shown in the text with a line on it, and the legend is shown at the bottom of the text in the Reviewing section.
In addition, in all formats, inserted text lines are represented with underlined lines and individual colors, and vertical lines appear on the left margin to indicate where the modification has been made. show.
Cells display mode (Balloons)
You can change the display modes of Balloons by selecting the Show menu located on the Reviewing toolbar and changing the modes.
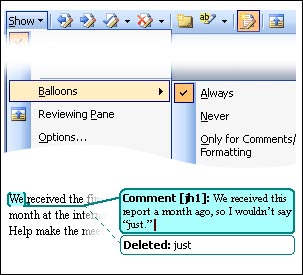
+ Always : Always appear a comment box during text manipulation
+ Never : Do not want to appear comments box during the text manipulation process
+ Only for Comments / Formatting : Appears a comment box for annotations and changes in text, while the deleted text will be displayed with a dashed line.
Conclude
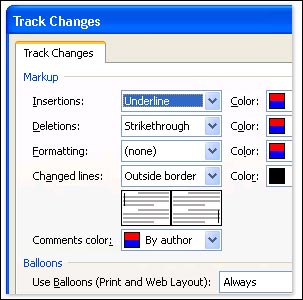
Deleted sections, annotations or formatting changes will appear in balloons in the observed modes: Print Layout , Web Layout and Reading Layout . In addition, you have many options for expressing, deleting, and changing the format in the " Tracks changes and Comment " section with different fonts, fonts, and formatting. Microsoft default mode. Go to the Show menu, select Options to have your own choices. Wish success.
Mai Huong