Fix hard drive not recognizing data in Windows
Why is the hard drive still recognized in Windows but no data is displayed? Let's find out the cause and how to fix it in the article below with Hacom!
Table of Contents
Have you ever turned on your computer and it still works normally, you can still boot into Windows but the hard drive does not show data in the File Explorer management section of My Computer? Is the hard drive broken? Stay calm, Hacom will help you answer this question.
During the process of using the computer, the hard drive error does not display data, which is one of the most common errors encountered by users. Below are some causes and how to fix this situation.
Causes and how to fix the problem of hard drive not showing data
1. Hard drive is not formatted
For new hard drives attached to the computer system, the error of the hard drive not showing data is often due to not being formatted during the initialization process for use. Of course, a hard drive without a hard drive partition will not be displayed in File Explorer. Therefore, to fix the problem of the hard drive not showing data with a new hard drive, we just need to format and partition the hard drive to be able to use it normally.
How to initialize and format the hard drive is as follows:
Step 1: Access the drive management area by following these steps:
- Right click on Computer > Manage > Disk Management
- Right click on your new hard drive and select Initialize Disk .
- In the dialog box, select the hard drive to initialize and choose MBR or GPT partition style.

Step 2: Create disk partition
- Right click on Computer > Manage > Disk Management
- Right-click on the uninitialized partition and select New Simple Volume
- In New Simple Volume, click 'Next' to continue.
- Follow the wizard to resize the partition, assign a hard drive letter to the partition, and then format the partition.

After creating a partition on the new hard drive, it will be used and displayed in Windows Explorer.
2. Hard drive has duplicate name, not named yet
When the hard drive is not named or has the same name as other drives, it will also cause the hard drive to not display data. To handle this case, the operation is quite simple, you do the following:
Step 1: Access the hard drive administrator by right-clicking on Computer > Manage> Disk Management
Step 2: After accessing Disk Management, a list of drives will appear.
Step 3: Find the list of partitions with the word Headthy on the Primary Partition and that drive does not have a drive letter in the form (C:) (D:),. then right-click on that drive and select Change Drive Letter and Paths. Note that this should only be done with partitions larger than 1GB.
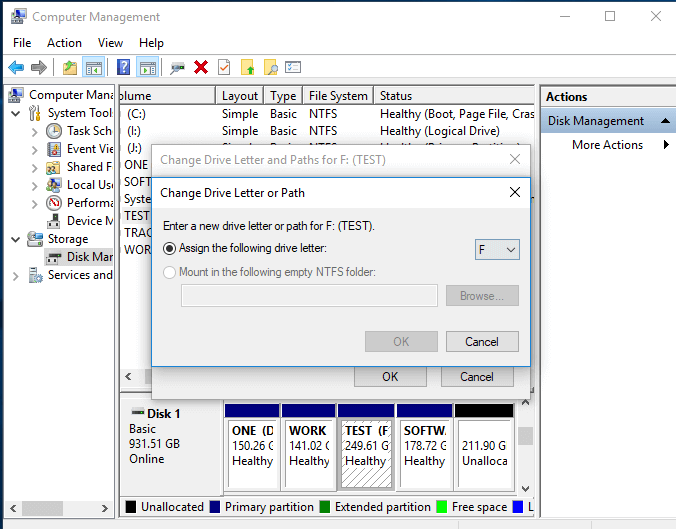
Step 4: A new window appears, select Add
Step 5: Next, select OK. You can also customize the drive letter in the section if you want.
Step 6: Now go back to My Computer by using the Windows + E key combination and you will see that the hidden hard drive has been restored and all the files in it are not lost.
3. Hard drive has not been partitioned
For newly purchased hard drives, when connected to the computer, the data will not appear. The reason is that the hard drive has not been partitioned to work. To create a partition for the hard drive, do the following:
Step 1: Right-click on "This PC" and select "Manage" > "Disk Management".
Step 2: Right-click on the hard drive that is being reported as unallocated space and select "New Simple Volume".
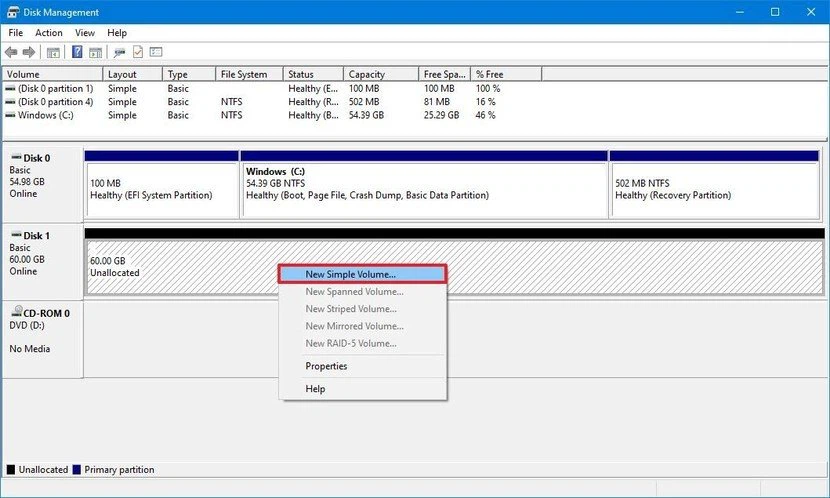
Step 3: In the New Simple Volume Wizard window, click "Next" to continue.
Step 4: Follow the wizard to specify the hard drive size, assign a drive letter to the hard drive, and then format the partition.
4. Hard drive driver is faulty or outdated
If you have tried the above steps but the hard drive still does not display data, your hard drive driver may be outdated and cannot function properly. At this point, try updating the hard drive driver or updating the main bios.
Since your hard drive is not detected, you cannot update it as usual by right-clicking on the hard drive and selecting "Update driver". Instead, go to the official website of the manufacturer who sold the hard drive and download the driver that is compatible with the product you purchased.
You can also try accessing the BIOS. Use the arrow keys on your keyboard and select 'Integrated Peripherals,' then press 'Enter.' Use the arrow keys to select 'USB Controller.' If it is disabled, change the option to 'Enabled.' Save the settings and reboot to see if the problem is resolved.
Was this article helpful?
Your feedback helps us improve.
Related Articles
 How to fix portable hard drive not recognized when connected to computer7 minutes read
 The simplest way to fix a Macbook with an SSD error and not recognizing the hard drive9 minutes read
 Dissection of hard drive components8 minutes read
 Computer hard drive is fast, why?5 minutes read
 How to partition a hard drive in Windows 11, 10, 8, and 7 without losing data.5 minutes read
 Instructions for 5 ways to fix the error of not recognizing the removable hard drive on Windows6 minutes read
Reader Comments 0
Sign in with email or Google to join the discussion.