Fix ClipChamp not working error on Windows 11
While using ClipChamp, you may also encounter some errors such as not being able to use ClipChamp when clicking. Below are some instructions on how to fix ClipChamp not working on Windows 11.
ClipChamp is a built-in application on Windows 11 for you to view and edit videos. While using ClipChamp, you may also encounter some errors such as not being able to install ClipChamp or not being able to use ClipChamp when clicking. Below are some instructions on how to fix ClipChamp not working on Windows 11.
Fix ClipChamp not working via Settings
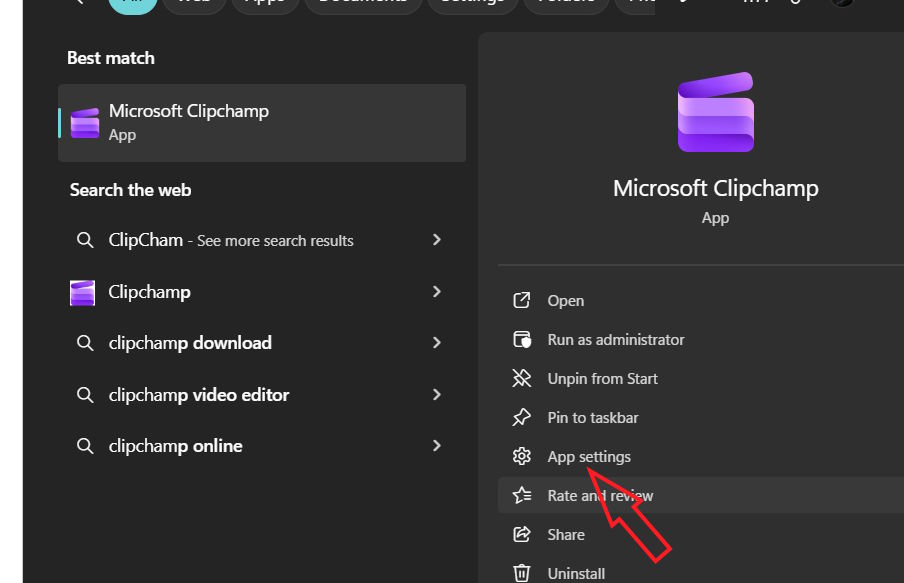
Step 1:
You type ClipChamp in the search bar , then click on App Settings as shown below.
Step 2:
Display the ClipChamp application installation interface, click the Repair button to repair the application that is having problems.
If ClipChamp still doesn't work, you can reset the app, which will erase all data and return it to its original default look. Tap Reset to reinstall the app.

Fix ClipChamp not working with SFC Scannow command
The SFC Scannow command automatically detects corrupted, damaged ClipChamp files and finds the correct file version.
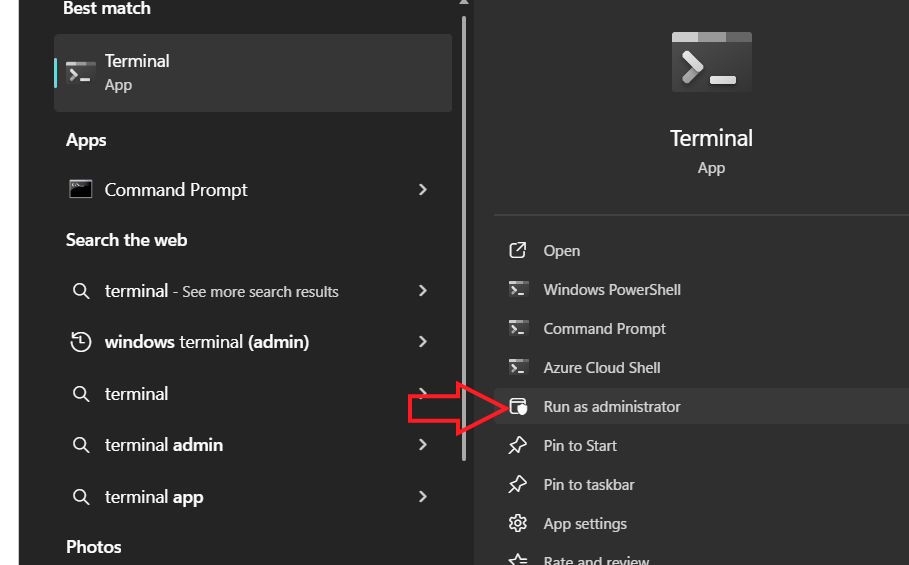
Step 1:
You need to open Terminal as administrator on your computer.
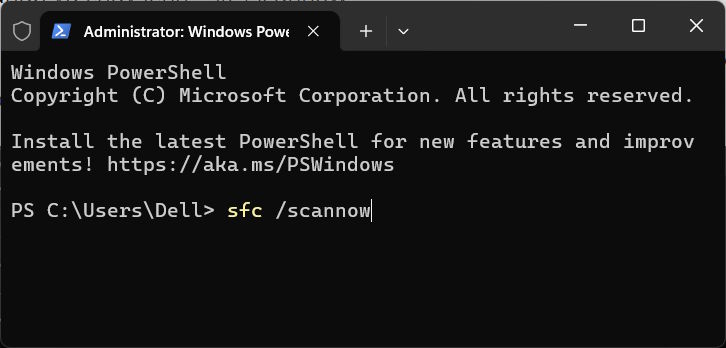
Step 2:
In this interface, you enter the command sfc /scannow . Then the corrupted files will be displayed and notified on the screen. You follow the displayed instructions and Windows will automatically reload all corrupted files.
Free up computer RAM
ClipChamp requires a lot of RAM and CPU resources to run. In some cases, ClipChamp will not run or will shut down due to lack of space. This can happen if you are using large or long videos and running other applications at the same time.
Try closing inactive programs, like Chrome or other heavy programs, to free up your computer's memory.
You can also use Task Manager to close background programs that you are not using.
- 8 Task Manager tips that Windows users should know
Turn off anti-virus or anti-scam software on Windows
If you are using third-party antivirus software, temporarily disable it and try running ClipChamp again. Alternatively, you can allow ClipChamp through your firewall.
Step 1:
Open Settings and select Privacy and security , then click Windows Security > Firewall & network protection .

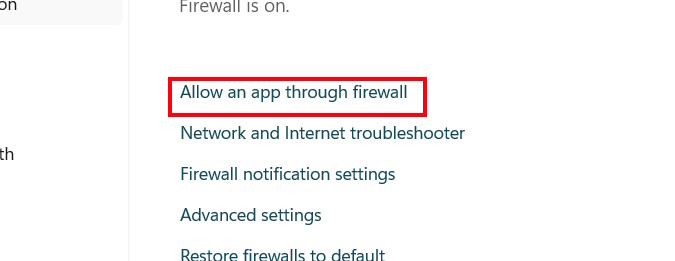
Step 2:
Switch to the new interface, the user selects Allow an app through firewall as shown.
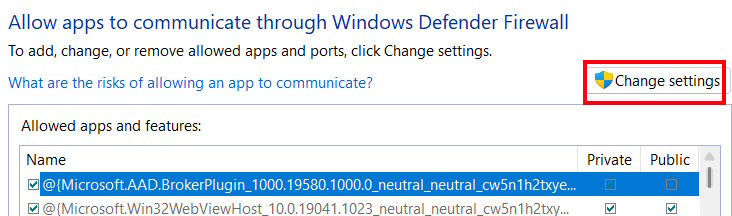
Step 3:
Click Change settings again to change the settings.
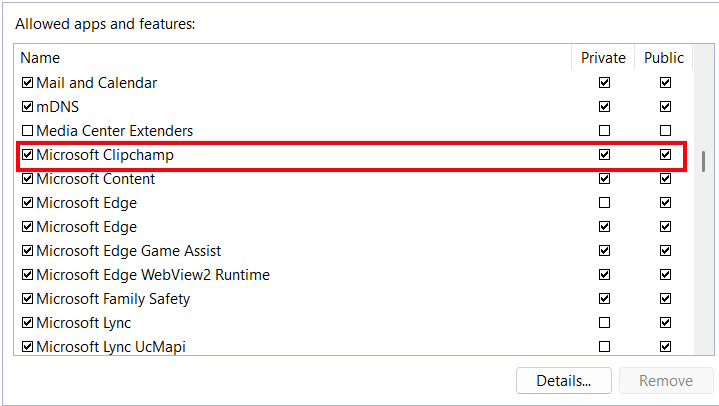
In the list below , find Microsoft ClipChamp and select both Public and Private options . Finally, click OK to save.
- Why can't Clipchamp export video?
- How to make videos with Microsoft's Clipchamp
- How to create and edit videos with Clipchamp's AI tools
- Instructions for using Clipchamp to edit videos on Windows
- How to Easily Trim Video by Removing Transcript in Clipchamp
- How to fix Has Stopped Working error on Windows
- How to fix the error Run as Administrator does not work in Windows
- Fix keyboard error not working on Windows 10
- How to copy text from Wattpad to word
- 5 best free CSV splitting tools, CSV file splitting software
- How to create ISO file with WinRAR
- Using Notepad ++ compare two files with a plugin
- How to get Cookies and Facebook Token simple
- Top 5 software to change MAC address on Windows 10
- Encoding of Vietnamese typing methods Telex, VNI and VIQR on UniKey
- 4 simple ways to extend any trial period to a software
- 7 best open source private cloud software to set up cloud storage
- Top 5 best keyboard test software


-
 Why can't Clipchamp export video?
-
How to Easily Trim Video by Removing Transcript in Clipchamp
-
Microsoft Copilot will bring video creation options to users
-
How to create and edit videos with Clipchamp's AI tools
-
Instructions for using Clipchamp to edit videos on Windows
-
Clipchamp - Download Clipchamp here
 Why can't Clipchamp export video?
 How to Easily Trim Video by Removing Transcript in Clipchamp
 Microsoft Copilot will bring video creation options to users
 How to create and edit videos with Clipchamp's AI tools
 Instructions for using Clipchamp to edit videos on Windows
 Clipchamp - Download Clipchamp here
-
Application
-
Web Email
-
Website - Blog
-
Web browser
-
Support Download - Upload
-
Software conversion
-
Social Network
-
Simulator software
-
Online payment
-
Office information
-
Music Software
-
Map and Positioning
-
Installation - Uninstall
-
Graphic design
-
Free - Discount
-
Email reader
-
Edit video
-
Edit photo
-
Compress and Decompress
-
Chat, Text, Call
-
Archive - Share
-
-
System
-
Mac OS X
-
Hardware
-
Game
-
Tech info
-
Technology
-
Science
-
Life
-
Electric
-
Program
-
Mobile