Design website with Adobe Dreamweaver CS5 software - Part 1
Adobe Dreamweaver is a powerful processing tool for web designers, users can program and develop web applications on multiple levels.If Dreamweaver only stops at a level of knowledge of web programming languages, Dreamweaver still meets the needs of professional website designers.
Non-professional users just need to find a satisfactory website template on the Internet, use a normal editing tool to edit or add some elements, then create a Template to apply to the entire Website.
In addition to drag-and-drop features to build websites, Dreamweaver also provides a fully functional coding environment including code writing tools (such as color coding, tag additions, code toolbars), Support common programming languages HTML , CSS , Javascript, ASP VBScript , PHP or XML . If Dreamweaver wants to build dynamic web applications running on ASP.NET, ASP, JSP and PHP server technology, Dreamweaver can fully meet these big projects.
The user interface is intuitive and user-friendly, the area of the code is numbered sequentially in the lines and colored by each card to facilitate monitoring and checking. In addition to the default interface, the program also supports a variety of interfaces with different toolbar layout layouts, in the Designer feature (for Dreamweaver CS5 version).
Adobe Dreamweaver can incorporate other Adobe software to create a perfect product, such as Adobe Photoshop to help edit and design images for the Website. You can download Adobe Dreamweaver 30-day trial here.
Create a folder containing web sets
Before embarking on creating a website, the designer's first job is to create a folder to contain all the web-related things, for example webserver .
In that folder, you will create other folders to store data such as:
The Image folder is used to contain the entire image of the website.
Flash folder is used to store flash files, video clips, .
Data folder used to store data
And other directories depend on the purpose of the web creator.
2. Create a new website
Start Dreamweaver, in the first window of the program select HTML to open a new document page. Or go to the File menu, select New . In the Blank Page section select HTML and click the Create button to create a new page (Figure 1).

Figure 1. Create website
3. Save a web page
Before embarking on the design, you should save the site by going to the File menu, selecting Save or Save as . Then save the website to the folder containing the web with the * .html format . Note , the website of the website must be named index.html and must be saved in the directory containing the web.
4. Website format
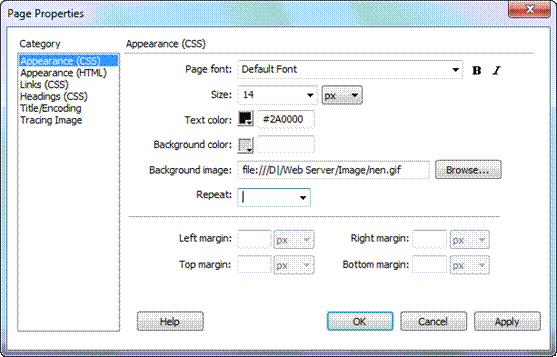
Figure 2. Site properties
After saving the website successfully, go to Modify menu and select Page Properties to set the format for the website.
In the Page Properties dialog box, adjust the following parameters (Figure 2):
Item Appearance (HTML):
+ Background image: Select Browse and browse to the image file used as the background for the website.
+ Background: Click on the palette button and indicate the background color for the website.
+ Text: Specify the default font color.
+ Link: Specify the default font color when you create a link for it.
+ Left margin: Enter the left margin compared to the content of the website.
+ Top margin: Enter the margin margin above the content of the website.
+ Margin width: enter the width of the website.
+ Margin height: enter the height of the website.
Item Title / Encoding :

Figure 3. Title and encoding
+ Title: Enter the title of the website.
+ Other items are left to default.
After tweaking the website format, select OK to set up (Figure 3).
5. See the web page in the browser
In the process of working, if you want to preview the website on the browser, then press Ctrl + S to save, then press F12 to see on the browser installed as default or click on the icon with the left picture land above and select the browser to view.
6. Create a table in the website
- Insert table
If you want to create a website with content that is located in the appropriate and easy-to-find locations on the search engines, you need to create a table before entering the content. To do so, go to Insert Menu, select Table.
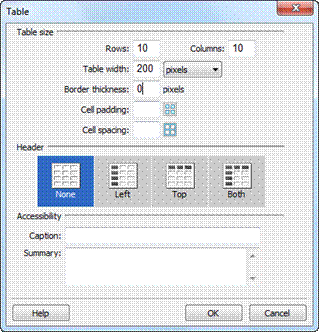
Figure 4. Setting table properties
The Table dialog box appears, enter the line number in the Rows section, the column number in the Columns section, the Table width in the Table width and in the Border thickness section, enter the size value of the frame in the table and then click OK (Figure 4). .
- Table format
Click on the frame of the table, the attribute frame of the table appears below as shown in Figure 5

Figure 5. Table format
Set the attribute table with the following contents:
W, H: Width and height of the board.
Rows: Number of rows.
Cols: Number of columns.
CellPad: distance from text to table.
CellSpace: the distance between the cells of the table.
Border: the border of the table.
Align: Alignment mode of the table.
BgColor: the background color of the table or cell.
Brdr: border color.
- Change table structure.
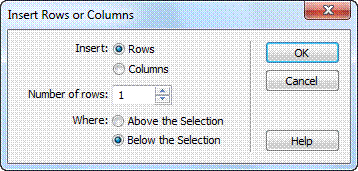
Figure 6. Add line to table
During work, the generated table may not be suitable. You can change the structure of the table with the following content:
Add line: select the line you want to insert a new line behind it. Select Modify > Table > Insert Rows or Columns .
In the window that appears, check before Rows and Below the Selection . In the Number of rows section , type the number of lines you want to insert and click OK (Figure 6).
Add a column: select the column to which you want to insert a new column to the right. Repeat the same steps as adding a line, but check the box before Columns.
Delete line: select the line you want to delete, select Modify > Table > Delete row (or right-click the line you want to delete, select Table > Delete row ).
Delete column: select the column you want to delete, go to Modify > Table > Delete column (or right-click the column you want to delete, select Table > Delete column ).
- Merge cells: select the cells you want to merge, select Modify > Table > Merge cells (or click the cell merge icon under the properties pane)
- Split cell: select the cell you want to split, select Modify > Table > Splits cells (or click the split icon under the property frame)
- Align text in a cell.
You select the text to format in the cell or select the cells to format, then right-click the selection and select Align . Then select one of four alignments: Left (left), Right (right), Center (center) and Justify (align) (Figure 7).
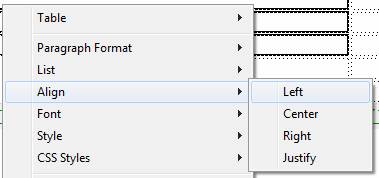
Figure 7. Align text in cell
You should read it
- ★ Install and use extensions for Adobe Dreamweaver CS6
- ★ Instructions for creating a website using Dreamweaver CC - Part 4: Changing fonts and creating basic styles
- ★ Instructions for creating websites with Dreamweaver CC - Part 6: Create links and navigation menus
- ★ Instructions for creating a website with Dreamweaver CC - Part 2: Adding and formatting text
- ★ Instructions for creating websites with Dreamweaver CC part 7