Design website with Adobe Dreamweaver CS5 software - Part 3
Part 3 will show you how to create a template, which is an indispensable page for website design with Dreaweaver, because it helps create a consistent structure for both the website system and change this structure easily. easy, faster ....
Part 3 will show you how to create a template, which is an indispensable page for website design with Dreaweaver, because it helps create a consistent structure for both the website system and change this structure easily. easy, faster .
10. How to create a Template
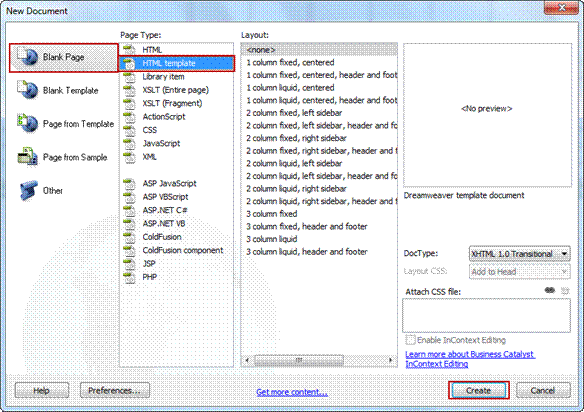
Figure 20. Create template for Website
In web design, you will design a home page and a system of many sub-pages. For the homepage and subpages to have a consistent structure, you must create a page called a template . When you want to change the content for the entire Website, you simply need to change the content in the template page and update the entire Website with simple manipulations.
The template file created will have the extension .dwt and it will default to Templates folder .
To create a template, proceed as follows:
Start Dreamweaver. Go to the File menu, select New . At Page Type > select HTML template then click the Create button to open a new page (Figure 20).
Next, declare the information about the new website by going to the Site , selecting Manage Sites , and then selecting New in the next window to declare.
At least need to declare some of the following information (Figure 21)
- Site name: Website name.
- Local root folder: root directory on the computer.
- Default images folder: the default folder for images.
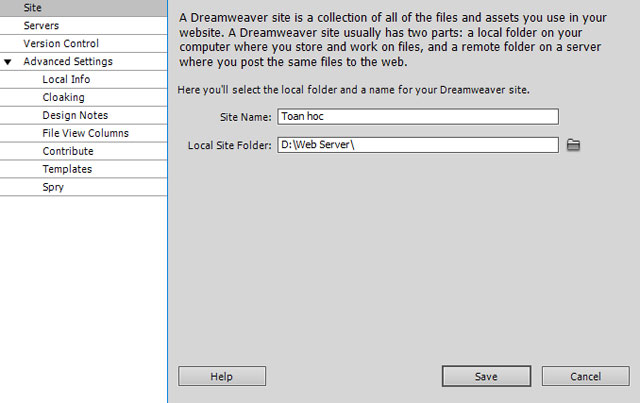
Figure 21. Select Website hosting directory
After the declaration is complete select Save and start creating the template . When determining which web component is unchanged, you will create the web page with those components, then select File > Save as Template .
In addition, you can also create a template from a previously designed website by opening it up with Dreamweaver, proceeding to declare the new Site for that site and choose File > Save as template . Then name the template you just created.
Next, you define the areas that can be changed as follows:
- Select the area that can be changed by clicking on the table of the area (the selected area will have a dark border surrounded).
- Select Insert > Tenplate > Editable Region (Figure 22).
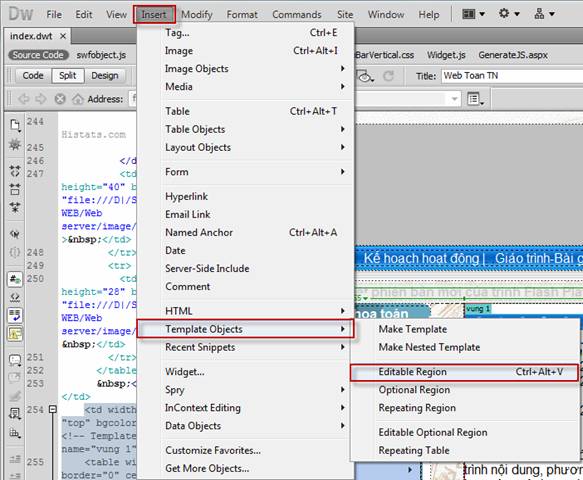
Figure 22. Select changing area on template
Name the selected area and click OK in the next window.
Finally, choose File > Save to save the newly created template page.
11. Create new website from template
Now, you can create the first web page from the template you just created.
Select File > New . In the window that appears, select Page from Template and select the File Template you just created then click the Create button (Figure 23).
Note, the files created from the template can only be edited in the Editable Region area that you selected at the time of creating the template. Other regions will not be allowed to change.
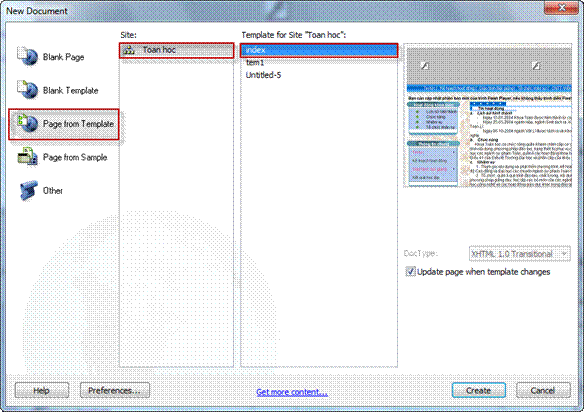
Figure 23. Create new website from template
In addition, when you have created the template with full content and links, you save changes on this template. Dreamweaver will appear a dialog box asking if you want to update changes on pages using this template, click Update to update.
12. Bring website to hosting
After completing the design of a website, you proceed to put the website on the Internet to test and share information. For websites designed with Dreamweaver in this series, to put the website online you do the following.
Use FileZilla FTP Client software to upload the website to hosting. Start FileZilla FTP Client to enter the information needed to connect to the hosting. The program window has 4 main frames as shown in Figure 24.

Figure 24. FileZilla program window
- In frame 1, find the path containing the web set (in the picture is the Web server directory).
- In frame 2, find and browse to htdocs directory (for byethost) or public_ html directory for 000webhost , .
- In the third frame, right-click on each file, folder (or press Ctrl + A to select all) and select Upload .
Wait for the program to upload the entire website to hosting. Time is fast or slow depending on the file size, the number of files to upload is more or less. Note, for Byethost there are many htdocs directories, you must browse to the htdocs directory located in the domain directory and the right file is located in the htdocs directory.
After the program has finished downloading, you open the browser and enter the registered web address, will see the fruits of your labor.