Install and use extensions for Adobe Dreamweaver CS6
Add-ons or extensions are new features that you can easily add to Dreamweaver CS6. You can use a variety of different add-ons.
Table of Contents
The purpose of learning how to use an add-on or extension in Adobe Dreamweaver to reformat the table, connect to the back-end database or help you write the script for the program Browser.
Add-ons or extensions are new features that you can easily add to Dreamweaver CS6. You can use a variety of different add-ons.
Note:
To install an add-on that all users have access to on a multi-user operating system, you must be logged in as Admin (Windows) or root (Mac OS X).
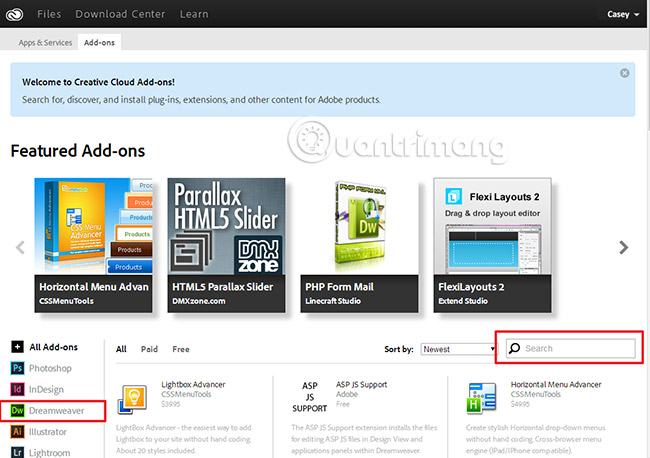
Adobe's Add-ons page lists all the add-ons that you can install and use with Dreamweaver. You can also install the utility easily from this Add-ons page.
Install an add-on by using the Add-ons page
Click Windows> Extensions> Browse Extensions to browse and install additional utilities. When you click Browse Extensions , Adobe Creative Cloud's Add-On page will appear.
On Adobe Creative Cloud's Add-On page, click Dreamweaver on the left to see Dreamweaver's specific add-ons. You can also use the search box on the right to search for a specific add-on.
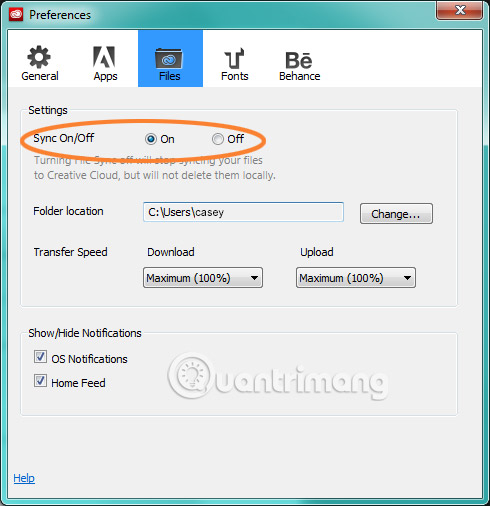
Important note: Before installing the add-on, make sure that you have the file synchronization feature enabled for your Adobe Creative Cloud account. See Enable file synchronization on Adobe Creative Cloud below for more details.
Follow the on-screen instructions to install the add-on.
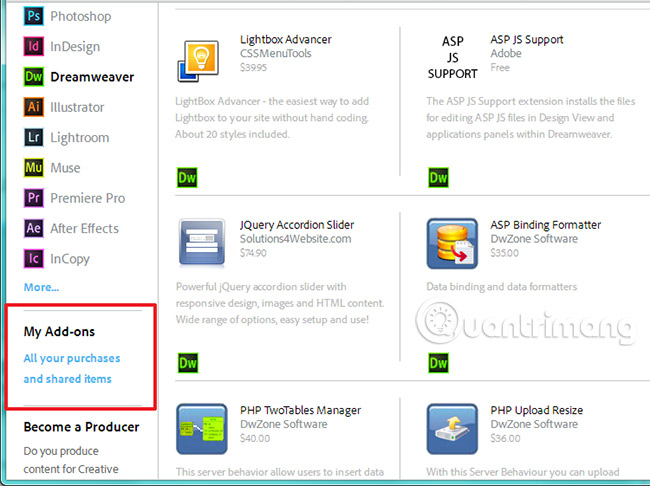
To see the add-ons you've installed or shared, click All Your Purchases And Shared Items in the My Add-Ons section .
Enable file synchronization on Adobe Creative Cloud
Before installing the add-on from Adobe Creative Cloud, make sure you have enabled file synchronization via your Adobe Creative Cloud client.
1. Open the Adobe Creative Cloud application.
2. Click the gear icon, then select Preferences.

3. In the Files tab , set Sync On / Off to On.
Use the additional utilities available in new versions of Dreamweaver
In most cases, a new add-on is built to work with a specific Dreamweaver version, mostly the latest version. This utility can be used with later versions of Dreamweaver, if it is built or configured for use on these Dreamweaver versions. When you install the new Dreamweaver version and uninstall the old version, additional utilities are also uninstalled.
In such cases, the Adobe Creative Cloud application on the desktop automatically installs the additional utilities you have purchased (from the Add-ons page ) after installing the new Dreamweaver version. After the add-ons are installed, Creative Cloud desktop will display a message indicating that the installation was successful. The only thing you have to ensure is that the option to synchronize files in the Creative Cloud for desktop application is enabled and allows the installation of additional add-ons automatically.
Note : Only add-ons compatible with the new version of Dreamweaver are installed by Adobe Creative Cloud.
Install third-party extensions
Installing third-party extensions can be installed via ZXP files, using the Exman command-line tool. If you don't have a ZXP file, contact the vendor for that extension.
Ensure that the extension is supported on the version of the application that it is being installed on.
Install a third-party extension on Windows
Download the ZIP file for the ExMan Command Line tool from http://www.adobeexchange.com/ExManCmd_win.zip.
Extract files to a location on your computer. In this tutorial, the files are extracted into C: Exmancmd_Win.Step text.
Download the ZXP file and copy the file to the same location. In this example, the ServerBehaviorDatabase_1_0_0.zxp file is copied to this location.
Run the command line tool as admin. Right-click the command-line application and select Run as Administrator .
Note:
Close the application related to the extension before you proceed with the installation.
In the command prompt, navigate to the directory containing your extracted files. In this example, the location is C: Exmancmd_Win. To navigate to this location, run the command:
cd C: Exmancmd_Win
Note:
When using the command line tool, make sure you maintain capitalization or lowercase mode for all the letters you enter.
To install extensions, run the command:
ExManCmd.exe / install .zxp
To verify the extension is being installed, run the command:
ExManCmd.exe / list all
Open the extension-related application and follow the instructions in the user guide to find the utility. Make sure you open the correct version of the application.
Install a third-party extension on Mac OS X
Similar to the Windows operating system, you can install extensions using the Terminal application on Mac OS.
Download the ZXP file and place a copy on the screen.
Download the ZIP file for ExMan Command Line Tool from http://www.adobeexchange.com/ExManCmd_mac.zip.
Extract the contents of the downloaded ZIP file. Copy the folder Contents to the desktop.
Open the Finder. Select Application> Utilitiies and double click on Terminal.
Enter cd ~ / Desktop to navigate to Desktop.
Note:
Close the application related to the extension before you proceed with the installation.
Run the command to install the extension:
./Contents/Mac OS / ExManCmd --install .zxp
Note:
If you have trouble with permissions, you can run the command with advanced privileges by adding the sudo prefix for the command. For example, in this case, use:
sudo ./Contents/Mac OS / ExManCmd --install .zxp
Enter the password at the command prompt and press Enter. You may not see the cursor move or the text appears on the screen as you type.
Open the extension-related application and follow the instructions in the user guide to find the utility. Make sure you open the correct version of the application.
Good luck!
See more:
- How to add a Wordpress website to Adobe Dreamweaver CS6
- Design website with Adobe Dreamweaver CS5 software - Part 1
- Design website with Adobe Dreamweaver CS5 software - Part 2
Was this article helpful?
Your feedback helps us improve.
Related Articles
 How to add a Wordpress website to Adobe Dreamweaver CS66 minutes read
 Design website with Adobe Dreamweaver CS5 software - Part 18 minutes read
 Design website with Adobe Dreamweaver CS5 software - Part 211 minutes read
 Work with the library item in Adobe Dreamweaver CS616 minutes read
 Dreamweaver integrates Photoshop3 minutes read
 Shortcut Dreamweaver2 minutes read
Reader Comments 0
Sign in with email or Google to join the discussion.