Instructions for creating a website with Dreamweaver CC - Part 2: Adding and formatting text
In the second part of this series, learn how to set up web pages to format text styles, add text directly in Live View, and copy text from existing documents..
In the second part of this series, learn how to set up web pages to format text styles, add text directly in Live View, and copy text from existing documents.
You will need:
- Sample in Creative Cloud library for practice.
https://shared-assets.adobe.com/link/20ff2162-aeaa-4b73-74fa-df7bfbbd5572
- Sample file (676 KB).
https://shared-assets.adobe.com/link/087cdc37-d0f4-436a-5963-265db72bb5ea
Note: The download includes the Creative Cloud library set and the full project file for this tutorial series. You can continue to build on the start file in the Website Creation Guide with Dreamweaver CC - Part 1 or navigate to the relevant directory to use the start file for each section.
Introduce
Welcome to the second part of the Dreamweaver CC 2015 tutorial series on how to build a responsive website. In the first part, you identified a website and created two new pages only available. threads. In this section, you will be guided to add text content to the homepage, index.html by typing the text directly in Edit mode of Live View and then copying and pasting the formatted text. Microsoft Word. If you do not have access to Word, you can paste the content from a rich text format (RTF) file and then make some minor adjustments.
If you are knowledgeable about graphic design, you will probably wonder why not designing images for pages but having to enter such text directly. The answer is that search engines don't care much about your beautiful image design, it only searches for text content with information titles and related links.
Create container for website and add style sheet
Before adding text, you should add a container to the entire page to center the page content on a large screen resolution. In this section you will also link a style sheet to the page.
Step 1 . On the Bayside Responsive page, open index.html (the blank site you created in Part 1). If the sights.html is open, close it. In this section you just need to focus on index.html, the homepage of the website.
Note : This is a general convention using index.html for the home page of the website. This is because most web servers treat index.html or index.htm as the default page in a directory. Therefore, this page is automatically displayed if the file name is not added at the end of the URL.
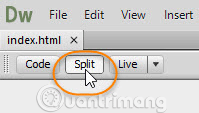
Step 2. Make sure the Split View opens by clicking the Split button at the top left of the Document window.
Step 3 . Click anywhere in Live View to make sure to focus on the body of the page.
Step 4 . Click on the Insert tab, select HTML from the drop-down menu.
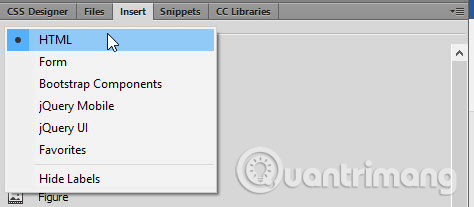
This tab contains options to insert the most commonly used HTML elements in a web page.
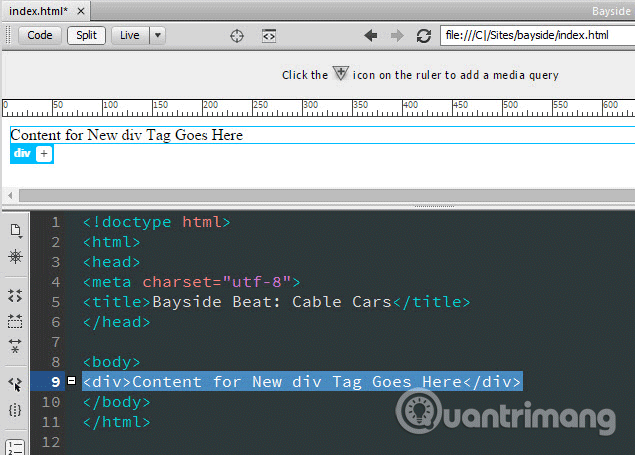
Step 5. Click Div (the first item at the top) to insert the HTML element and some placeholder text between the tags in the HTML below. The placeholder text is displayed in Live View surrounded by a light blue border. The blue border has a tab with the name of the HTML element. This tab is called Element Display .
Step 6 . Element
Click the Element Display button on the Element Display to open an additional class or ID field for the element. Type #wrapper into that field and press Tab or Enter / Return to determine the change.
Step 7. A frame appears next to Element Display asking you to select the source for the type rule for the newly created ID. Open the drop-down menu and select Create a new CSS file .
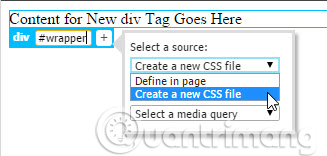
Step 8. On the Create a New CSS File dialog box that opens, click the Browse button to the right of the File / URL field to open the Save Style Sheet File As dialog box.
Step 9. Create a new folder called styles in the root of the page.
Step 10 . Type the responsive in the File name field and click Save , then click OK to close the first dialog box. If the Select a source dialog box is still displayed, click on it to close.
Step 11 . You need to remember that card
The ID attribute in HTML does not start with the hash function. Dreamweaver's intuitive interface uses CSS syntax to distinguish between IDs and classes. In CSS, the ID selector starts with a hash function, while a class starts with a dot.
Step 12 . You will see a new toolbar appear at the top of the Document window between the file name tab and the Split button. This is the Related Files toolbar, listing all the files attached to the current web page.
Click responsive.css on the Related Files toolbar. The Code View section of the Document window now shows the code in the style sheet you just created. Lines 2-3 contain an empty type rule for the wrapper ID.
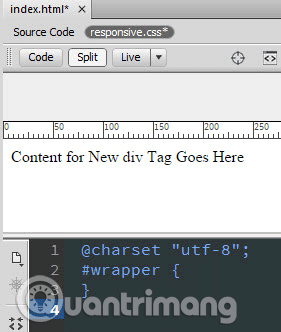
Note that the style sheet selector starts with a hash function to indicate that it will style the element with the same ID. You will add the wrapper type definition
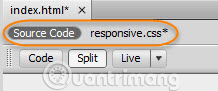
Step 13 . Click Source Code in the Related Files toolbar to return to the HTML in index.html.
Step 14 . Check the code in line 6. It links the style sheet to the current page like this:
Step 15 . Both file names have an asterisk next to them so that they are not saved. Choose File> Save All Related Files .
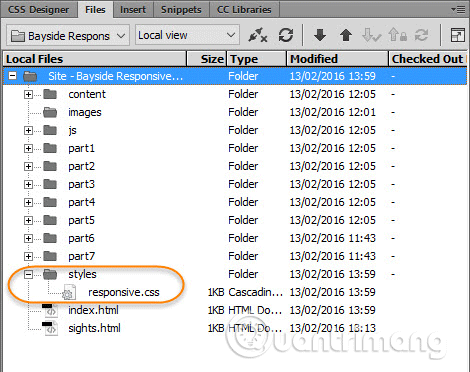
Step 16 . Open the Files tab and expand the styles folder to make sure the responsive.css style sheet is created in the right place.
Add text content directly in Live View
Dreamweaver's Live View uses Chrome Embedded Framework, so this is really a browser running in the Document window. This is also an editable surface for you to add new content or rearrange existing content. You can drag and drop text and images in Live View, but it is not an image layout tool that can resize and position elements by dragging their borders. Layout and positioning are all controlled by CSS.
To add text content by typing directly in Live View, follow the steps below.
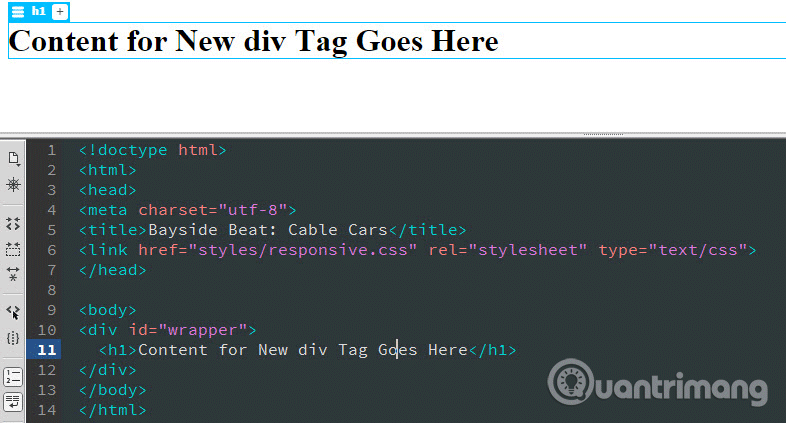
Step 1. Make sure to select the Source Code in the Related Files toolbar and click anywhere in the placeholder text in Live View . You can see the insertion point (a vertical line) somewhere inside the text in Code View .
Step 2 . In the Property Inspector, activate the Format drop-down menu and select Heading 1 . If you can't see the Format menu, check that the HTML button is at the top left of the Property checker.

Step 3 . In Live View , you should now see placeholders with large font sizes, bolded, and Element Display only here
, meaning the highest title.
In the code below, Dreamweaver has wrapped placeholder text in a pair of tags
The cage is inside the wrapper
Step 4. While still selecting the title
, double click anywhere in the text in Live View to access Edit mode. You should now see the orange border replacing the blue filler line and the Gray Code View .
Step 5 . Select all placeholder text and type Bayside Beat . Click from the orange border to exit Edit mode. In Code View , text between tags
must be the same as you just entered.
If not careful when replacing all placeholder text in Edit mode, Dreamweaver will add Enter immediately after the HTML tag opens or immediately before the closing tag. This is an HTML character entity for an undamaged space. Dreamweaver added it to just add some content between open and closed tags. if you see , go to Code View and delete it manually. Character entities for a space that is not destroyed in code can cause problems for the layout. This is why you should carefully consider what is going on in the markup, even if you do not enter the code yourself.
Step 6. Next, you will add a list of bullet points to then switch to navigation menu. In HTML, bullet points are called unordered lists and are encased in a pair of tags
- . To create an unordered list in
- You need to start with a paragraph.
With the title
Still selected in Live View , open the Insert tab and select Paragraph from the HTML list (this is the third item from the top).
Step 7 . On the Position Assist Dialog dialog box that appears, clicking After to add a new element is the text after the title.
Step 8 . Dreamweaver will insert new paragraphs with some placeholders after the main title.
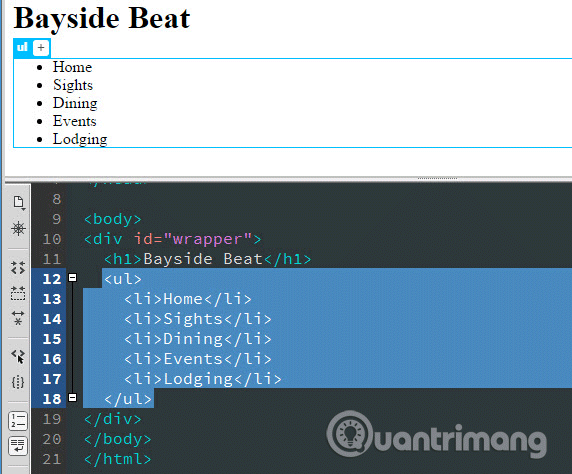
Step 9 . Still select the paragraph in Live View , convert it to a bullet point by clicking on the Unordered List icon in the Property checker.

Step 10. Check that your page looks like the image below. In Live View , placeholder text is placed before the bullet point and Element Display indicates the element
- (list item) has been selected. In the HTML below, the element
- The application is in a pair of cards
- .

Step 11 . With the list item still selected in Live View , double-click anywhere in the placeholder text to enter Edit mode. Select all placeholder text and replace it with Home .
Step 12 . In Edit mode, press Enter / Return and type Sights .
Step 13 . Doing the same way to add Dining , Events and Lodging to the bulleted list.
Step 14 . Click out of the orange border to exit Edit mode. Your page will look like the image below.
Step 15 . Save index.html.
Copy and paste text from Microsoft Word
Dreamweaver is a web development environment, not a word processor. Importing a large amount of text directly into Live View can be quite tedious. However, Dreamweaver can convert a Microsoft Word document into HTML to keep the titles, paragraphs, bulleted and numbered lists, as well as bold and italics.
The technique you use here is not the same as using Microsoft Word to save text in HTML format. Word adds a lot of its code to HTML but Dreamweaver will remove all this unnecessary code when copying and pasting from Word, leaving you with clean HTML.
If there is no copy of Microsoft Word, you can use sample files that contain text content in RTF format. You will be instructed to use the RTF file after this section. One thing to note is that you don't use Open Office or Libre Office instead of Word because pasting from the OpenDocument Format will add unnecessary code that is difficult to clean.
Step 1. In the Files tab, expand the content folder and double-click index.docx to open the file in Microsoft Word.
Step 2 . Select all the text at the end of the copyright notice and copy it to the clipboard.
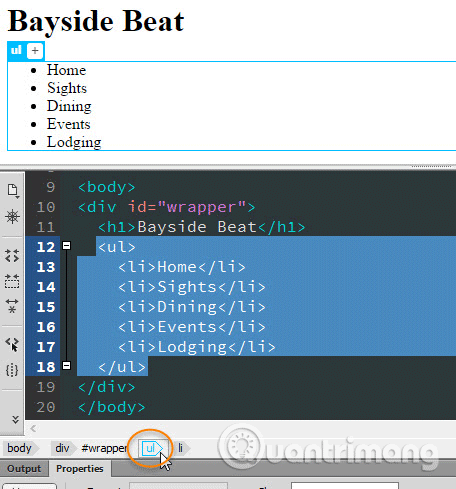
Step 3 . Go back to Dreamweaver and make sure the list is unordered in Live View . You can select the entire element by clicking anywhere in the list, then click ul in the Tag set at the bottom of the Document window.
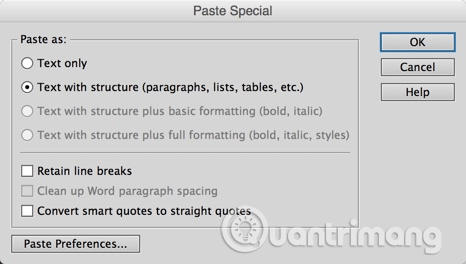
Step 4. Select Edit> Paste Special or use the shortcut Ctrl + Shift + V (Windows) or Cmd + Shift + V (Mac) to open the Paste Special dialog box.
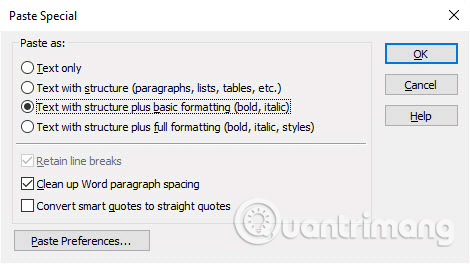
Step 5. Select the third option Text with structure plus basic formatting (bold, italic) and select Clean up Word paragraph spacing , then click OK .
Dreamweaver paste the text after the selected element (unordered list) and format the paragraphs and titles with the correct HTML tags.
Note: Do not select the fourth option for the full format, even if you want to use the same color and font. Because this option will copy a large amount of proprietary Microsoft code into your HTML page, making CSS styling very difficult.
Step 6. Select the first paragraph (the paragraph beginning with "Bayside Beat keeps you ." ) by clicking anywhere in the text in Live View . Element Display indicates that it is an element
(paragraph). In Code View , the text is wrapped in a pair of tags
.
If the pasted text has no Element Display and no tags in the code, that means you are in Code View mode when pasting content from a Word document. Undo pasted text by pressing Ctrl + Z (Windows) or Cmd + Z (Mac), then select the unordered list in Live View before pasting.
Step 7 . Select the first title Ride the Cable Cars by clicking anywhere in the text. Element display displays it as an element
(second level header) and in code, text is wrapped in tags
.
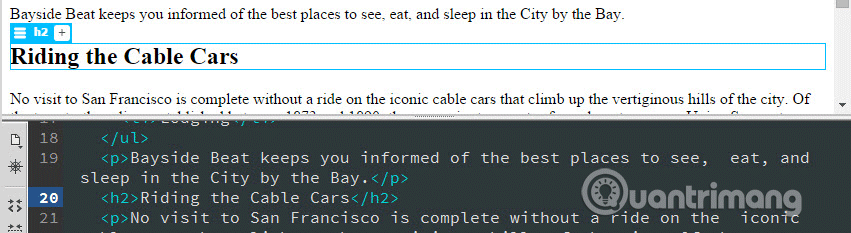
The styled title in Word is Heading 2, so Dreamweaver automatically applies the equivalent HTML tag.
Step 8 . Click anywhere in the text of the copyright notice (this is the last paragraph in the page) and it must have Element Display indicating that it is a paragraph.

Step 9. If there is no Element Display , you need to adjust the format by selecting the text of the copyright notice in Code View . Then select Paragraph from the Format drop-down menu in the Property checker.
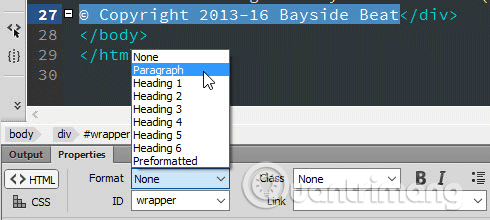
This occurs because Dreamweaver relies on line breaks at the end of paragraphs, titles and other text elements in Word to determine the type of HTML tag. When selecting text in a Word document, there is usually a small space after the last paragraph.

Step 10 . Save index.html.
This way you will enter text much faster than typing directly into Live View . Dreamweaver remembers the settings in the Paste Special dialog box, so next time you can paste directly into Live View with the usual keyboard shortcuts Ctrl + V (Windows) and Cmd + V (Mac). Before pasting into Live View, make sure you select the element that appears immediately before the new content.
If you look closely at HTML in Code View , you'll notice some instances of. The text in the Word document uses clever quotes that Dreamweaver has converted into HTML character entities for a correct citation.
Use the Quick Property Inspector to format text elements
If you don't have Microsoft Word or Word Viewer, you'll need to copy and paste the text content from a rich text format file and then format the titles as all text will be formatted as paragraphs. .
Step 1 . In the Files tab, expand the content folder and right-click on index.rtf . Select Open With> Browse from the context menu and select the appropriate text editor, such as TextEdit.
This file contains the same content as in index.docx, but adds a blank line after each paragraph and title to Dreamweaver formatting text exactly like paragraphs.
Step 2 . Select all text from the beginning of the file and include the copyright notice line. Copy selected text to the clipboard.
Step 3 . Go back to Dreamweaver and make sure the list is unordered in Live View .
Step 4 . Select Edit> Paste Special or use the shortcut Ctrl + Shift + V (Windows) or Cmd + Shift + V (Mac) to open the Paste Special dialog box. You can see in the picture below, the last two options and the second checkbox are disabled because you didn't paste the content from Microsoft Word.
Select the Text with structure option (paragraphs, lists, tables, etc.) and uncheck the Retain line breaks , then click Ok to Dreamweaver paste all text formatted as paragraphs.
Step 5 . When pasting from a rich text format, Dreamweaver doesn't recognize the title. So, click anywhere in the paragraph "Riding the Cable Cars" .
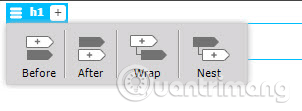
Step 6. Click on the three horizontal lines icon on the left of Element Display to display the Quick Property Inspector and select h2 from the drop-down menu to turn the paragraph into a second level title.
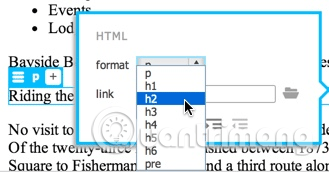
Step 7. Repeat the previous step with the Cable Car Tips heading.
Step 8 . Select the copyright notice at the bottom of the page to determine that it has been formatted as a paragraph. If necessary, adjust the format as described in Step 9 of the previous section.
Copying and pasting text content from a text file of a fairly simple nature. Important points to remember are:
- There should be two blank lines between each paragraph or title.
- Copy blank lines after the last paragraph.
- Always use Edit> Paste Special or
Ctrl+Shift+V(Windows) orCmd+Shift+V(Mac) and uncheck the Retain line breaks . Although Dreamweaver remembers your settings, but usingCtrl+VorCmd+Vto paste from rich text format, additional line breaks will be added to HTML. - Access Quick Property Inspector by clicking on the three-bar icon on the Element Display to convert the paragraph into an HTML title.
Now, the Bayside Beat home page has full text content, but it looks very boring. If the page loads in the browser, the paragraphs will extend the full width of the view. You can control that with CSS, but you also need to add other HTML structure elements to divide the page into logical groups for styling and that will be guided in Part 3 of this series.
See previous section: How to create a website using Dreamweaver CC part 1