How to automate Microsoft Word forms with custom fields
Whether it is a student or an office worker, almost everyone needs to use the document anytime, anywhere. Some jobs even require creating letters, forms or other documents on a regular schedule. Using custom fields in help documentation can save a lot of time. The article below will help readers find out what a custom field is and how to use a custom field.
Use custom fields to save time when working with Word documents
- What is a custom field?
- How to create a custom field
- Why should I use custom fields?
- Bill
- Outline
- Survey
- Information form
What is a custom field?
Custom fields allow you to build a common document that you can reuse for many other purposes. Create custom fields that streamline processes and help you work more efficiently.
There are many ways to use custom fields. You can create a template letter with custom fields that you can use to adjust to any recipient object. You can create a reusable survey or data collection form, regardless of what information you need to collect. Using custom fields can save you hours because you no longer have to create the same document again and again.
How to create a custom field
Using custom fields in Microsoft Word is much easier than you imagine. The first thing to do is decide which type of document you will create, and custom words or phrases.

For example, you want to create a letter, which is used to send quotes to customers. You can write the letter once before, then identify the areas in the mail you want to make custom.
In this example, we will create 3 custom fields: the recipient's name, the number of jobs and the company name. To set up these custom fields, go to the Info menu in Word and on the right side of the screen, click the drop-down arrow next to Properties> Advanced Properties .

In this pop-up window, you can add a recipient field by name. Select Type as 'Text' and the value you want. Click Add, and then select OK.

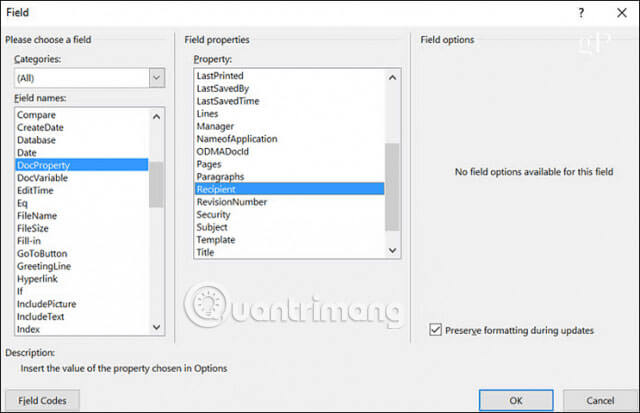
In your document, you can highlight the name 'John' in the original message. In the Word menu, click Insert> Quick Parts> Fields . In the pop-up window, click DocProperty under Field names and click Recipient (or whatever other name you set for the field) in the Property section .

After clicking OK, the highlighted text will be updated according to the field (and field value) you specified. Now, you can return to Advanced Properties again and add the rest of the fields.

When you're done adding all the fields, you'll see all your custom fields listed in the Properties box .

If you ever make any changes to the value of the custom field, to update those values in the actual document, right-click the field and select Edit Field.

When you need to write another letter to a new recipient, you don't have to rewrite it from scratch. Just open the created document for the nearest recipient, go to the Advanced Properties area and update all fields for the new guest you plan to send. Update the value and click the Modify button .
This will update the value in the Properties section . After finishing updating all custom fields in Advanced Properties, you can go back to your documents, black out the fields and update them.

Why should I use custom fields?
Using custom fields is a great way to reduce the time to write letters or send any form of written communication to people. If you need to do a task like this often, create a template with custom fields and you'll never have to rewrite that letter again. Besides, the custom field has some other uses.
Bill
One thing almost every business needs to do is to bill customers to buy products or services. If you are a small business, you may not be able to afford the billable accounting software. So you will need to create an invoice from the beginning.
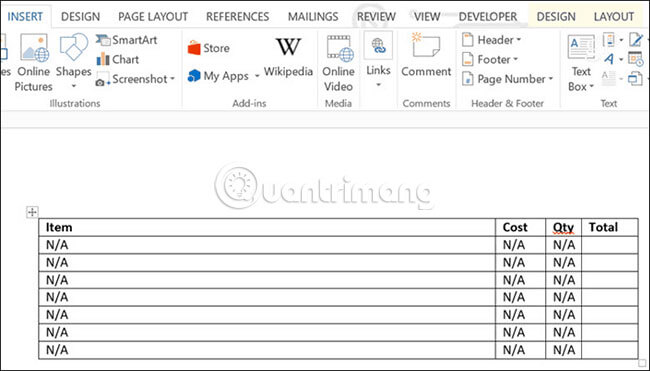
Many small business owners choose to use MS Excel or Word to edit available invoice forms. If you use Word, you can streamline the billing process by placing each item under each column into a custom field. You only need to create a custom field for each cell, just like you did for each field in the example letter above. Then create the first sample invoice and place 'N / A' in each cell.

When creating a sample spreadsheet, you can specify the cells that each custom field is connected by right-clicking on the text inside the cell and selecting Edit Field.

This allows you to select the custom field assigned to that cell. Continue to assign a custom field this way to the remaining cells.

Once completed, the next time you need to create an invoice, you can open the created template and go to the Advanced Properties area . In the Custom tab , simply flip through all the custom fields and fill in the value according to the current monthly invoicing needs. This is much faster and more efficient than creating an entire invoice from scratch.

Outline
Another great way to save time and work more effectively is to use a custom field to create an outline. This approach is really only effective if you often correct a standard outline with the same number of items, such as the curriculum for university professors.
In this case, each item can be defined as the entire field. Then, from a location in Advanced Properties, just scroll down and determine your outline. This allows you to keep common titles and other areas in the outline without changing and focus only on the items that need adjusting.

Survey
A very useful way to use custom fields is to create surveys or questionnaires. This type of document may include a series of questions, each with a blank line followed.
There are two approaches to using custom forms with such a document, depending on what you need to do. For example, if the survey is for students, you can define empty fields as custom fields. Then, anyone who fills out the form can only use the Advanced Properties box to fill in the answer, all in a row.

Another case is that teachers often need to create tests that include questions and answers. In that case, questions may need to change every year. Teachers can identify each question as a custom field, and at the beginning of the year, simply open the document and update the questions. This avoids the need to completely create and reformat test documents. Formatting is only performed once. By updating custom fields, you can create a completely new document without having to do everything from scratch.

Information form
The final use case for custom fields is the form. If you have some information you need to collect regularly at work or at home. You can create a form that allows you to collect and record information quickly. This is very similar to the survey example above, but this will be a document that allows you to continuously collect similar information repeatedly.
By specifying the spaces in these forms as fields, simply go to Advanced Properties and fill in the data for the form from a few seconds to a few minutes. This approach can significantly reduce the time spent on data collection, saving you a lot of work (or data collectors for you).

As you can see, custom fields are a great way to make individuals or businesses work more efficiently. The use cases mentioned above are just a few small examples. Any type of document has many similar items and only certain parts need to be changed to be the appropriate option to use custom fields.
Take the time to think about the type of material you have to create or work every day, and you'll be surprised to discover how combining a few custom fields can save you a lot of time.
Hope you are succesful.