How to use Microsoft Forms to create professional surveys
Surveys are great tools to capture information from customers about products or services. They can help you make more informed decisions about your business services.
Although there are many tools for creating surveys, but a very simple application is Microsoft Forms, an alternative to Microsoft InfoPath. If you want to try this tool, the following article will guide you to perform surveys with Microsoft Forms.
Tao professional survey with Microsoft Forms
- Create a survey in Microsoft Forms
- Choose a type of survey question
- Characteristics of the question types
- Choice question type
- Type of Text questions
- Rating question type
- Adjust settings for survey questions
- Select the settings for the survey
- Share survey
- Review the survey feedback
Create a survey in Microsoft Forms
To get started, visit the Microsoft Forms website and log in with your Microsoft account information. On the My Forms screen , click New Form to create the survey.
Give the form a title and description (optional). You can click on the image icon to upload photos from your computer or OneDrive, even search Bing to get the right image. And you can choose a theme on top or use your own image as a background.
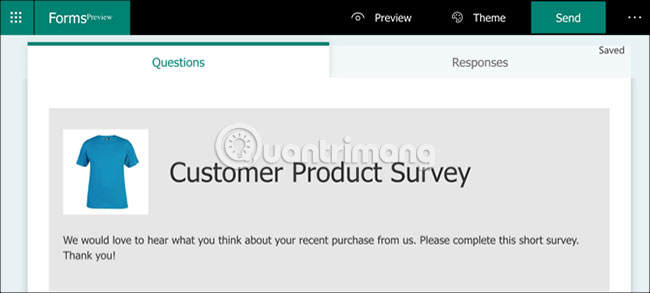
As you continue to create your survey, Microsoft Forms will automatically save it. So you don't have to worry about losing any job.
You should also click the Preview button at the top when creating the survey. This allows you to view the survey from the perspective of the participants. You can use the additional buttons at the top to see the survey on both computers and mobile devices.
Choose a type of survey question
To add a question, click the green Add New button. You can choose from different types of questions.
- Choice: Multiple choice questions provide the 'Other' option for an answer.
- Text: Text in free form for your questions and participants' answers.
- Rating: Use up to 10 levels with stars or numbers for the ranking system.
- Date: A simple date entry for survey participants.
- Ranking: Participants move the items you provide up and down in the list to rank them.
- Likert: Extensive option for feedback from statements you provide.
- Net Promoter Score: Survey participants choose one point for answers from 1 to 10.

You can also choose to create a new section in your survey, if you want to divide it into different areas. Give each section a name, description and picture if you want.
Characteristics of the question types
While some questions are very basic and do not require anything more, the other questions give you flexible options. For example, the Date question type is simply a participant entering a date and has nothing to adjust. However, with the Choice question type , you can change the question type and rearrange the answers.
Now, find out in detail the types of questions and their characteristics.
Choice question type
For multiple choice questions, you will enter your questions and possible answers. By default, the answers use radio buttons. But you can choose to use the menu style if you like by clicking the More> Drop-down button .
If you want the survey participants to choose more than one answer, you can turn on the Multiple Answers option at the bottom. And if you want the option to add content to the answer, you can click on the Add 'Other' Option answer .
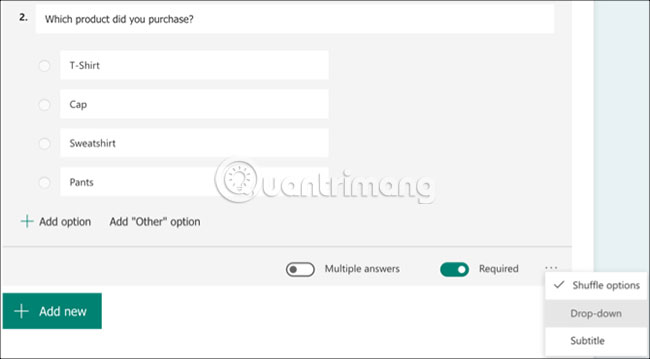
You can rearrange the answers in your list by clicking, dragging them to new locations, and then release the mouse button.
Type of Text questions
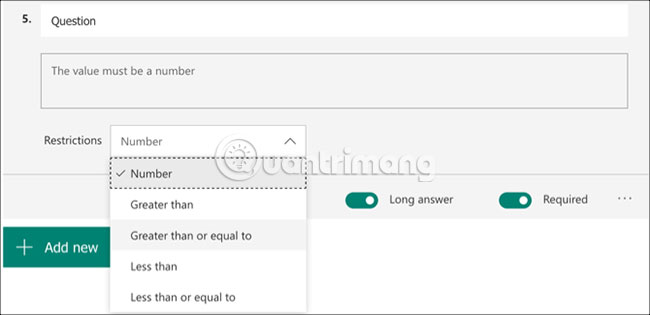
Although this type of question allows participants to type their answers, you can adjust this type of question for numbers and add restrictions.
Click the More> Restrictions button. In the drop-down Restrictions box , you can choose from options such as greater than, less than (smaller), equal to (equal) and between (within range). Just select the restriction you want and enter any corresponding details.
Rating question type
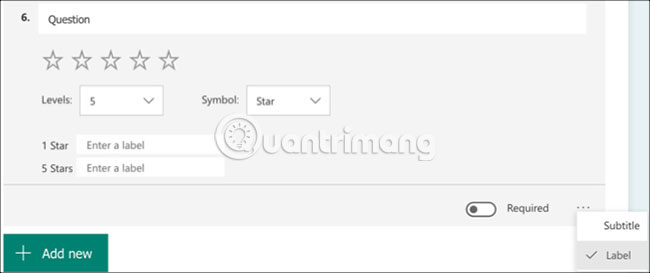
As mentioned above, the Rating question type provides a maximum of 10 numerical or numerical levels for the rating system. In addition, you can add labels to the star or the first and last number in the rating. Click the More> Label button.
Adjust settings for survey questions
After selecting a question type, there are several settings that you can change as needed. At the top of the question section, you will see buttons to copy, delete, scroll up or down.

At the end of the questionnaire, you will see a switch to toggle the option, if you want to ask the required question. You can see additional options beside, depending on the type of question. For example, if you use the Text question type, you can enable the Long Answer option for participants.
The More button (three dots icon) on the bottom right also provides options, depending on the type of question, such as Subtitle, Shuffle or Restrictions.
Select the settings for the survey
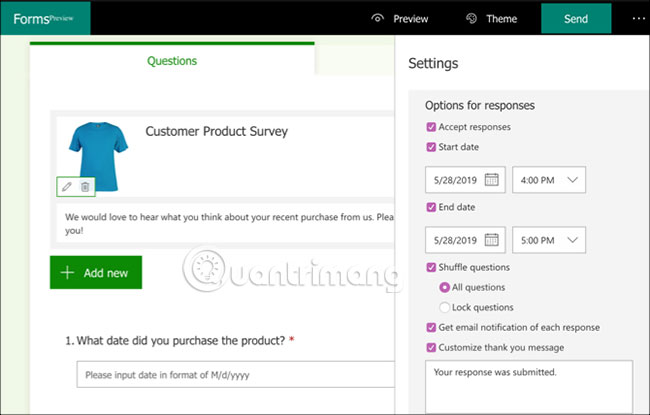
When the survey is complete, you can choose options for the answer. Click the More button (three dots icon) at the top right of the survey page and select Settings.
Here, you will see options to accept answers, start and end dates, scrambling questions, receive email notifications and customize message notifications. Check the boxes for the settings you want and enter any corresponding details.
Share survey
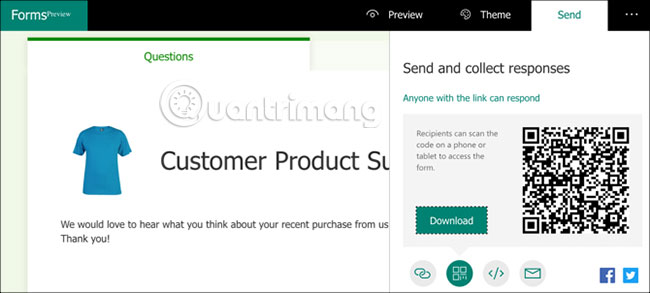
You have some interesting options to submit or share your completed survey. Click the Send button at the top to see the following options:
- Copy a link to the survey and send it to the participants.
- Download QR codes to share with participants.
- Get the embed code to put the survey on a website.
- Create and send emails with a link to the survey.
- Share surveys directly on Facebook or Twitter.
Review the survey feedback
If you want to see all the responses to your survey, go back to Microsoft Forms and log in. You will see the number of responses you have for your survey on the My Forms page .

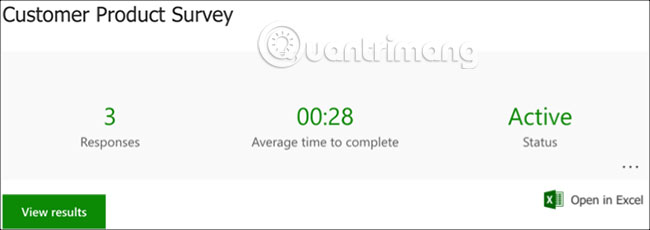
Click on the survey and select Responses tab on the top. You will then receive a large amount of information starting with the number of responses, average time to complete and survey status.
You can click the View Results button to see each completed survey of participants. And you can save all feedback in the spreadsheet by clicking on the Open in Excel option . If you're already using Excel, you can also see how to create surveys and collect data with it.
For each question, you will see the answers given by the participants in a different way. For example, the Choice question type will show your answer in a convenient pie chart as well as the number of responses for each answer.

As another example, you will see the answers ranked Ranking and Likert in a bar chart style.
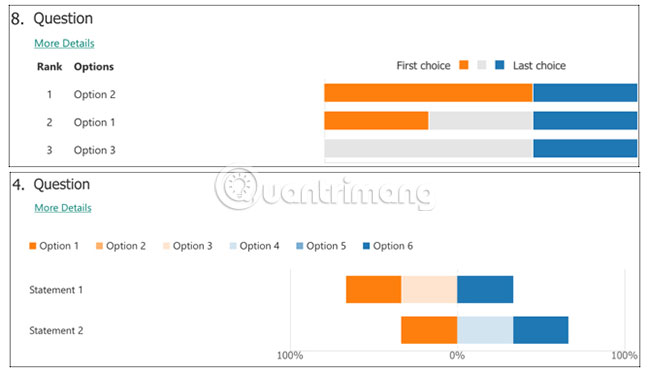
Below each question, you'll see the More Details link . If you click on it, you can see each answer to that question in the clean table format.

Now, you have an overview of how Microsoft Forms works to create surveys. It's time to incorporate elements to create your own survey. Get ready for the questions, go to the Microsoft Forms website and create the survey you need.
Hope you are succesful.