CorelDRAW12 - Lesson 3: Types of tools - selection tool
On CorelDRAW12's screen, the toolbar is always on the left side of the screen. You can move any position on the screen so that it is easy to use. If the toolbar is not displayed, open it by selecting: Window - Toolbars - Toolbox.
 On CorelDRAW12's screen, the toolbar is always on the left side of the screen. You can move any position on the screen so that it is easy to use. If the toolbar is not displayed, open it by selecting: Window - Toolbars - Toolbox .
* General introduction about the tools of CorelDRAW 12:
Pick Tool: Tool to select objects on the drawing page
Shape Tool: Tool to edit objects (we can change the shape of objects, add or subtract objects of the object and can edit straight lines into curves or curves to straight lines)
Bezier Tool: Group of line drawing tools
Text Tool: Input tool
Rectangle Tool, Ellipse, Polygon Tool, Basic Shapes: Group Basic drawing tools such as: squares, circles, polygons and other basic types
Free Rotation Tool: Free rotation tool
Free Scale Tool: Free image retrenchment tool
Roughen Brush: A group of tools that make roughness or smoothness
Free Transform Tool: Free shape transformation tool
Artistic Media Tool: Art brush tool
Interactive Blend Tool: Group of tools to mix, create shadows, create layers
Outline Tool: The group draws the contours
Interactive Fill Tool: A group of color mixing tools
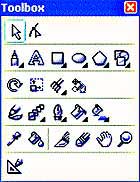
Figure 2
Eye Dropper Tool: Tool to copy colors
Fill Tool, Interactive Fill Tool: A group of coloring tools for objects
Knife Tool: Cutting tool
Eraser Tool: Photo eraser tool
Hand Tool: Tool used to move the screen
Zoom Tool: Tool to zoom in and out of objects
Smart Drwing Tool: Figure drawing tool (Figure 2).
* Pick Tool:
Pick Tool (Pick Tool) does not directly create shapes for objects but it is very necessary and very much used in the drawing process.
Color copy tool Color grouping tools for object Image cropping tool Eraser tool Tool for moving the screen Tool to zoom in, zoom out objects Drawing tools (Figure 2). Pick Tool (Pick Tool) does not directly create shapes for objects but it is very necessary and very much used in the drawing process.
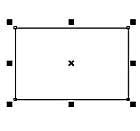
Figure 3
Properties of the selection tool:
- Select object:
To select an object, select Pick Tool click on the object or its contour. The selected object will appear 8 surrounding black squares called control points, the slash in the middle is the center of the object (Figure 3).
When the object is selected, the information will be displayed in the status bar, also known as the properties bar (Figure 4).

- Select multiple objects:
Method 1: To select multiple objects, hold down Shift and click to select each object and vice versa holding Shift select the object selected again, we remove that object.
Method 2: Click and hold and drag the mouse to create a selection around the objects you want to select.
- Moving objects:
To move the object, hold down the drag and move to the position where you want to place the object and then release.
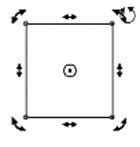
Figure 5
- Rotating object:
Double-click on the object, click on one of the object's four rotating points and drag in the direction you want to rotate and release the mouse (Figure 5).
- Drag the object:
Double-click on the object, click on one of the object's four rotating points and drag in the direction you want to rotate and release the mouse (Figure 5).
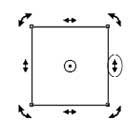
Figure 6
Just like rotating an object but clicking on one of the four skewed positions (two arrow heads). If you want to skew the object in any direction, pull it in that direction (Figure 6).
- Change the size of the object:
Select the object, click on one of the 8 black handles around the object, drag the mouse close to the center or away from the center, then release to minimize or enlarge the object.
- Delete object:
To delete one or more objects, select one or more objects and press the Delete key to delete.
Lam Khe
- CorelDRAW12 - Lesson 6: Drawing polygons
- Lesson 32: Selection Menus in Bootstrap 5
- Excel Selection Pane: A great tool you shouldn't miss.
- How to Use Selection Tools in Zoner Photo Studio X
- Instructions on creating a tool to randomly select groups of students.
- Instructions for using AI to create quality lesson plans
- 4 methods to create the best selection in Photoshop
- Making whiteboard lessons more engaging through conversation with Claude.
- Coreldraw - Lesson 9: Road drawing tools (continued)
- Photoshop will add a new tool that makes selecting objects in an image incredibly easy
- How to Refer to Tables and Figures in a Text
- Backup for Exchange Server with DPM 2007 - Part 2: Configure DPM 2007
- Installing, configuring, and testing Exchange 2007 CCR on Mailbox Server (Part 3)
- Deploy CCR Cluster of Exchange 2007 SP1 on Windows Server 2008 Failover Cluster (Part 1)
- Standby Continuous Replication Management (SCR) - Part 1
- Balancing download of Exchange 2007 SP1 Hub Transport servers with Windows Network Load Balancing (Part 1)
- Backup for Exchange Server with DPM 2007 - Part 3: Backup process
- Balancing download of Exchange 2007 SP1 Hub Transport servers with Windows Network Load Balancing (Part 2)
- GroupWise to Exchange 2007 - Part 3: Ability to collaborate and convert
- GroupWise to Exchange 2007 - Part 4: Ability to collaborate and convert
-
 How to use the DirectX Diagnostic Tool to troubleshoot problems.
-
What's new in CorelDRAW Graphics Suite 2018?
-
Learn the basics of the Mesh Tool in Illustrator.
-
Draw and edit curves with the Curvature tool in Illustrator.
-
How to enable and disable the Screenshot tool in Firefox browser.
-
Optimize Windows 10 using VMware OS Optimization Tool
 How to use the DirectX Diagnostic Tool to troubleshoot problems.
 What's new in CorelDRAW Graphics Suite 2018?
 Learn the basics of the Mesh Tool in Illustrator.
 Draw and edit curves with the Curvature tool in Illustrator.
 How to enable and disable the Screenshot tool in Firefox browser.
 Optimize Windows 10 using VMware OS Optimization Tool
-
 Free Tools
-
Application
-
Web Email
-
Website - Blog
-
Web browser
-
Support Download - Upload
-
Software conversion
-
Social Network
-
Simulator software
-
Online payment
-
Office information
-
Music Software
-
Map and Positioning
-
Installation - Uninstall
-
Graphic design
-
Free - Discount
-
Email reader
-
Edit video
-
Edit photo
-
Compress and Decompress
-
Chat, Text, Call
-
Archive - Share
-
-
System
-
Mac OS X
-
Hardware
-
Game
-
Tech info
-
Technology
-
Science
-
Life
-
Electric
-
Program
-
Mobile