CorelDRAW12 - Lesson 6: Drawing polygons
The Polygon Tool is used to draw polygons, from these polygons we can draw many different shapes. To draw polygons, do the steps in turn ...
The Polygon Tool is used to draw polygons, from these polygons we can draw many different shapes.
To draw polygons, do the following steps in turn:
- On the tool bar select the Polygon Tool ( Figure 1 ).

Figure 1
- At this point the mouse pointer becomes the symbol as shown in Figure 2 .
- To draw, hold down the mouse to drag any diagonal line and release the mouse to get a polygon (Figure 3).


Figure 2
Figure 3
Generated polygons have default properties, we can change these attributes.
To change the properties for polygons, we can make changes to the parameters on the properties of the polygon ( Figure 4 ).

Figure 4
The Polygon Tool draws three shapes:
- Polygon - drawing polygons ( Figure 5 ).
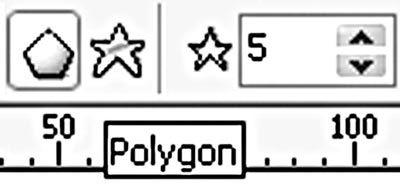
Figure 5
- Star - draw stars ( figure 6 ).
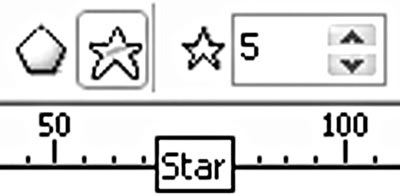
Figure 6
- Polygon As Star (drawing polygons shaped like stars).
To draw polygons or stars:
- On the toolbar select the Polygon Tool.
- Select the Polygon or Star icon on the properties bar.
- Click and hold the mouse to drag any diagonal line and release the mouse button ( Figure 7 ).

Figure 7
- Note: to convert polygons into stars, the number of sides of the polygon must be greater than or equal to 5.
To draw polygons shaped like stars:
- On the toolbar, select the tool and double click on the Polygon Tool.
- Options dialog box is opened ( Figure 8 ).
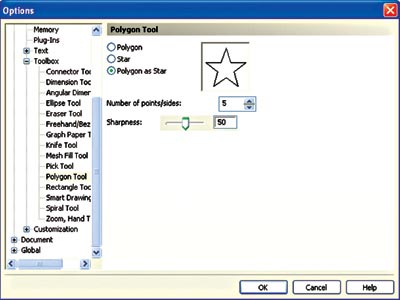
Figure 8
- In the Polygon Tool section, select Polygon As Star.
- Enter the polygon edge number in Number of points / sides.
- Enter directly or drag the Sharpness slider to create sharpness for polygon corners.
- We have some types of polygons ( Figure 9 ).
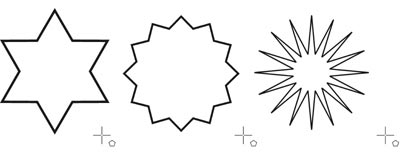
Figure 9
The shape of the polygon can be changed with the Shape tool to create different shapes.
To set the number of edges for polygons, on the properties bar of the polygon enter the Numbers of Points box directly on Polygon or click the up and down arrows to increase or decrease the number of sides of the polygon ( Figure 10 ).
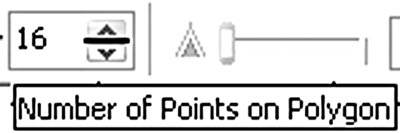
Figure 10
Lam Khe
- CorelDRAW12 - Lesson 3: Types of tools - selection tool
- MS PowerPoint - Lesson 6: Drawing Toolbar
- Coreldraw - Lesson 9: Road drawing tools
- Coreldraw - Lesson 9: Road drawing tools (continued)
- Tips for learning Anime and Manga drawing tips
- Corel Draw 12: Draw the butterfly
- Top 7 best electronic drawing boards 2019
- 9 best drawing apps for Windows 10
- The best digital drawing software 2019
- Get familiar with CorelDRAW 12 - Lesson 1: Set up the drawing page
- How to Refer to Tables and Figures in a Text
- Backup for Exchange Server with DPM 2007 - Part 2: Configure DPM 2007
- Installing, configuring, and testing Exchange 2007 CCR on Mailbox Server (Part 3)
- Deploy CCR Cluster of Exchange 2007 SP1 on Windows Server 2008 Failover Cluster (Part 1)
- Standby Continuous Replication Management (SCR) - Part 1
- Balancing download of Exchange 2007 SP1 Hub Transport servers with Windows Network Load Balancing (Part 1)
- Backup for Exchange Server with DPM 2007 - Part 3: Backup process
- Balancing download of Exchange 2007 SP1 Hub Transport servers with Windows Network Load Balancing (Part 2)
- GroupWise to Exchange 2007 - Part 3: Ability to collaborate and convert
- GroupWise to Exchange 2007 - Part 4: Ability to collaborate and convert
-
 Prompt to create toy models with Gemini
-
How to create an MLive account on your phone
-
How to Refer to Tables and Figures in a Text
-
Backup and Restore Wifi settings in Windows 7
-
Install and configure the solution to handle email on TMG 2010 Firewall - Part 1: Installation
-
Install and configure email handling solutions on TMG 2010 Firewall - Part 2: E-Mail Policy
 Prompt to create toy models with Gemini
 How to create an MLive account on your phone
 How to Refer to Tables and Figures in a Text
 Backup and Restore Wifi settings in Windows 7
 Install and configure the solution to handle email on TMG 2010 Firewall - Part 1: Installation
 Install and configure email handling solutions on TMG 2010 Firewall - Part 2: E-Mail Policy
-
 Free Tools
-
Application
-
Web Email
-
Website - Blog
-
Web browser
-
Support Download - Upload
-
Software conversion
-
Social Network
-
Simulator software
-
Online payment
-
Office information
-
Music Software
-
Map and Positioning
-
Installation - Uninstall
-
Graphic design
-
Free - Discount
-
Email reader
-
Edit video
-
Edit photo
-
Compress and Decompress
-
Chat, Text, Call
-
Archive - Share
-
-
System
-
Mac OS X
-
Hardware
-
Game
-
Tech info
-
Technology
-
Science
-
Life
-
Electric
-
Program
-
Mobile