Configure the System Restore feature in Windows 10
The System Restore feature works like creating a backup of the system, but it is not exactly that way. Because when restoring the system from the previous backup point, it will not affect your documents or settings before creating a special restore point. However, System Restore will remove applications, drivers, system updates and registry changes after restore points have been made.
Table of Contents
System Restore allows you to return to the state in which your computer worked most stable before. This feature is relatively easy to use and helps you quickly restore the system to a more secure state than other recovery features. Here's how you can set up and use this feature most fully on Windows 10 .
- Download Windows 10 Enterprise
The System Restore feature works like creating a backup of the system, but it is not exactly that way. Because when restoring the system from the previous backup point, it will not affect your documents or settings before creating a special restore point. However, System Restore will remove applications, drivers, system updates and registry changes after restore points have been made.
Activate the System Restore feature
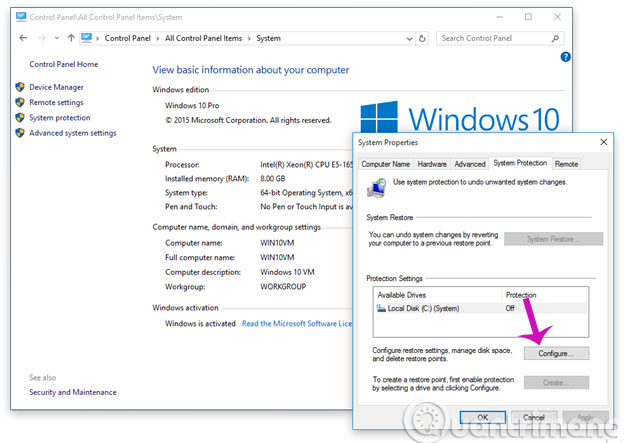
Step 1 : Access the Start menu, or click the search box next to the Start button and enter the keyword type Create a restore point and then press Enter to open the " System Protection" dialog box to configure the system's features.

Step 2 : In the "System Properties" dialog box displayed, select the "System Protection" tab, make sure that your Windows installation drive (usually C) has been turned on ( On ) protected under Protection Settings .

Step 3 : If the Protection feature is off ( Off ), the Create button will not be available. The next step is to select the drive where you installed Windows and click the Configure button.
Step 4 : In the "Restore Settings" window, make sure the "Turn on system protection" option is activated.
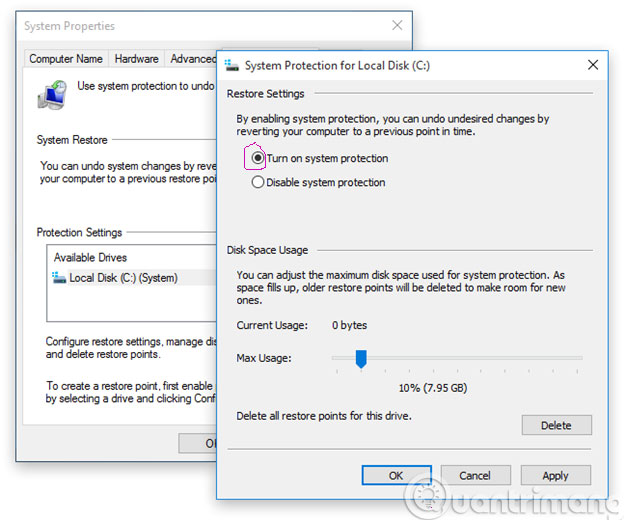
Under the "Disk Space Usage" section of the Max Usage line, you can adjust the maximum storage space reserved for system restore points. By default, Windows uses only a small percentage of the total storage capacity of a specific drive. When the disk space for storing restore points is full, old restore points will be deleted to make room for new restore points. You will also see the Delete button to delete all restore points that the system previously backed up with just one click.
Step 5 : After configuration is complete, click Apply > OK . Now, you will see that the Windows installation system drive is protected.
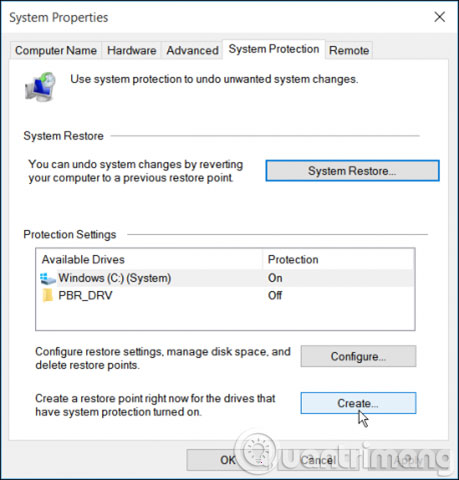
Create restore point
After you have enabled Restore Point in the system, the operating system will create an automatic restore point every time a significant change is made on the system. However, sometimes you may want to create a manual system restore point before attempting to interfere with the system that you think may cause system instability.
To configure a manual restore point, simply press the Create button, then enter the description information to help you determine the correct restore point ( for example, System Restore Point before installing Cclean software ). Then click the Create button to complete the process. Restore points will be created quickly without taking much time.
Use System Restore
If at any time during use, Windows has problems such as unstable operation, software conflicts, hardware . then this is the time you should restore the system. But before you use the backup or "Reset this PC" feature in Windows 10, you can use the system restore point created above, this will help you restore the system to earlier stable status faster.
To undo unwanted system changes, you will bring the system back to a previous backup point, when the system is operating most stable. Do as follows:
Step 1 : Access the Start menu, or click the search box next to the Start button and enter the keyword type Create a restore point and press Enter to open the " System Protection " dialog box to configure the system's features.
Step 2 : Click the System Restore button and click Next to continue.
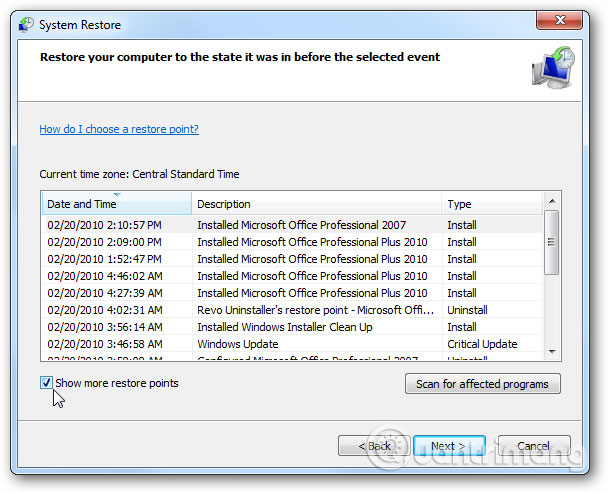
Step 3 : You will see all restore points available with specific time, date, detailed description and more importantly, you will also know that the restore point is created manually or automatically. When you select a restore point, you can click the " Scan for affected programs " button to see applications installed from the last restore point and they will be deleted during the restore process. Then click Cancel to return to the wizard.
Next click the Next button and finally click the Finish button to begin the recovery process. Once the process is complete, you will return to the right time when Windows works best, most stable according to your choice.
Advanced
So, you already know how to use a system restore point when something goes wrong, but only if you still have access to Windows as usual is possible. However, in some cases, you already have a system restore point, but the computer does not boot because of a specific error after you have changed Windows.
In these cases, you will have to use advanced options during the boot process to access the " System Restore " feature. To do so, start your computer to access the auto-repair environment in Windows 10, and then:
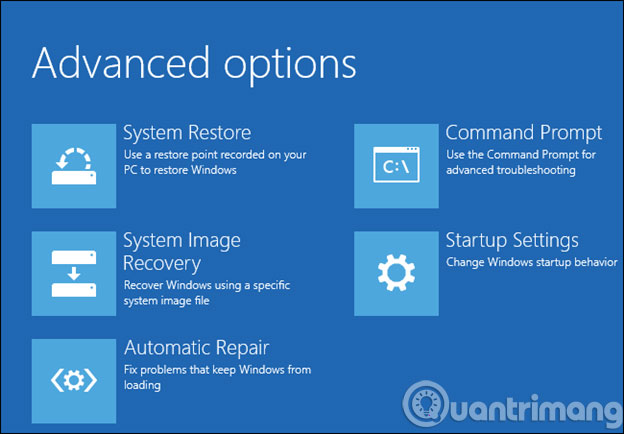
Step 1 : Click the Advanced startup option
Step 2 : Select Troubleshoot > Advanced options > System Restore .
Step 3 : System Restore will load and you can use the same steps as above to restore the system based on the previously created backup point.
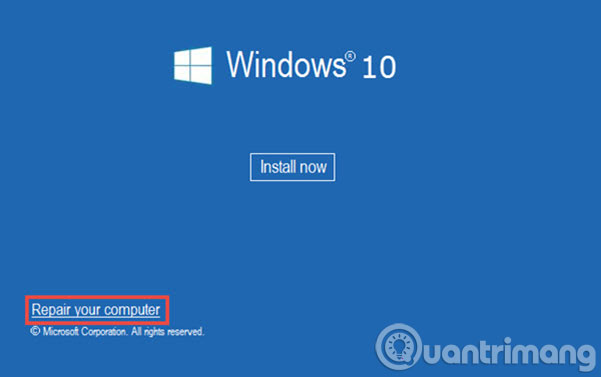
In addition to the above, you can use the Windows 10 installation boot disk to boot your system and then:
Step 1 : Click Next and click Repair your computer .
Step 2 : Select the Troubleshoot option> Advanced options > System Restore .
Step 3 : System Restore will load and you can use the same steps as above to restore the system based on the previously created backup point.
For a long time, System Restore is a feature that Microsoft has integrated into its Windows versions, including Windows 10. Like in previous versions, this feature is relatively easy to use but quite surprisingly few users. But anyway, this feature will not be an alternative to creating a full backup of the entire system. Because if the computer's hard drive fails, you will not be able to restore previous versions of the operating system and you may lose all your data. In addition, the Windows 10 Reset feature will only help you reset all settings, applications and operating systems back to their original default settings.
- Vietnamese translation for Windows 10
- 9 ways to enable File Explorer in Windows 10
- 10 custom tools on Windows 10
Having fun!
Was this article helpful?
Your feedback helps us improve.
Related Articles
 Instructions on how to use System Restore on Windows7 minutes read
 Instructions for creating backup and restore points (Restore Point) on Windows 103 minutes read
 How to Manage System Restore Points Using CCleaner (Windows)5 minutes read
 How to use System Restore in Windows: Turn off, turn on, create, restore System Restore3 minutes read
 How to enable or disable System Restore on Windows3 minutes read
 Instructions for restoring the system on Windows5 minutes read
Reader Comments 0
Sign in with email or Google to join the discussion.