Works with Recovery Storage Groups
Introduce
The Recover Storage Group (RSG) feature was introduced earlier in Exchange 2003, allowing you - as an Exchange administrator - to have a secondary copy of the mailbox database (typically a database). Data can be restored by backup) so that you can extract data from one or more mailboxes in the corresponding database without affecting the production database.
If you used the Exchange 2007 Management Console (EMC) then you have a chance to create an RSG from within EMC. With Exchange 2007, this was done using the Exchange Troubleshooting Assistant (ExTRA), which was launched through the Database Recovery Management tool, found in the Exchange Toolbox toolbox or by using Exchange Management. Shell (EMS).
When attaching a copy of the Mailbox database to the RSG, you can extract data from a mailbox and then combine it with another mailbox located in the mailbox database in the production Storage Group, but you can also extract the data and then copy it to a specific folder in another mailbox.
Note :
For Exchange 2003 RTM, the data is extracted, copied and combined with another mailbox or mailbox folder is using the Microsoft Exchange Server Mailbox Merge Wizard (ExMerge) tool, but with the Exchange 2003 SP1 process is integrated inside Exchange 2003 System Manager GUI.
Some restrictions of Recovery Storage Group
There are some limitations you should know when working with RSG. The first is that they cannot be accessed by other protocols than MAPI, and although they can be accessed using MAPI, this does not mean you can connect to a stored mailbox. in the database restored by an Outlook MAPI client. MAPI is completely used to access mailboxes using Exchange Troubleshooting Assistant (ExTRA) or the corresponding cmdlets in Exchange Management Shell. In addition, you should know that you cannot use RSG to restore Public Folder data but just mailbox data. Although you can create up to 50 Storage Groups on an Exchange 2007 Enterprise server, you are limited to the RSG on the server, but you can add multiple mailbox databases to an RSG as long as all databases are available. Data belong to the same Storage Group. Finally, although it is possible to add a restored Mailbox database to an RSG on another Exchange 2007 server, you need to understand that the Exchange 2007 server must be in the same Active Directory.
Recovery Storage Groups management with Exchange Troubleshooting Assistant
You can create an RSG using Microsoft Exchange Troubleshooting Assistant (ExTRA) or run the New-StorageGroup cmdlet with the Recovery parameter in the Exchange Management Shell.
To create an RSG using ExTRA you first launch by opening the Database Recovery Management tool found in the Toolbox of the Exchange Management Console (EMC). Use the tool to check other tools or upgrade to the configuration file, then press and Go to Go to Welcome screen link. Now enter a label identifying this action (such as Create RSG) then click Next. On the Tasks list that appears, click Create a Recovery Storage Group and then select Storage Group that you want to link to the Recovery Storage Group as shown in Figure 1, then click Next again.
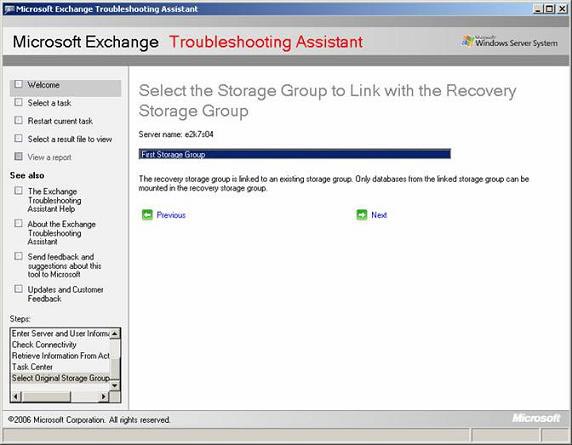
Figure 1 : Select Storage Group to link to the RSG
To create the RSG, before you do this you need to give it a name (the default name is Recovery Storage Group that satisfies the solution). When you have entered an appropriate name, click Create the recovery storage group (Figure 2).
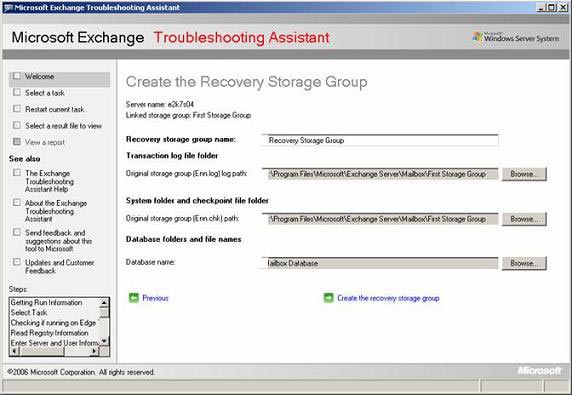
Figure 2 : Creating an RSG
After a while you will see a display on the screen similar to the one shown in Figure 3 and the RSG for the corresponding Mailbox database is created.
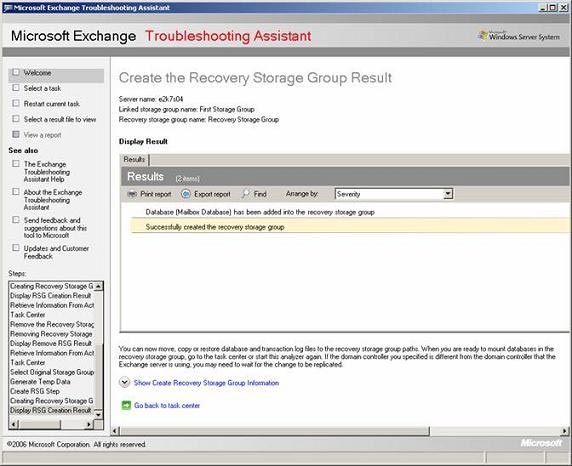
Figure 3:RSG results
With the created RSG we can transfer, copy, or restore database and session log files to the recovery storage group paths. To see the path to the recovery storage group record and database file, click Show Create Recovery Storage Group Information . The default path is C: Program FilesMicrosoftExchange ServerMailboxRSGxxxxxxxxx as you see in Figure 4. The RSGxxxxxxxxx folder appears empty in Windows Explorer until you transfer, copy or restore the database and contact session log files to it.
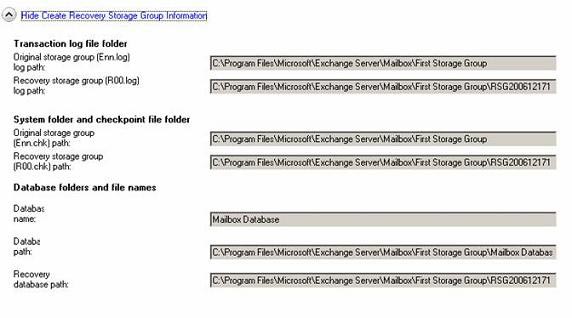
Figure 4:Storage Group and Recovery Storage Group paths
For the purpose of the example in this article, we will restore the mailbox database from a backup using the Windows 2003 Backup tool. Launch the Windows 2003 Backup tool by clicking Start | Run and type cmd.exe then press Enter. We will restore the mailbox database using this tool in advanced mode, click Advanced Mode. Now select the Restore and Manage Media tab. Here you have to select the mailbox database and the log file you want to restore, once you have selected it, click the Start Restore button.
Note
The drop-down box is set for the original location. We cannot change this option. But does that mean that the current Mailbox database in the product will be replaced by a database we restore from backup? No, this is not the case, first we do not dismantle the mailbox database and the second we do not enable this database can be overwritten with a recovery option in the site. Mailbox database. Because this mailbox database is restored to Recovery Storage Group, the component we just created.
Now specify the Exchange server that you want to restore the corresponding mailbox database, then enter the temporary location of the log and patch files. Finally check Last Restore Set (review the log files when the recovery process is complete). When you have done so, click OK and wait for the restore job to complete then click the Close button.
The corresponding files are now restored to the RSGxxxxxxxxxx folder as you see in Figure 5.
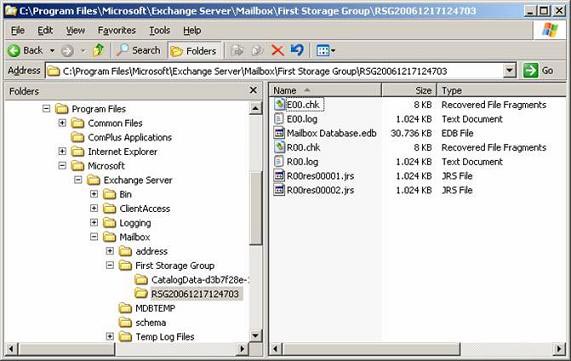
Figure 5 : Recovered Mailbox Database in Windows Explorer.
Since we have not checked the Mount Database After Restore option, the Mailbox Database will be in a dismounted state, now go back to ExTRA Task Center. Figure 6 we have some new Recovery Storage Group related tasks, because the Mailbox Database needs to be mounted before we can extract data from it so we have to click Mount or dismount databases in the recovery storage group .
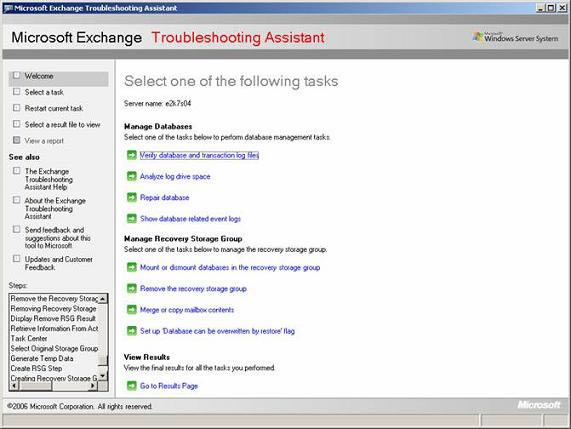
Figure 6 : Select Mount or dismount databases in the recovery storage group
On the Mount or Dismount Database page, check the Respective Mailbox Database and click the Mount selected database (Figure 7).
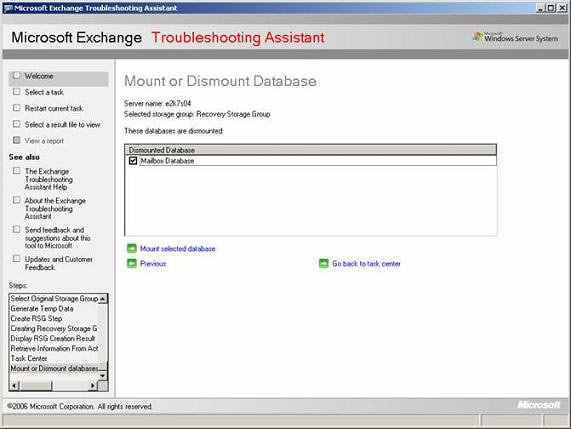
Figure 7 : Mounting the mailbox database using the ExTRA tool
When the Mailbox Database is mounted, click Go Back, then select Merge or copy the mailbox content. The screen similar to Figure 8 will appear, here we have to make sure the mailbox database that wants to extract data from is to be selected, then click Gather merge information.
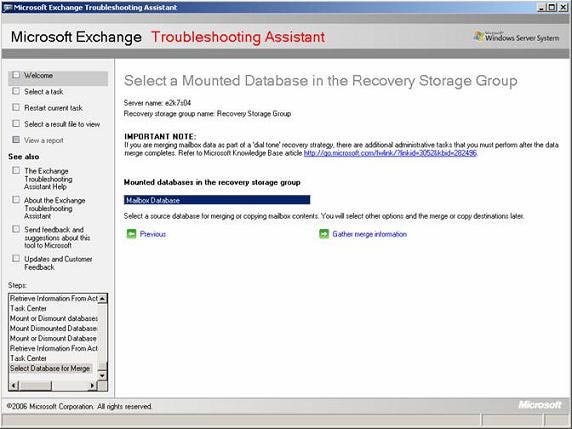
Figure 8 : Select the database assigned in Recovery Storage Group
We now have an option for exchanging the mailbox database attached in the RSG and the production mailbox database (one step is recommended if you are performing a recovery of a dial-up database. dial-tone code) is linked by clicking on the Swap database configurations as shown in Figure 9. Since this option will exchange two databases, both need to be dismantled, which will affect Mail service for users that have mailboxes saved in the corresponding database.
Since we are not processing dial-tone data recovery in this example, just click Next.
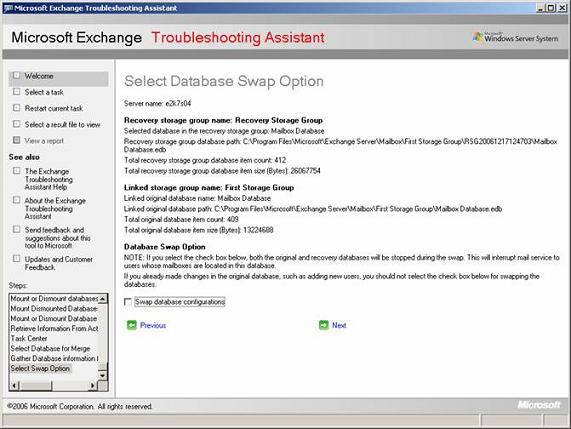
Figure 9 : Database Swap Option
On the Select Merge Options page, we click Perform pre-merge tasks (Figure 10).
Note that you have the option to click Show Advanced Options. Under the advanced options we can specify different selections and validations as well as bad selection limits. This is also where you have specified all associated mailbox data to be associated with the corresponding mailboxes in the production mailbox database or copied to some target mailbox.
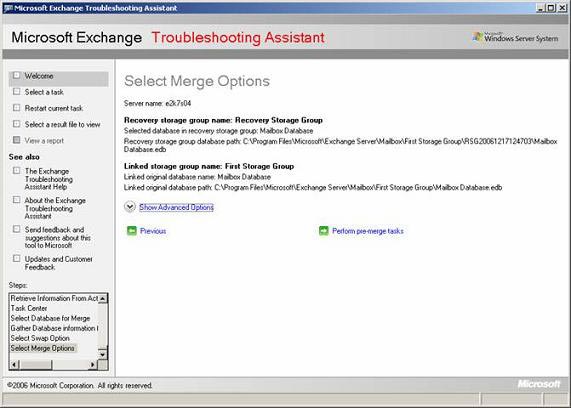
Figure 10 : Specify matching options
The final step is to select the mailboxes you want to combine. Do this by checking the box to the left of each user name in the list as shown in Figure 11.
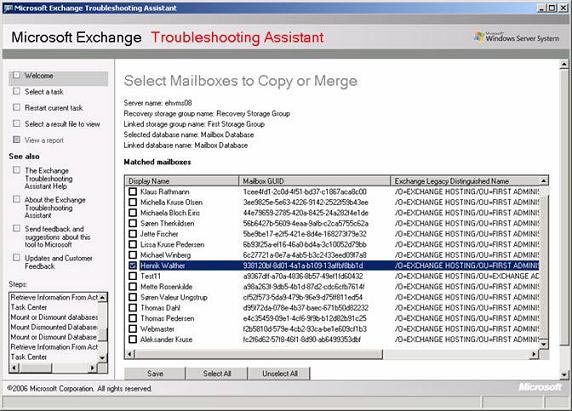
Figure 11 : Select mailboxes to combine
Now wait for the tool to combine mailbox data from the mailbox database in the RSG for the selected mailbox. When the mailbox data is finished, you can view the deleted content from the production mailbox database. You do not even need to restart the Outlook or OWA client so that the restored data appears!
Once you have combined or copied the required mailbox data, you can use ExTRA to remove and remove the RSG. Make sure you have to remove the files in the RSGxxxxxxxxx folder after removing it once so that these files do not take up disk space.
Working with RSG with the Exchange Management Shell
As you can see in the introduction, you can manage an RSG with the Exchange Management Shell (EMS). If there is some experience working with cmdlets, restoring mailbox data from the mailbox database in the RSG can be done much faster than using ExTRA.
First, you must create an RSG. To create RSG via EMS you need to run the New-StorageGroup cmdlet with the –Recovery parameter. So to create the RSG for the first Storage Group on a server named E2K7S04, enter:
New-StorageGroup –Server E2K7S04 –LogFolderPath 'E: Program FilesMicrosoft Exchange ServerMailboxFirst Storage GroupRSG -Name' Recovery Storage Group '-SystemFolderPath' E: Program FilesMicrosoft Exchange ServerMailboxFirst Storage GroupRSG '-Recovery
LogFolderPath and SystemFolderPath are used to specify where RSG-related files are located. As you can see, we have assigned them to be restored to a small folder called RSG under E: Program FilesMicrosoft Exchange ServerMailboxFirst Storage GroupRSG . If you intend to do the same, then you must ensure the disk space for the mailbox database you are restoring from the backup copy.
To see if a corresponding Storage Group is an RSG, you can use the Get-StorageGroup command |FL . If Storage Group is a Recovery Storage Group, it will be correct (True) under Recovery as shown in Figure 12.
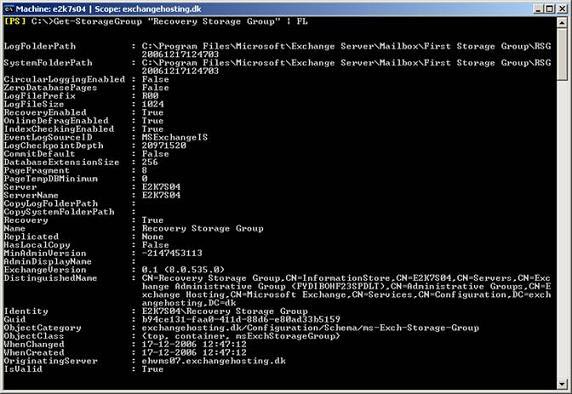
Figure 12 : Complete information of Recovery Storage Group
The next step is to add a recovery database (both transfer, copy or restore from the backup) to the RSG, to do so you must run the New-MailboxDatabase cmdlet with the MailboxDatabaseToRecover parameter. So to add a recovery database to the RSG on the server named E2KS04 by pointing the file edb E: Program FilesMicrosoft Exchange ServerMailboxFirst Storage GroupRSG , enter:
New-MailboxDatabase –MailboxDatabaseToRecover 'Mailbox Database' -StorageGroup 'E2K7S04 Recovery Storage Group' –EDBFilePath 'E: Program FilesMicrosoft Exchange ServerMailboxFirst Storage GroupRSGMailbox Database.edb'
With the database (Mailbox Database) created in the RSG we need to configure it to allow overwriting by running the Set-MailboxDatabase cmdlet with the AllowRestore parameter. To enable file recovery for the newly created recovery database, simply enter:
Set-MailboxDatabase -Identity "E2K7S04Recovery Storage GroupMailbox Database" -AllowFileR
estore $ true
We have now created a recovery database in Recovery Storage Group and have enabled it to be writable by a recovery file, now to restore the mailbox database from the database you want. extract and copy or combine data with mailbox databases in production. To do so, launch the Windows 2003 Backup tool and restore the corresponding version of the Mailbox database using the same steps as we did when using ExTRA to restore mailbox data.
To mount the recovery mailbox database, use Mount-Database cmdlet. Import:
Mount-Database –Identity 'E2K7S04 Recovery Storage GroupMailbox Database'
With the attached Mailbox Database we can extract mailbox data from it. If you want to combine a user's mailbox data existing in the recovery database into a production mailbox database, you need to enter:
Restore-Mailbox –Identity -RSGDatabase 'servernameRSG namedatabase name'
In Figure 13 we have restored mailbox data for a user named Test User 1 on the server called E2K7S04.

Figure 13 : Restore mailbox data from a mailbox in the RSG
Note
Depending on the size of the mailbox that has been restored, this merging process may take place quickly or slowly.
If you need to restore mailbox data for all users in the RSG, you will need to use the following command:
Get-MailboxStatistics - Database 'Recovery Storage GroupMailbox Database' | Restore-Mailbox
Let's assume that the mailbox in the restored database from the database you want to recover data is then deleted from the production mailbox database. In this case, you have the option to restore mailbox data to the specified directory in another mailbox using the following command:
Restore-Mailbox –RSGMailbox 'Test User 1' -RSGDatabase 'servernameRSG namedatabase name' –Identity 'Test User 2' –TargetFolder 'Test User 1 Recovered data'
As is the case with data recovery using ExTRA tool, Exchange Management Shell, you should remember to remove the RSG after the requested data has been restored. To do this you use the command to remove the recovery database:
Remove-MailboxDatabase –Identity 'E2K7S04 Recovery Storage GroupMailbox Database'
Click Yes for the confirmation message, then type the following command to remove the RSG:
Remove-StorageGroup –Identity 'E2K7S04 Recovery Storage Group'
Finally delete the RSG directory manually with Windows Explorer.
Conclude
When you came across the whole article, the way we did with Recovery Storage Groups (RSGs) changed a lot with Exchange 2007. The RSG was not managed by the Exchange Management Console (formerly known as Exchange System). Manager); instead you need to use Exchange Troubleshooting Assistant (ExTRA) or Exchange Management Shell (EMS). But although the new methods are used to manage RSGs, there is still not much improvement of the RSG. The example still does not have an option to restore the Public Folder database to an RSG.