Transfer Windows 2003 system with Exchange to Small Business Server 2008
TipsMake.com - In the following article, we will guide some basic operations to move Windows 2003 Standard system with Exchange 2003 to Windows Small Business Server 2008. To do this, you will need to Some tools are as follows:
- Exchange Best Practice Analyzer
- Windows 2003 Support Tools
And before we start, we need to do some more work on Windows 2003 server system:
- First, please make sure to back up the SYSTEM STATE , this process can be done with the built-in Backup tool or external support utility, but note that you must do it first.
- If the Windows 2003 server system has more than 1 network card, then it must turn off the function.
- Assuming that our test system is single server and DHCP / DNS mode is installed on the source server, make sure that Windows 2003 server uses only the IP address set in the TCP / IP section, The gateway will be the router's LAN IP address .
- When you perform the above settings, it is best to restart the system to apply the change.
- Update all updates from Microsoft , for Windows 2003 , at least Service Pack 2 comes with Service Pack 2 for Exchange 2003 .
For Windows 2003 Server system:
When you upgrade Domain or Forest functional levels, you need to be aware that this process cannot be reversed (except for Windows 2008 R2 and functional parts depending on specific circumstances). Technically, these functional levels allow users to access and take advantage of many advanced features in newer versions of Directory Services . For example, when we perform the upgrade of Domain / Forest functionality to Windows 2003, it will prevent any Domain Controllers that do not belong to the basic Windows 2003 feature. You can refer to the article Technet Active Directory Functional Levels Technical Reference.
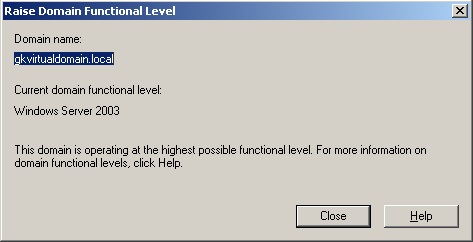
To perform the Windows 2003 Domain Functional Upgrade function, in Active Directory Users and Computers section , right-click the domain and select Raise Domain Functional Level:
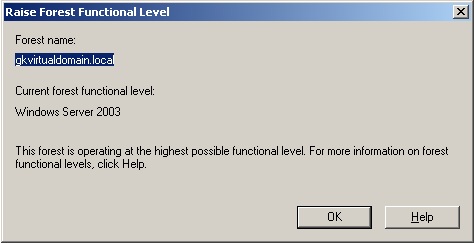
Next is to upgrade the Forest Functional Level in Windows 2003 Forest , also in Active Directory Domains and Trusts, right-click Active Directory Domains and Trusts and select Raise Forest Functional Level:
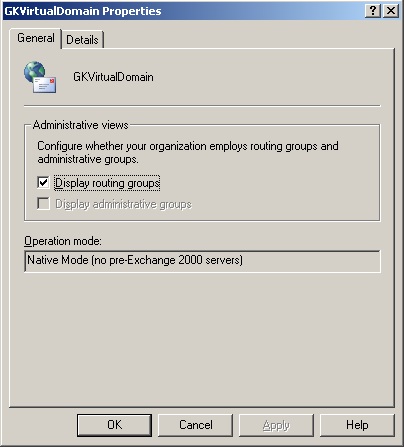
In the Exchange System Manager section , right-click on the top part named Organization Name (Exchange) and check if the Exchange Functional level has been set to Native Mode (no pre-Exchange 2000 servers) :
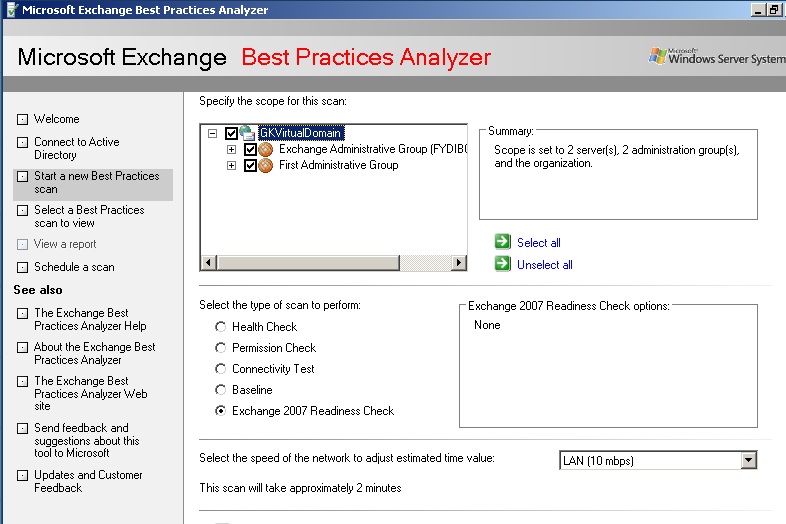
When finished, we will use the Exchange Best Practice Analyzer, the purpose of this test is to check whether Exchange 2007 is ready for the next operation. This scan will inform the user what needs to be resolved before installing Exchange 2007 as well as part of Small Business Server 2008:
Prepare Active Directory:
The first step in preparing for the SBS2008 installation process is to use the sourcetool.exe tool, namely the forest , domain, and Exchange switch from Mixed mode to Native (Exchange 2007 will not be installed if it is in Mixed degrees).
Insert the SBS - Small Business Server installation disc into the Windows 2003 Server computer (if you copy the sourcetool.exe tool to Windows 2003 server, make sure you copy the entire tools folder) and then the tools folder to run the sourcetool.exe file .
First, the system will ask you to confirm the FULL backup process, which is where all the changes are made to Active Directory . Check the required boxes and click Next to begin:
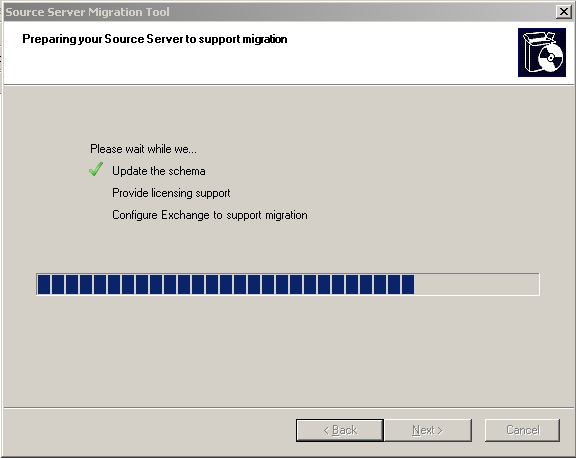
When done, the system will display the screen shown below, and the next step to do is to optionally create the Answerfile file. We say it is optional because the system allows the user to close the Wizard process without creating an Answer file, but if you don't have this file then you can't put SBS2008 in Migration Mode:
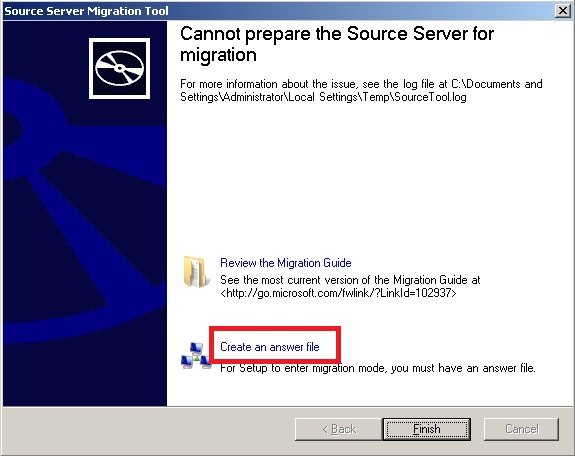
As we have seen, the above information says that the utility cannot create the source for this migration process, this is completely normal because the system does not execute the file WindowsServer2003-KB943494-x86-ENU .exe . To confirm it, open the log file and search for the following component:
Current version: 5.2.3790.131072
Service pack version = 2
Running D: toolsKB943494WindowsServer2003-KB943494-x86-ENU.exe / quiet / norestart
Package returned: 1603 (0x643)
ProgressPage: Task Finished. Succcess = False
To continue, click on the link and fill in the form as shown below:
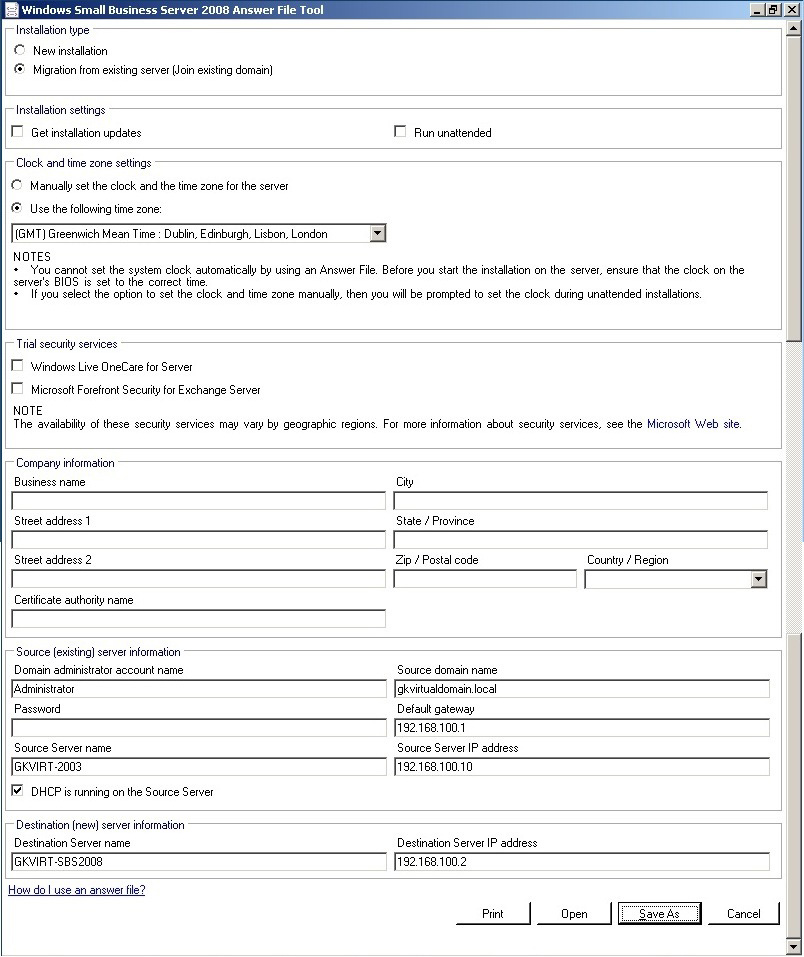
Some very important functions of this Answerfile file:
- Determine the installation mode, make sure that you have selected Migration from Existing Server (when importing from an existing domain).
- Remove the Run unattended option to keep track of ongoing processes.
- Select Time Zone to use. Pay special attention to this process, if the timezone parameter of the two server systems does not match, the migration process will fail.
- Provide information about Source and Destination Server , namely the destination server information will be set during the installation based on DCPROMO and the server's real name.
After filling in the required information, click the Save As button at the bottom right and save it as SBSAnswerfile.xml file - this file will be used during the SBS2008 installation process. Copy this file to a USB flash drive or some floppy disk.
Small Business Server 2008 installation process:
To install SBS2008 if your server system has 2 network cards, turn off the operation of one card in the BIOS settings, otherwise the communication and data transfer process between the two servers will be difficult. towel. Change the boot mode from the DVD / CDROM drive, insert the DVD2008 DVD disc into the drive, and plug in the USB drive containing the SBSAnswerfile.xml file.
Follow the instructions to install SBS, the process is relatively simple because there are complete instructions. After the second reboot, the system will find and check the Answerfile file, if successful, you will see the screen below:
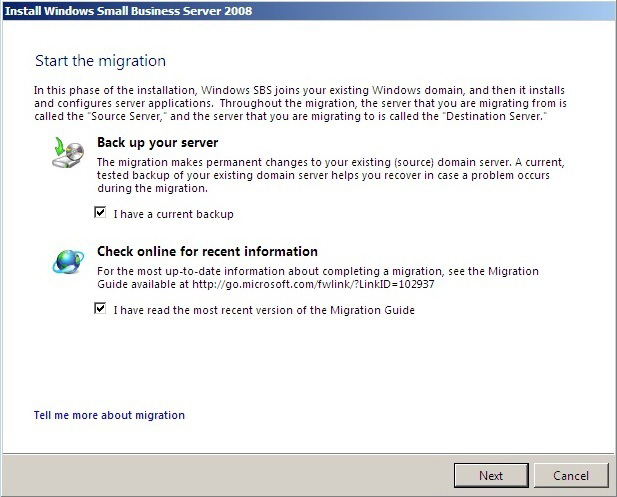
At this step, the system will continue to ask you to confirm the backup so you can continue. The next screen is the confirmation section of the two servers:
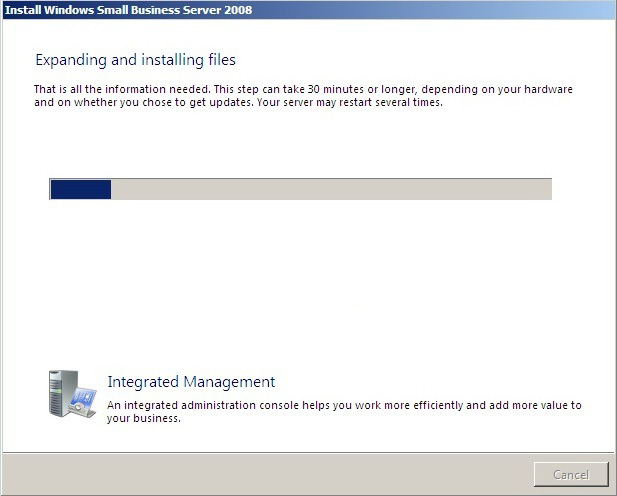
The installation process will take about 45 minutes - 2 hours. If you see a screen that does not have "static action", you should not worry, because if the system fails, it will display a message. Once completed, the system will restart once and the next screen will look like this:
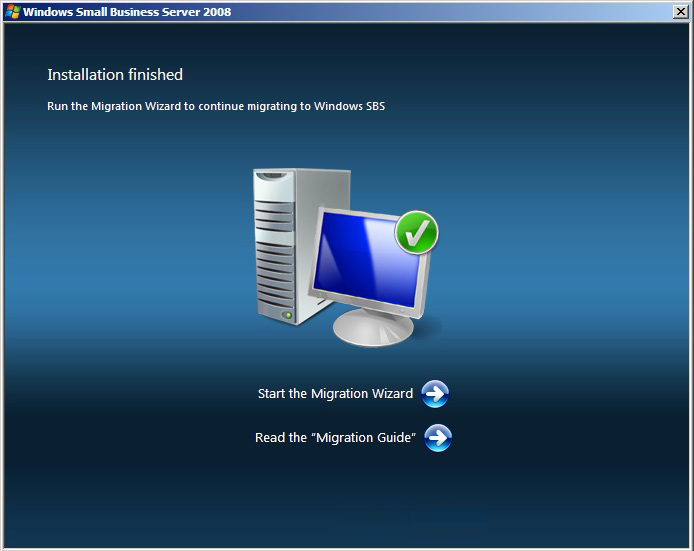
Now we have the Windows 2003 Domain Controller with installed Exchange 2003, SBS2008 server and Exchange 2007. The next step is to move data from Exchange 2003 to 2007.
Exchange data transfer:
In essence, it is possible to perform 'relocation' of Exchange 2003, by integrating account mailboxes and Public Folders to Exchange 2007.
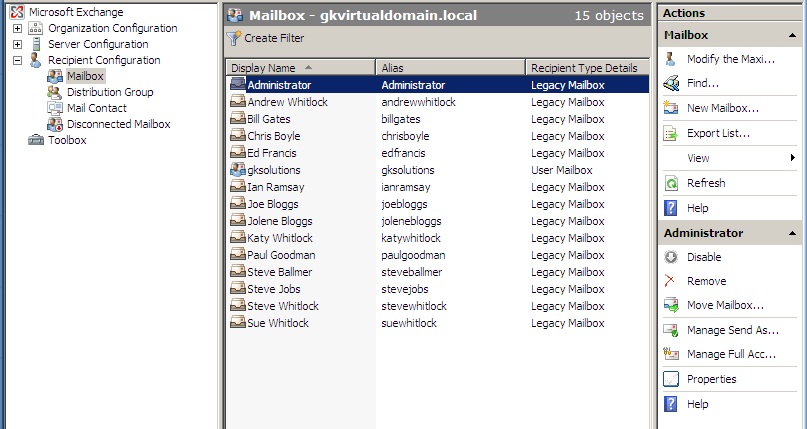
To move the mailbox, start the Microsoft Exchange Management Console , go to Recipient Configuration> Mailboxes , where we will see all mailboxes in the Exchange 2003 server will be listed as Legacy Mailbox. Right-click on the mailbox and select Move Mailbox, follow the instructions here to move the entire mailbox to the SBS2008 server. This process is fast or slow depending on how much data the hosting accounts have:
Besides, if you want to move Public Folder on the Exchange 2003 server , start Exchange System Manager, choose Administrative Groups> First Administrative Group> Servers> Exchange 2003 Server> First Storage Group> Public Folder Store . Right-click Public Folder Store and select Move All Replicas , select SBS2008 server and click OK. After we allow Public Folders to create the replica itself (this process will take time), right-click on the Public Folder Store item in Exchange System Manager and select Delete , a message window will appear, click OK and Continue OK then to confirm the delete command.
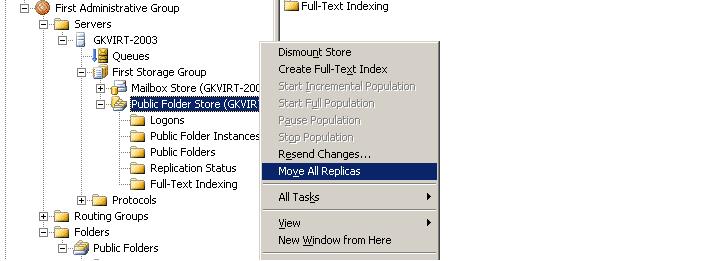
If the Store section does not complete replication (on Exchange 2003 Service Pack 2), the user will not be able to delete the old Store section.
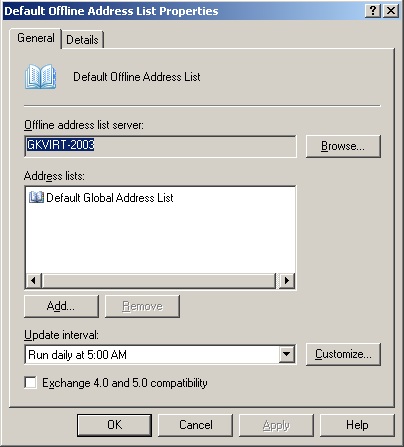
Reorder the Offline Address component, in Exchange System Manager of the 2003 server, select Recipients> Offline Address Lists , for each address list, right-click and select Properties . Click the Browse button next to Offline Address and enter the name of the SBS2008 server, click OK . Do the same for each Offline Address List component .
In case you use Recipient Policies - the same as Manage Mailbox policies , you will need to delete them, similar to the Recipient Policies that apply to the definitions, initialize email addresses and mailboxes, and the rules of management. in the mailbox. Specifically, the Manager Settings section will need to be removed, and we do not need to delete the policies of the email address. Open Exchange System Manager , point to Administrative Groups and right-click Exchange Administrative Group (FYDIBOHFSPDLT) and select New> Public Folder Container , under First Administrative Group section , expand Folders , drag and drop Public Folders from First Administrative Grou p to the folder you just created under Exchange Administrative Group (FYDIBOHFSPDLT).
Besides, the Recipient Update Service service is not used in Exchange 2007 and so we should delete it with ADSI Edit, by Start> Run> mmc and click OK , File> Add / Remove Snap-in> Add> ADSI Edit , click Add> Close> OK . Right-click ADSI Edit and select Connect to through the drop-down Select a well known menu Naming Context> Configuration and OK.
Continue, open Configuration> Configuration> Services> Microsoft Exchange> Organization Name> Address List Container> Recipient Update Services , right-click on the Recipient Update Service (Enterprise Configuration)> Delete . On the other hand, we can also remove the Recipient Update Service (ORGNAME) section, but you should note that only the Recipient Update Service section in the Container should be deleted, especially not to delete the Container or other Entry itself .
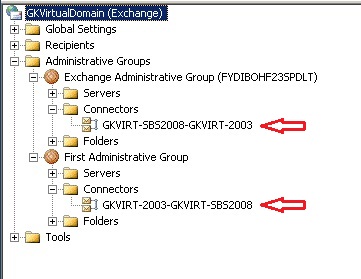
The final necessary step to remove Exchange Server 2003 is to delete the connectors created during the installation process above:
Delete Exchange Server 2003:
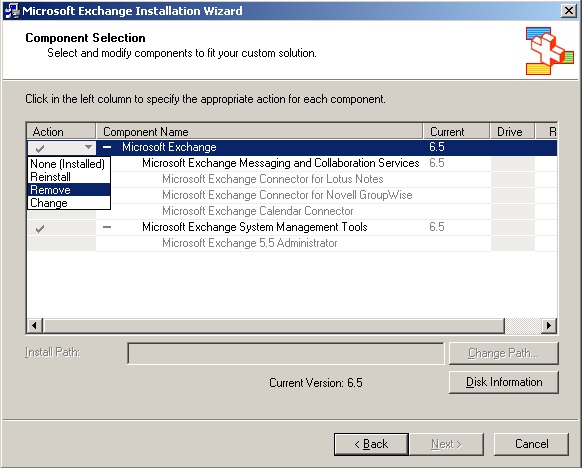
Now that we have moved all mailbox data, public folders and address lists, we are ready to remove Exchange Server 2003 . To do so, open Start> Control Panel> Add / Remove Programs. From the displayed list, select Microsoft Exchange and select Change / Remove. When the Exchange Wizard window appears, click Next and Remove from the Action menu:
When Exchange Server 2003 has been successfully removed, we need to continue to change the role of Windows 2003 server to no longer implement the domain controller function. If you decide to remove the Domain Controller , you need to do the following:
Confirm that the Windows 2003 server is not a Global Catalog server, open the Active Directory Sites and Services section , go to Sites> Default-First-Site-Name> Servers> server 2003 name , right-click on NTDS Settings> Properties and uncheck the Check in the Global Catalog box .
From the Command Prompt interface , type the command: NETDOM QUERY FSMO to check all the 5 FSMO roles that belong to SBS2008 server. And this process should be done while installing SBS2008.
Run the DCPROMO command, not the item Server This is the last domain controller in the domain.
SBS Console Wizard:
After completing all the steps above, we will continue with SBS Console and try to complete the steps below:
- Connection to the Internet
- Internet Address setting
- Smart Host configuration for email address
- Assign the appropriate certificate
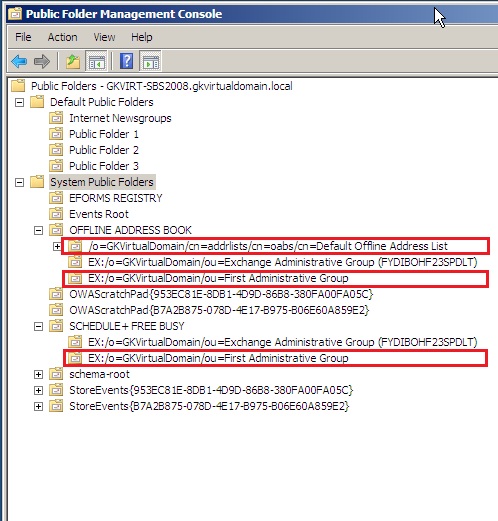
Here, when we do Set up your Internet Address , there may be an error, because some Public or Mail system folders are enabled by default. To ensure that this process works successfully, in Exchange Management Console, open the Toolbox and double-click Public Folder Management Console . For example, as shown below, the system folders are marked, you just need to right-click and select Mail Disable:
On the other hand, there are some other steps that need to be taken to complete an SBS 2008 system , which is the user accounts that need to be moved to Active Directory Users and Computers respectively. By default in a non- Small Business Server environment, all user accounts will be created in Active Directory User and Computers , under the Users container for SBS, namely under MyBusiness> Users> SBSUsers containers, or simpler than drag and drop operation.
Computer accounts will be moved from the default location in Active Directory Users and Computers to MyBusiness> Computers> SBSComputers . You can refer to the 2 articles here:
- Why Are Some of My Users Not Displaying in SBS Console?
- How to Remove the Last Legacy Exchange Server from an Organization
Good luck!
You should read it
- ★ Some common problems with Exchange 2003 systems - Activesync and workarounds
- ★ Transfer Exchange 2003 to Exchange 2007 (Part 1)
- ★ Transfer Exchange 2003 to Exchange 2007 (Part 2)
- ★ Transfer from Linux Mail Server to Exchange Server 2007 (Part 1)
- ★ Learn about Windows Server® Solutions Phone Connector