Add drives for virtual machines running Windows XP on VirtualBox
Network Administration - With advantages such as: efficient, reliable and easy to recover, virtualization technology brings many benefits to us. However, those who are able to go deeper into the virtualization world recognize that sometimes managing virtual machines can be a little confusing.
Normally, virtual machines are set up for fixed storage, and once you reach that limit, you may feel confused, unless you know how to add virtual drives to the machine. This can be done in VirtualBox, even though it's a bit round-the-clock. However, the final result will satisfy you.
The following article will show you how to add a drive for a virtual machine running Windows XP on VirtualBox, done on a Linux computer (Ubuntu 10.10). Implementation on other platforms may be slightly different, but the basic idea is unchanged.
Step 1: Turn off the virtual machine
First you need to turn off the virtual machine to access the setup.
Step 2: Create a new virtual drive
To create a new virtual drive, you need to do some of the following.
The first step is to create a completely new virtual machine. During this process, you will create a new hard drive for the machine. Note to set the storage capacity for this hard drive exactly as you want to add to the virtual machine. The initial default capacity is 10 GB, if you feel you have not met your needs, you can optionally change it.
After the new virtual machine has been created, you can go back and delete the virtual machine. As a result, the newly created hard drive will be left, and from there you can use it for the original virtual machine.
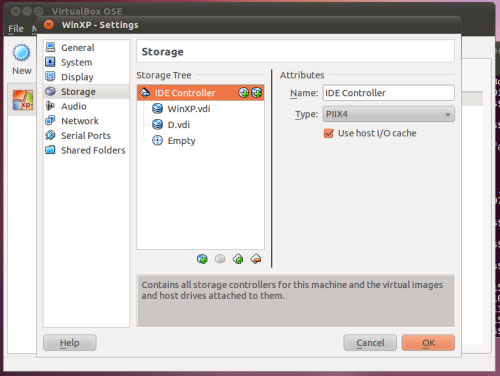
The next step is to open the initial virtual machine setup, move to the Storage section (as shown in Figure A). Here you will proceed to add new hard drives to the virtual machine. This hard drive needs to be started after the virtual machine has booted (details later in the article).

Figure A - As you can see, I previously added a drive to this virtual machine, and labeled it drive D.
To create a new drive, click the Add Hard Disk button. Soon, the new drive will appear under Controller. When selecting this new drive, you can change the Hard Disk entry to the previously created virtual hard drive (as shown in Figure B).

Figure B - When you select the Hard Drive item, you will see a list of available hard drives.
After selecting the drive, you need to set it to Primary Slave at Slot . Continue to click OK .
Step 3: Launch the hard drive
First, you need to start the virtual machine. After booting, you log into the virtual machine, click Start -> Run -> enter compmgmt.msc . After the tool starts, click Disk Management under Storage , then select the drive you want to start. The Initialize and Convert Disk Wizard window will appear (as shown in Figure C). Highlight the drive and click Next .

Figure C - If you have more than one drive listed in the list, mark the drive you want to start.
Next you need to select the drive you want to convert. Check and click Next. Finally, you will receive a notification of completion (as shown in Figure D).

Figure D - If you see everything as expected, click Finish to finish and the hard drive will be launched.
Step 4: Create partitions
At this point, you have a new hard drive that has been launched but has not been formatted. You need to partition the hard drive to put it into use. Right-click the Unallocated area (as shown in Figure E), select New Partition . The partition wizard will appear.

Figure E - Right click on the area marked with diagonal lines.
Next, you need to add the drive to the selected area (as shown in Figure F).

Figure F - By default, your drive is already selected. If not, you can select it yourself and click the Add button.
After selecting the drive, click Next to go to the next step in the partitioning process. In this step you will assign a letter to the drive and click Next (as shown in Figure G). In the next window, you need to select the drive format.

Figure G - Select a letter to assign to the drive.You can also label the drive if you want.
Click Next to complete this step.
Step 5: Restart the virtual machine
In order for the hard drive to be ready for use in Windows, you need to restart the virtual machine. After restarting, the job is complete.
Now, your virtual machine has added a new hard drive. The process of adding a new hard drive to a virtual machine does not help you expand the capacity of your main hard drive. To do that you need to use a disk image creation tool like Clonezilla.
You should read it
- ★ Installing Ubuntu in VirtualBox does not need DVD or USB
- ★ Instructions to increase the virtual hard drive capacity on Virtualbox
- ★ Change Storage Space in Storage Pool on Windows 10
- ★ 6 useful VirtualBox commands to manage virtual machines
- ★ Instructions on how to install Ubuntu on VirtualBox virtual machine