6 steps to 'hide' garbage on Windows?
Hidden Garbage or Cache are data in the previous session of applications, programs that the operating system saves to make loading data in later sessions faster. It will swell over time if you leave it alone and waste memory and slow down the process. Therefore, to regain space for hard drive and speed up the computer, you can refer to the cleaning steps below of TipsMake.com..
"Hidden" or Cache is the data in the previous session of applications, programs that the operating system saved to help download data in the following sessions are faster. It will "bulge" over time if you leave it alone and waste memory and slow down the process. Therefore, to get back "space" for hard drive and speed up the computer, you can refer to the "clean up" steps below of TipsMake.com.
1- Clear the Cache of Windows Update
Normally, Windows will keep the updated files downloaded from Windows Update so that users spend less time downloading updates when the process is interrupted. However, this feature is annoying for users when it takes up too much storage space.
First, disable Windows Update by entering the following command in Command Prompt , then press Enter to execute: net stop wuauserv

Next, open the folder under the path C: WindowsSoftwareDistributionDownload and then delete all the files in the Download section.

Finally, enter the following command into the Command Prompt to reactivate Windows Update : net start wuauserv

2- Clear the Cache of the cache
Windows usually has a system directory dedicated to storing temporary files. These temporary files are usually generated by certain actions using a software. And they are usually deleted after the session ends. However, not every software "cleans" its cache. Therefore, over time these data are getting more and more and take up more space.
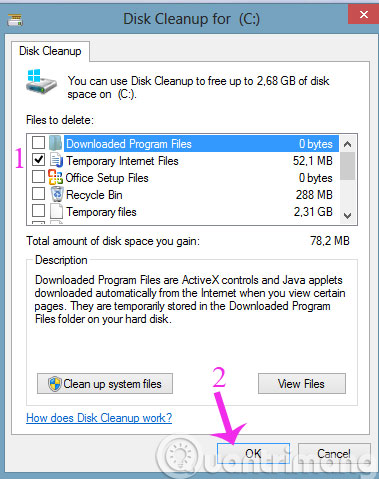
To do this, please do the following on Computer , right-click on drive C and select Properties . Then, click Disk Cleanup .
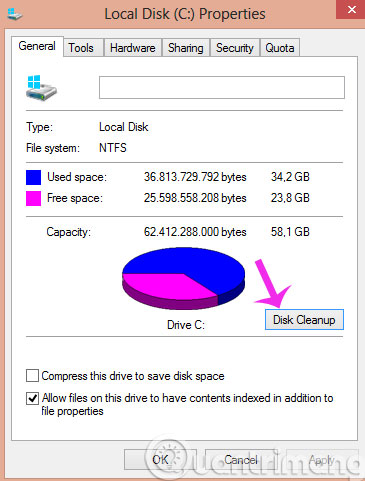
When the Disk Cleanup dialog box opens, check the Temporary Internet Files box and click OK
3- Delete Thumbnail Cache
Windows has a nice feature that displays the preview image of MP4 video files with the format defined as .PNG . And of course these images are created from File Explorer and they are saved for faster view later.
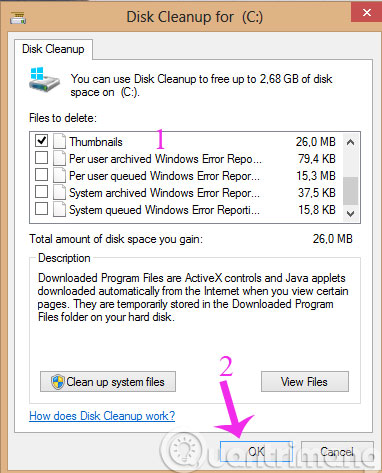
To delete Thumbnail Cache , still in the Disk Cleanup dialog box, check the Thumbnails box and click OK
4- Clear the System Restore Cache
It can be said that System Restore is one of the very useful features in Windows. It is an excellent solution for quickly restoring the system to a previous stable state. However, the only downside of this feature is that it uses a lot of storage space. Therefore, if you sometimes feel unnecessary, you should delete System Restore restore points to free up storage space.
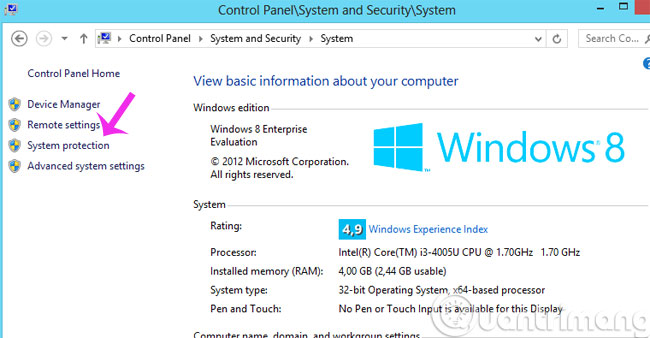
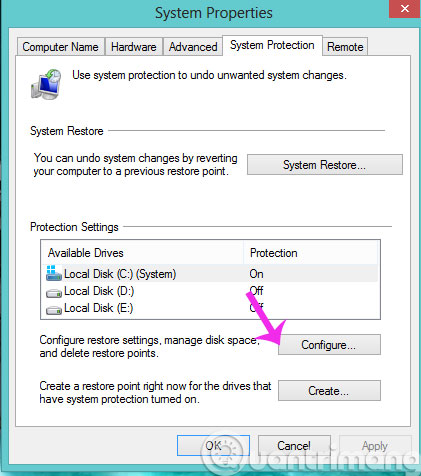
Go to Control Panel > System and Security > System . At the System interface, click System protection
The System Protection dialog box appears, click the Configure option and then press Delete to finish.
5- Clear the cache of the web browser
Similar to other software, web browsers also store cache data in web browsing sessions so that subsequent visits are faster. And if you say the agent produces the most cache, the web browser is the # 1 cause now.
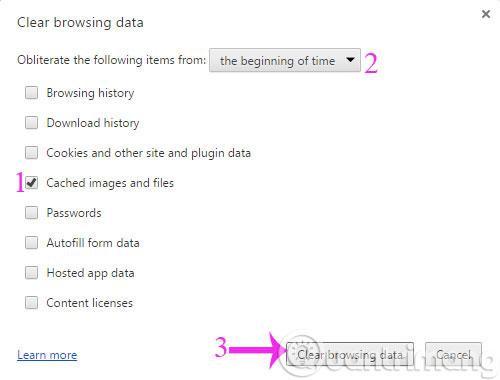
With Chrome : Settings > Show advanced settings . > Clear browsing data > tick the option Cached Images and Files and select The beginning of time . Finally, click Clear browsing data .
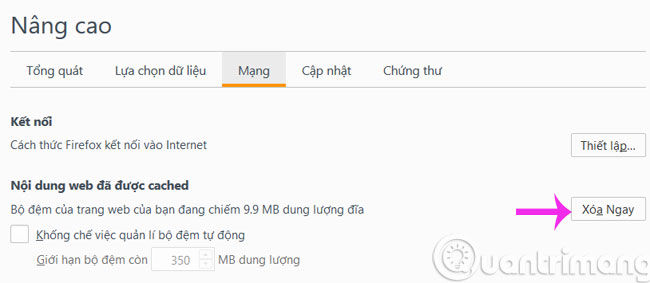
With Firefox : Go to the Tools menu> Customize > Advanced and click the Networks tab. Next, in the Cached Web Content section, click Delete Now .
6- Clear cache of DNS
Most Internet service providers run their own DNS servers, however, information can also be retrieved from other DNS server cache. The router can also act as a DNS server, which stores information from the Internet service provider's DNS servers. Your computer also has a local DNS cache, so it can quickly consult a lookup rather than doing it on another DNS server.
However, when the router's DNS data changes, the previous cache data becomes obsolete and often causes web page loading problems. Therefore, "cleaning up" it is also a must.
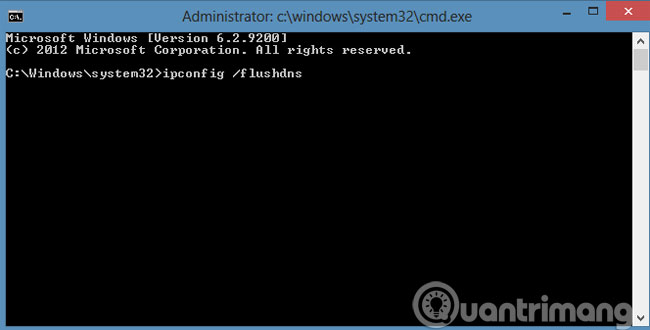
Enter the following command into Command Prompt and press Enter : ipconfig / flushdns
- How to launch Admin rights application for User account in Windows?
- 2 ways to hide hard disk partitions on Windows
- Fixed a bug when Libraries folder opened automatically when booting the computer
Hope the article will be useful to you!