Table of Contents
This guide provides a clear, practical overview of steps to record screen video on Mac, with useful context, important details, and straightforward takeaways for everyday readers.
Using the Screenshot utility
The most obvious improvement is that the screen capture and video recording feature has now been integrated into a single Screenshot tool, bringing obvious convenience to users.
You can open the Screenshot app on your Mac using one of the following methods:
- Method 1. Press the key combination Command + Shift + 5 .
- Method 2. Using Spotlight (Command + Space), search for the keyword ' Screenshot ' and Method 3. click on the corresponding application from the returned results.
- Method 4. Open the Utilities folder using Finder with Go > Utilities and select ' Screenshot '.

Set screen recording options
Once the Screenshot app opens, you'll see a toolbar at the bottom of the screen. The three options on the left side of the toolbar are for taking screenshots. What you need to pay attention to here are the two options in the middle for the screen video recording feature.

Of these two options, ' Record Entire Screen ' allows you to record a video of the entire screen, while the other option ( Record Selected Portion ) will assist you in recording a video of only a specific area of the screen. With the second option, you can optionally set up a specific screen recording area with just a few simple mouse clicks.

Before you start spinning, click on 'Options'. At the top of the list, you can choose a location to save your recordings.
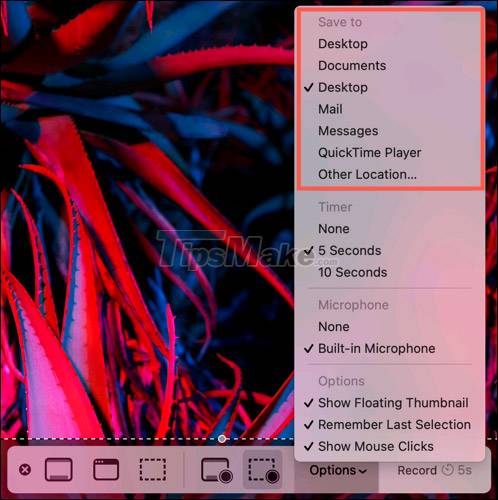
In addition, you can use some other handy optional features to shoot more efficiently.
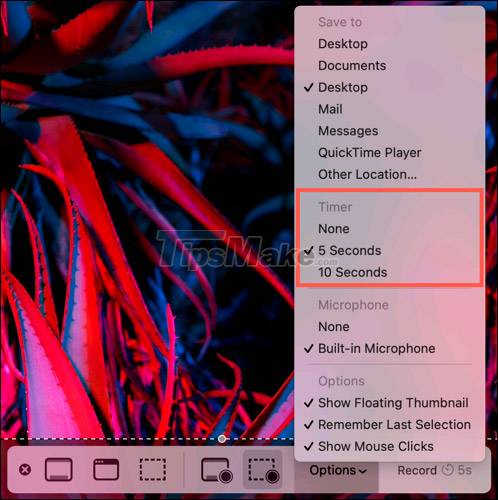
For example, when you need some time to prepare before you start recording, use the Timer option.
Or To include audio in your recording, select 'Built-in Microphone'. This feature is essential in case you want to explain yourself what you are recording.
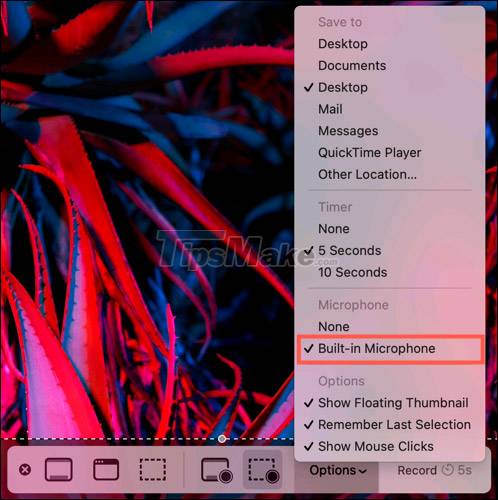
The 'Show Floating Thumbnail' option will also be useful if you want a thumbnail preview that appears in the corner of the screen by default.

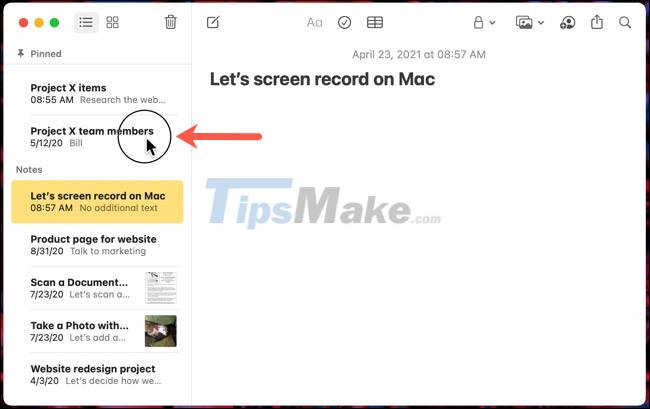
If you need to show your steps on the screen, use the 'Show Mouse Clicks' option. When you enable this feature, each of your clicks will show up as a circle. That way, viewers can understand your actions in a clear and scientific order.
To close the screen recorder, simply click the 'X' on the left or press the Escape key on your keyboard.
Start screen recording
After you have done the necessary setup operations, click the 'Record' button on the toolbar to start recording the screen. If the Timer option is enabled, you will see a countdown timer appear on the right.

A small Stop button will appear in the menu bar while you record the screen. Click this button when you finish recording. Then go to the location where you chose to save the recording to review it.

Key Takeaways
Use the information above as a practical reference for steps to record screen video on Mac. Review each step carefully, confirm any requirements, and choose the option that best fits your situation.
FAQ
What does this guide explain about Steps to Record Screen Video on Mac?
It explains the main concepts, practical considerations, and useful steps related to steps to record screen video on Mac without requiring advanced knowledge.
Who can benefit from learning about Steps to Record Screen Video on Mac?
This information is useful for readers who want a clear overview, practical guidance, and reliable steps related to steps to record screen video on Mac.
What should I check before applying this information?
Review the requirements, confirm that your device, software, or situation matches the instructions, and back up important data before making major changes.
Related Articles
 Instructions for Rotating Screen, Video Game Using Bandicam Software9 minutes read
 Steps to Record Screen with VLC Media Player4 minutes read
 Steps to Record Screen in Anydesk3 minutes read
 3 the Fastest Way to Record Video on Your Computer4 minutes read
 How to Record Video Game Play on PS55 minutes read
 Instructions to Record Video on Windows 10 Screen Without Software3 minutes read
Reader Comments 0
Sign in with email or Google to join the discussion.