Table of Contents
This guide provides a clear, practical overview of steps to record screen in anydesk, with useful context, important details, and straightforward takeaways for everyday readers.
Step 1. Open Recording
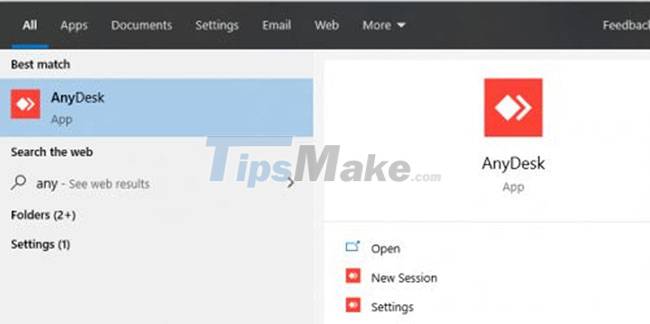
Launch the AnyDesk application on your computer. Click on the three vertical dots that represent the settings menu. In the menu on the left side of the screen, click the Recording tab .
Step 2. Unlock Recording Settings
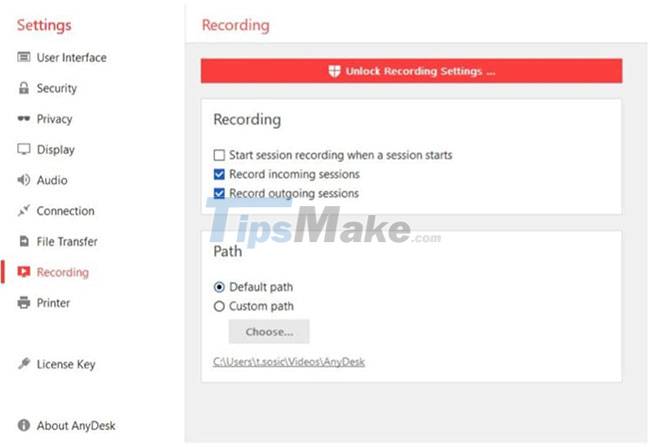
First, you will need to click on the option to unlock recording settings at the top of the screen in the red button. Once recording has been unlocked, you will have a record button on your home screen. You can also choose to enable one of 3 different automatic options.
- The first option is Start Session Recording When a Session Starts . This option will enable recording as soon as a session starts.
- The next option is Record Incoming Sessions, and enabling this option will automatically record every incoming session (from another machine to your device).
- The last option is Record Outgoing Sessions , which will automatically start recording any outgoing sessions (from your machine to another device).
Step 3. Record sessions using the Record . button

If you don't want to set automatic recording, you can also choose to record a specific session or start it in the middle of a specific session. There is a way to do that. You just have to tap the record button when you want to start recording and again when you're done.
As you can see, setting up recording of AnyDesk sessions is straightforward. If you follow the steps above, you can set up AnyDesk to record all of your sessions, or just some of them.
Hope you are succesful.
Key Takeaways
Use the information above as a practical reference for steps to record screen in anydesk. Review each step carefully, confirm any requirements, and choose the option that best fits your situation.
FAQ
What does this guide explain about Steps to Record Screen in Anydesk?
It explains the main concepts, practical considerations, and useful steps related to steps to record screen in anydesk without requiring advanced knowledge.
Who can benefit from learning about Steps to Record Screen in Anydesk?
This information is useful for readers who want a clear overview, practical guidance, and reliable steps related to steps to record screen in anydesk.
What should I check before applying this information?
Review the requirements, confirm that your device, software, or situation matches the instructions, and back up important data before making major changes.
Related Articles
 Link Download Anydesk 5.5.39 minutes read
 How to Install and Setting Up AnyDesk6 minutes read
 What Is AnyDesk? Is AnyDesk Software Really Safe?8 minutes read
 AnyDesk vs. TeamViewer: Key Differences9 minutes read
 How to Install and Use Anydesk on Linux7 minutes read
 How to Record Your iPhone Screen and Audio Is Super Easy6 minutes read
Reader Comments 0
Sign in with email or Google to join the discussion.